

Hi everyone! I hope you are all enjoying the summer. I have been in the craft room for days but I have returned with a new blog post. And maybe it's just too hot being surrounded by all this fabric but I just might be crazy because I can’t seem to work on a
project without taking on a few more at the same time...
In this case however the corset project has been a long one in coming. It all started when my sister sent me some corset images and said she wanted one in a Star Wars print. Well, I do like that idea and wow, she really is my sister all right. She might have had to wait a year while I worked my way through the craft mania but I finally made my way there. At the same time I managed to injure myself and in trying to straighten out and keep my body aligned as I healed I thought about the corset idea a bit more and realized it wasn’t such a bad idea, not entirely.
In this case however the corset project has been a long one in coming. It all started when my sister sent me some corset images and said she wanted one in a Star Wars print. Well, I do like that idea and wow, she really is my sister all right. She might have had to wait a year while I worked my way through the craft mania but I finally made my way there. At the same time I managed to injure myself and in trying to straighten out and keep my body aligned as I healed I thought about the corset idea a bit more and realized it wasn’t such a bad idea, not entirely.
Now, before you make a judgment and send me pictures
of crazy corset wearing women from the Victorian era I will say a few things on
corsets. They are not supposed to be painful, and I do not want any of you
wearing them so tight as to injure yourself-and yes I also mean by way of
mushing your internal organs too much. I want you to take care of yourselves,
nothing too tight ladies! But I will say a few things about the non-painful and
organ jeopardizing issues that come with the idea of a corset starting with the
concept that they are for the most part simply a different type of
undergarment.

Despite the obvious uses such as how they work with certain
outfits better than other undergarments, corsets also keep your posture
straighter, they remind you to hold your stomach in and I will say in its most
basic form, the idea of an undergarment that reminds you of your waistline is
not a bad idea. In truth I see it as more of a ‘mind hack’ in a sense where
even when it is not worn you remember to hold yourself in a straighter manner.
So do take care when wearing these but I think that our purpose for these today
is a little different than that of the past.
So I started the project by looking at corset images
online to get a decent idea of the various styles and I pulled these images ->
I selected the above links so you have a chance to
see the silver grommets in back, the different lacing options, etc. Based on those images you pretty much have these
various styles ->
Corset Styles:
1)
Classic Corset:
Peaked at the top bodice and goes to a V at the lower waist. (This style would
mostly be chosen to go underneath a gown where the top bodice is cut in a
similar manner and the waistline comes to a V as well).
2)
Sweetheart Corset:
Rounded at the top bodice and forms either a soft V at the lower waist or goes
straight across (I would say this is probably one of the more common styles for
corsets)
3)
Modern
Corset: Straight across both the top bodice and
the waist (slightly shorter in the waist than the 2 styles above). Any other
modern changes that you will find useful.
4)
Cup Corset:
This features a laced corset style however the difference is in that the cup
for the bodice are set in and rounded. (This is another fairly popular style
and as comfortable as the Sweetheart style above)
5)
Undercup-Opened
Cup Corset/ Corset Vest: This is an opened
bodice piece in the Cup Corset style, featuring the same cut for the waistline
minus the cups. The Vest version of this style is an image such as this one
where you have a corset vest with the cup area opened. Here is a link to give
you an idea: http://goo.gl/dsXL6
6)
Half Waisted Corset:
Straight across the top, straight or soft fan cut for the lower hem, shorter
cut across the waist (lacing in back is standard, lacing both in back and front
is optional)
The styles highlighted above are the four corsets I plan on making in my part I-IV blog posts on modern corset making. I am now going to cover a few of the details I
experienced while making this first corset. It’s not perfect mind you but if you are setting out to make your own you might find some of the details below helpful.
This is the pattern I used ->


Simplicity 5006
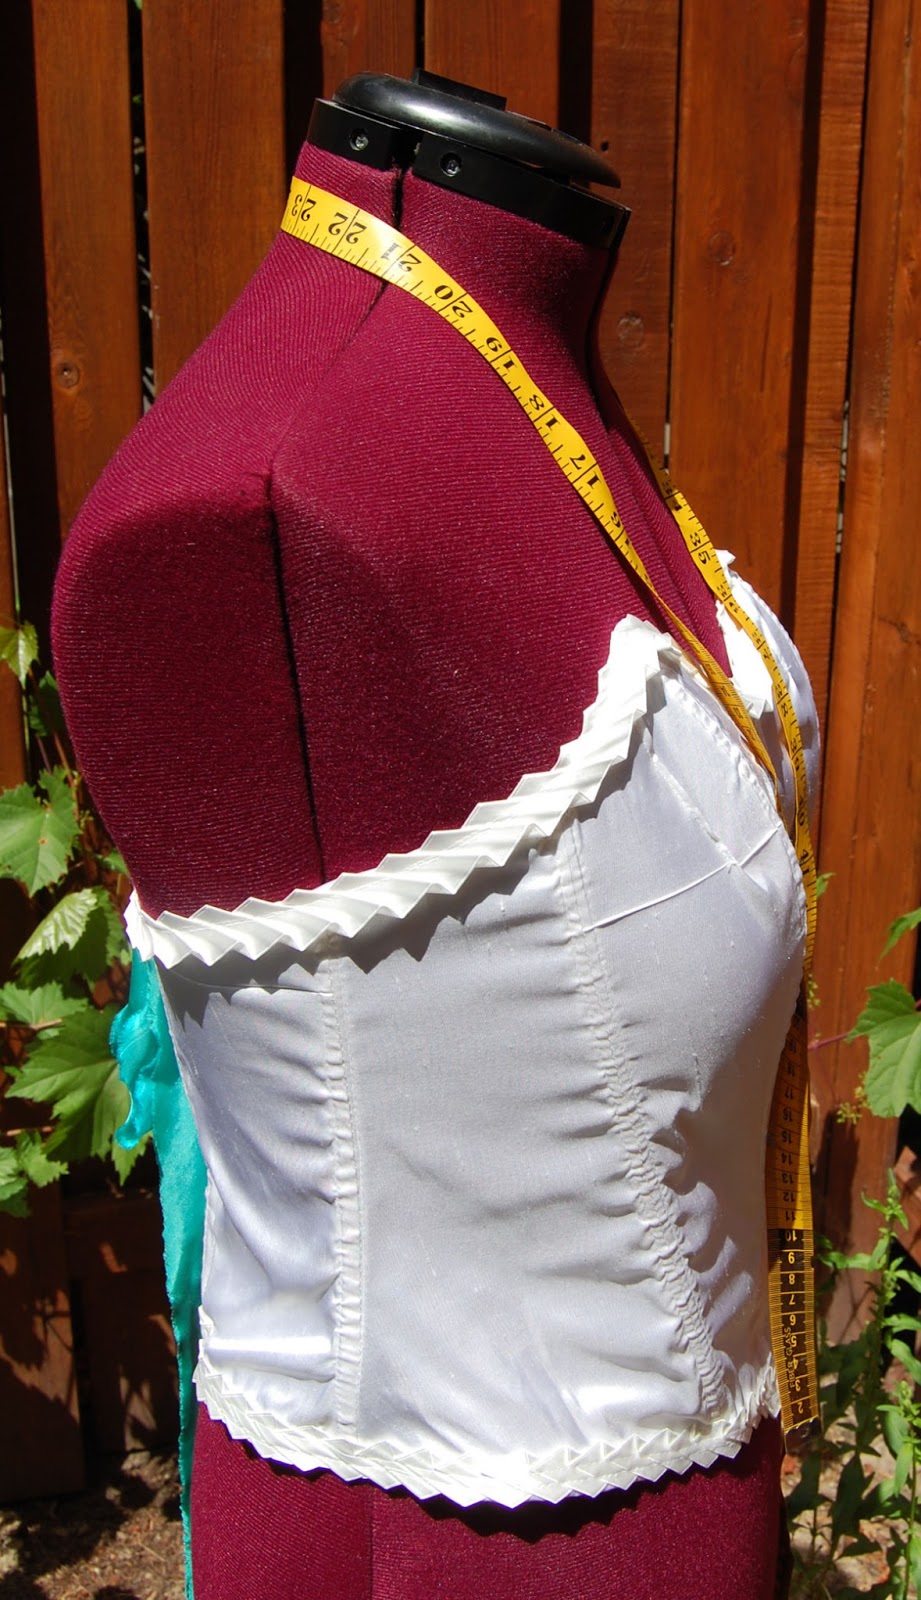
This first corset is what I have been calling the
Classic Corset Style and it was made was with a white silk, pressed satin white
trim, a simple white lining, boning, and silver eyelets. The idea with this
first one was I wanted to check the cut, the boning, the comfort level. I wanted stability but you
never know it’s going to go with a test so before you purchase even more
materials, check out what you have so far and see. I personally like this
pattern and the finished first item. I have boning running up all seams but the
very back. I just didn’t want the poking in the back. It holds, it’s pretty
comfy and well, it works! I pinched the top a little bit. I made it a size too
big but that was because I thought the pattern
might run small and this first one was a test after all. The lower half is a
bit big as well so the rule from now on is just going to be to go with your
size because this is a good pattern but most certainly runs true to size. I
used the amount if boning called for in the pattern as well, it was accurate.
Picking
the perfect materials:
I made this first corset with a white silk because I
wanted to see how the silk breathes in the warmer weather and it’s an easy one
for wearing under lighter colored shirts. I found that I do need a fabric
steamer as folds in the fabric are showing up horizontally across the bust (puts fabric steamer on the shopping list) but
more in different styles and prints are on the way. It will be more fun that
way ;)

I say if you’re going to wear one make it something
you like
(It’s just you and yours that are going to see you in it anyway so it’s not a big deal).

For boning materials I go with boning already in the casing. It’s what my
mom always uses and well, I just do. If you don’t use that type of boning then
you will have to make your own casing. This is probably pretty easy but I admit
I have not done this before so I recommend an online search if interested in doing
that. I went with white silk, white pressed satin trim, and I went with silver
grommets in back and hand dyed blue satin ribbon for lacing. The ribbon was
about 1” wide so I took silver thread and bound the ends about ½” in so it
would be easier to thread. The silver also looked pretty good for detail. For
the lining I recommend a natural or breathable fabric.

Making
the corset: Cutting the pieces and following the
instructions for this particular pattern were quite easy. The pattern is true
to size so just go with your correct size and you should find it fits well.
Definitely go with grommets, it’s worth the splurge for the grommet pliers and
grommets. I ran a test and laced up the back with button holes on one and did
not like it. It was a test but I just went right back to the craft shop and
picked up the grommet materials. I made the front, sewing each piece as
instructed. Next I clipped the inside vertical seams and flatten it out. I then add the boning. If you have boning
already in the casing you will find you can (carefully + slowly) sew the right
and left sides of the casing to the inside of the inside seams of the corset.
Then add the lining. Then you are going to sew down the top and bottom hem and
for this step I found the best way to get the perfect flat fit around the top
and bottom was to trim and then sort of roll the hem down while stitching on a
wide zig zag.

Once you have gotten this far you are going to want
to go back over those seams in most cases with a trim and you can add this with
a straight stitch. Just make sure that when you are sewing the hem down and
under for both the top and bottom of the corset that you avoid sewing the
boning itself as you go across. I also recommend not cutting the boning pieces
out until the top has been sewn. Then take the boning and lay it out over the
front seams and cut once you have matched the pieces up. This pattern called
for boning up the middle center and I did this with this first one but I am
thinking I will skip it next time, it’s not entirely necessary as the sides
provide enough structure. We’ll find out soon when I run my next text.

Now that
the corset is almost finished, you really just need to finish up the back seams
and this is a fun part. Mark out on your fabric where you are going to want
your grommets, assuming 7-9 holes on each side and don’t forget to line up your
back right and left side and making the hole marks together so they are
perfectly aligned. A ruler or measuring tape will help you with this part. Next, if you have not used a grommet/ punch before try a few
times on scrap fabric for a test so you do a decent job your first time on your
pretty little corset. For the grommets and the grommet punch simply follow the
instructions on the back of the package, essentially just punching the mark in
the hole and them doing it again with the grommet set in and then punched in
the fabric once more. Lace that baby up and you should be all set!


Final
Project Notes: After having made a few of these as
tests and working with the pattern I have to say I have learned a great deal
about the corset in general, the comfort level and how and when they are most
useful. I found they were rather comfortable, much more than I originally
expected, and if I did not have a current day bra at my disposal or if I needed
to wear a dress that required a strapless undergarment this is not so bad at
all. I would say however that the best way to find one you like is to read
through the details I have above so you can select a custom corset that will
work really well for you. Your choice of cotton cording for lacing or silk or
satin ribbons depends on what you are pairing it with. If this is a top meant
to be shown as a top with a skirt then it makes sense. I am also really looking forward to incorporating the corset style into my dress making in the future. I think that will be a lot of fun for future projects and having a decent handle on the corset top construction certainly won't hurt!

If you are hoping to use
this for the everyday or for a tighter fit then you are going to want to go
with a cotton cording most likely. *I would probably steer away from black satin cording as I imagine it would
be too slippery to hold a proper lace but we shall see soon, I have some in
stock and a black corset coming up soon as a test so I will update as I test this.
You can easily switch out the lacing at your digression as well. Some of you
would also prefer to have the opportunity to lace yourself as opposed to
needing a hand with it so if this is the case you are going to want to go with
lacing in front so you can dress yourself and you will find those options below
when you determine the lacing options you would like. I would like to just say
one more thing if you do decide to go about sewing yourself a corset and that
is to not let yourself be intimidated by it, just take your time and you really
will do a fantastic job. In the end you
will be surprised by how easy it really was to construct.

Eyelet Lacing Options:
These are the metal grommets added to the areas you plan to lace up. Here is a link of the tool you will find most helpful -> http://www.joann.com/dritz-eyelet-plier-/prd11082/
I found I had to pick up additional silver grommets to cover the 14 I used up the back as the pack only came with about 10 silver grommets. Don;t forget to read the instructions on the back of the pliers and practice with some of those extra grommets before adding them to your finished corset.
I found I had to pick up additional silver grommets to cover the 14 I used up the back as the pack only came with about 10 silver grommets. Don;t forget to read the instructions on the back of the pliers and practice with some of those extra grommets before adding them to your finished corset.
A) Eyelet
lacing in back (standard) (This usually requires help lacing up the back)
B) Eyelet
lacing in front and extends either half way or all the way down (This allows
you to lace yourself more or less and is a bit practical for the everyday as it
does not require help from someone else when lacing as you can have the back
laced once and then tighten and lax the lacing in front for easier removal)
C) Eyelet
lacing on the lower sides (runs ¾ of the way up the sides-intended more for
those with V peaked lower hem style)
D) Hook
Lacing or other-this is a different style than the eyelet grommet pieces I add
for lacing purposes for my corsets however when the materials become available,
I will allow this sewn in hook trim to be added in which case you can lace it
with these pieces added vertically down both sides and lace up as desired. You
may even want to add in a hidden side zipper or similar modern closure so you
really make this item work for you.


When it comes to the style and design for these you
can see how many options you have. I know you’ll do a fabulous job if you decide
to make one for yourself. I have three more tests coming up soon so stop back in
the next few weeks and I should have the rest up. Once I have finished all of
these then I just might list a few custom orders for these in the Sophia shop,
you never know ;)
Until next time, happy sewing...
Lindsay
No comments:
Post a Comment