What's Crafting?

What's Crafting?
Click here for this weeks updates...

Search This Blog

Wednesday, November 30, 2011

Halloween 2011: Never Again and What's Changed

It's all in the title. Halloween 2011 was sheer madness and not something I will ever repeat! What was in the beginning of the season casually being referred to as Halloween Madness ended up as a disaster toward the end and the stress I experienced was absolutely awful. If you are thinking of starting an online shop, take the lessons below to heart because they can not only make or break a small company but they can also easily bring you to the edge where sanity no longer sees straight!

Halloween has always been a tough holiday to become involved in from a costume-making perspective because despite how much money people spend for the holiday, it is time sensitive, and unlike other holidays such as Christmas, customers tend to think about Halloween 2 weeks or so prior to the holiday and getting custom orders finished and shipped out in that period of time can wreak havoc if you take on too much. It's tempting if you sew just about everything like I do, but it's also rather tricky as well.

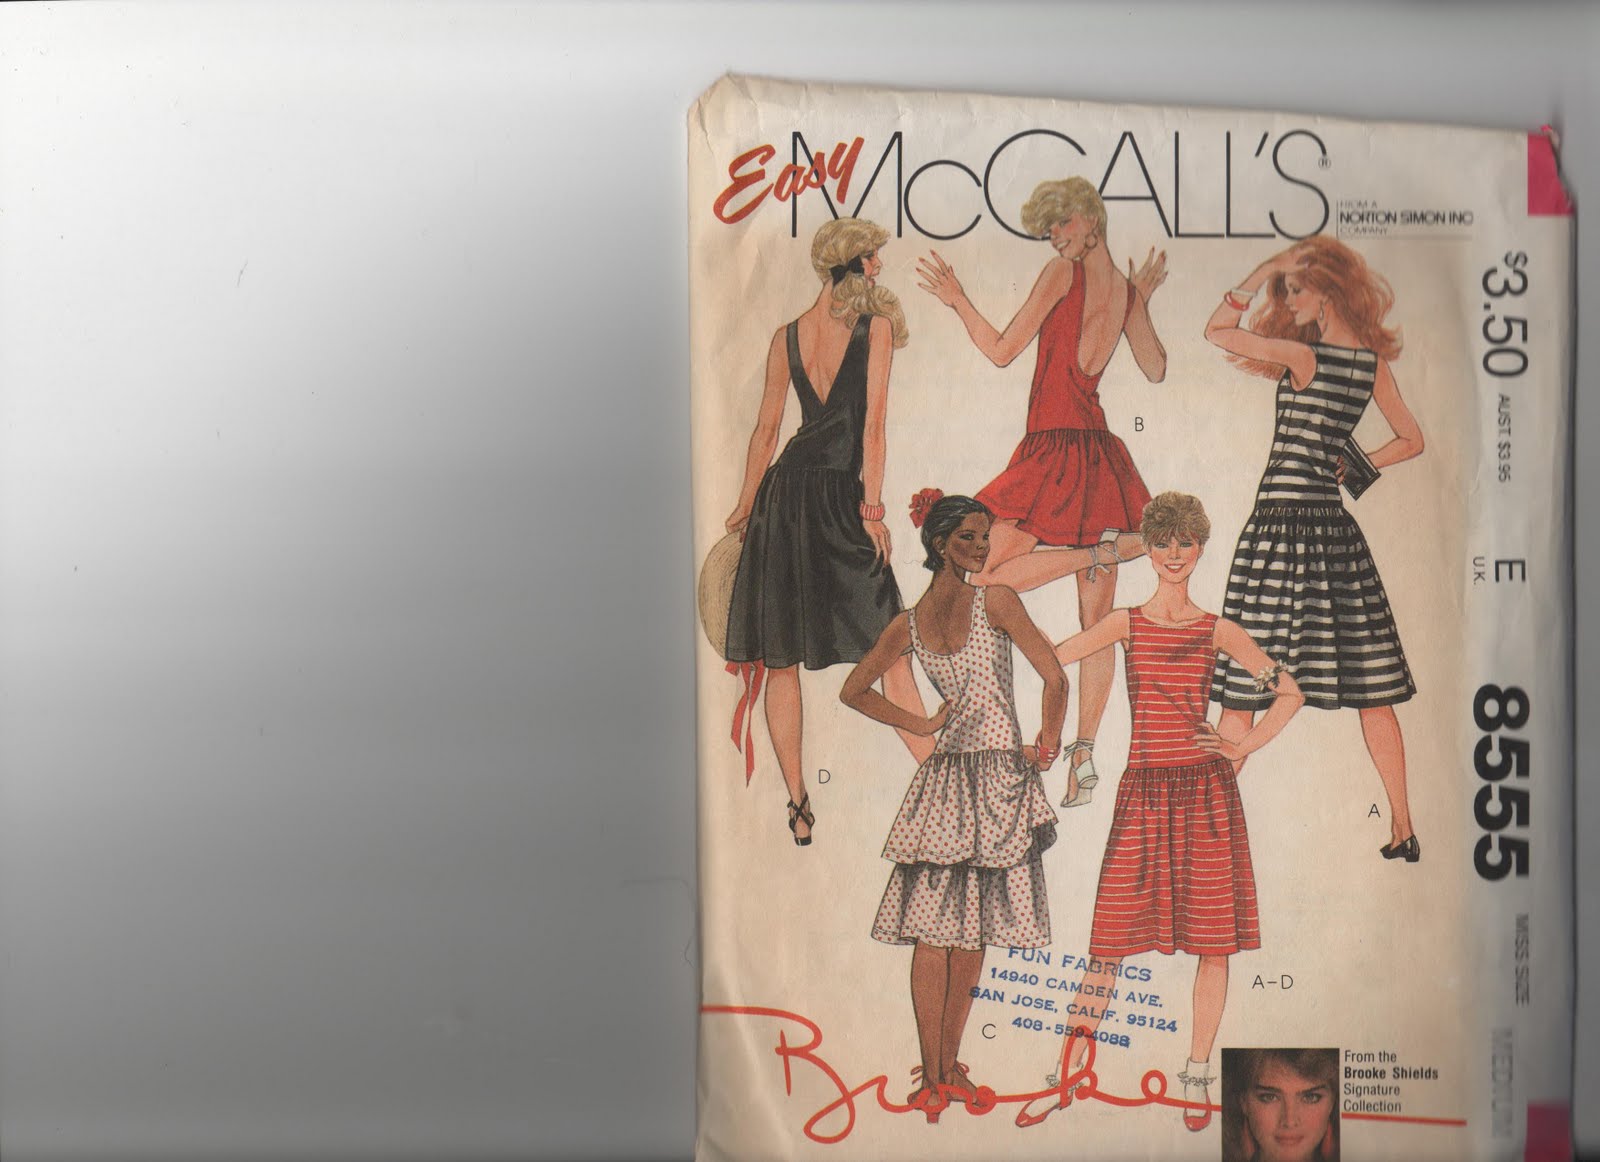
I tried to keep it simple this year and decided ahead of time that I would offer a total of 5 costumes that could be ordered as custom orders. My intent was also to add costumes toward the end that were ready-made, and also different than the 5 different custom costumes I was offering, but unfortunately that never happened. I offered the Male and Female Garden Gnome costumes (young/ adult sizes available), Bam Bam and Pebbles, (Bam Bam coming with a hair piece that matched the shorts and a felted club, and the Pebbles costume which included a matching bone hairclip), and the Mummy Wrap Dress.


Somehow, despite only offering 5 costumes for the Halloween Season, chaos quickly swooped in and what was steady costume making for over 120+ custom Halloween costumes turned into a disaster! It took a lot longer to put together the costume sets than I expected, and I ended up sewing so much that not only were my hands just worn like you would not believe, but I ended up in front of the sewing machines day and night for weeks and those last 4 days before everything had to ship (time was running out!) I went without sleep for 2 days except for 4 hrs, and then the final 2 days with no sleep at all. So by the time I shipped the rest of the packages express I was literally running on empty-with only 4 hrs of sleep in 4 days. There was no way I could keep up at that point.

Every time I stopped in to check on the shop I would have 25+ messages from customers, and within each message, a stream of messages from that one person. I tried to message everyone back but messages were bouncing back, people were angry saying I wasn't getting back to them, and then cancelling orders as I desperately tried to email everyone their tracking info. And the shipping log..not updated! How could it possibly have been...since I fell asleep on it in front of the computer monitor at 3am after having desperately tried to organize and update it.

In the end some orders were cancelled, and despite having tried to get in touch with everyone, it was just too much for one person. Next year I plan to have someone help me, and until then, I took a few weeks off after the Halloween awfulness to catch up and make sure everyone had their refunds and such. The saddest thing for me was that despite my best efforts, it was still a mess and the hate emails were just awful! That almost perfect customer happiness rating dropped down to an awful 91% and despite the messages and tracking info and details and returns and exchanges and the best of my efforts, it just still ended up awful.

So, as I begin to work on other blog posts and move into the winter holidays I just wanted to offer a personal apology to my 2011 Halloween customers. I have never experienced such order chaos or lateness or disaster on so many fronts. Organization in the last few weeks however has greatly improved my Craftzies functionality across the board, and areas I know I desperately needed to work on prior to the Halloween disaster are just humming along from order placement to shipping these days. I really needed to take the time to re-develope how I was doing business and so, as unhappy and depressed as I was over the Halloween 2011 incident, it was a good lesson because I really needed to improve the steps I took from when I received an order to when it shipped.

So my lesson for anyone who is thinking about running a shop or is currently running one and is having a hard time on the organization front, it is fair to say that I have been there, and here are a few areas that will greatly improve your chances of ease when it comes to running a shop because no matter how it looks or seems, there is a lot of work involved and their are ways in which you can seriously make your life easier. These help!

1) Business Cards
2) Customer Order Forms
3) Customer Order Log
4) Shipping Labels
5) Packaging Materials (incl. product tags)
6) Work station/ Wrapping Station
7) Phone/ email
8) Web-based programs to improve time management/organization
9) Advertising

So, these 9 are pretty self explanatory however we will just go through them briefly. I went for years without business cards but the truth is, they do matter. I leave them pinned up on cork boards at sewing and craft stores as often as I can remember. They are great to have when someone asks what you do or shows an interest. It is professional to hand someone a business card than just telling them and hoping they will remember, because they probably won't. Standing in line at the post office people were asking for my business card -always keep some in your wallet and you're good.

Customer Order Forms and an Order Log-SUPER IMPORTANT! and what a pain for me. You know, we're all made up on different stuff and sometimes things that are easier for one person can be the bain of another's existence. Such was the case when it came to keeping track of orders. It seems like it should be a simple process but here is how it was going down. I would receive an order on etsy for an item. I would take that info, in many cases for a custom order, and I would hand write the info including color details and measurements down on a scrap piece of paper and then take it upstairs, make the item, tag, photo, wrap, and then take the wrapped package down to the computer and pull up the order on etsy again, take that name and date and confirm address via paypal, and then take the package to the post office.

This was not working for me at all! As I broke down each step I took to making and sending orders I saw how this process needed a change, primarily because after a custom piece is made, I am a bit burned out. So to have to wrap it, take it to the computer and pull up the address again on etsy and paypal..well.. what a pain! I don't know why it was a bump in the road to easily getting things shipped and out the door, but it was. So it was in looking more carefully that I saw some major flaws, and this was one of them. So I created a custom form on ms publisher and it was pretty simple but it does the trick. I can pull up the order on etsy and paypal once and copy and paste the details into the order form, print, and that official copy can go upstairs to the workshop. This copy essentially has a top area with the etsy/ ebay info and the lower half has the paypal info, and then there is a small part on the side that I cut or tear off that has the same name and order number I have assigned the item which I keep for my records.

Now, if you are running a shop where you are making items and then listing them, the order form idea may not be entirely needed, but for someone who makes a lot of custom orders, this is essential and cannot really be done any other way efficiently or effectively. If I copy and paste the etsy and paypal info onto the order form as my very first step, not only do I not have to go back after the order is finished and confirm again the shipping address from both sites, but I can just take it from the shop to the post office hassle free. The second portion of the form will always have the paypal address and any details or comments from that site as all of my payments are usually received from there. My shop has a wrapping station of sorts as well so once an order form makes it up to the shop, it's all done right there and then shipped out right away.

Similar to the order form is the Customer Order Log and this is essentially an excel document with all of my orders however below I discuss replacing this with a web-based program such as Toggl). It gets a little intense around here because I receive so many different requests. In some cases customers contact me and want a custom order that is rather basic. Others want variations if you will, where they might want a tablecloth added afterwards or they want this in a month from now but we want to design the fabric now, or it;s a split payment, or we're designing something entirely new, and each project, from wedding dresses to messenger bags, needs to be on an order form to keep my head straight. I use excel because I can have different pages and essentially keep all of those details and variations organized. If a customer puts in a custom order, I will drop their name and a few details pertaining to their order in the excel document and then as things change or details begin to develope, I know where I am with that particular customer/ order. This helps me a great deal, and for more than one shop such as selling in etsy and ebay, I can customize my order form in excel as needed. If you dont have or don't like excel, a simple word or notepad document with a running total of orders and where you are in relation to their status is primo! Just keep yourself updated and you'll be fine.

Rules 4-7 are essential so as much as you might be tempted to skip them, don't because they can really help you. Having shipping labels and packaging materials (incl. product tags) on hand is so important I cannot stress this to you enough. If you are lucky enough to set up shipping at your home so they come pickup it is a fabulous service, but one I have not done yet. I'm almost there and expect I will be ordering the usps scale soon, however until then, having all of my packaging supplies on hand is seriously a God-send. I went online to usps and ordered a TON of packaging materials because I definitely needed them, and they delivered in a few days and well, it is lovely! If you can turn a small corner or closet or even a drawer into a wrapping station, you will be on top of the world. How many times have we gone hunting for those scissors to wrap a package only to find the scissors have disappeared or..geez..where on earth is that tape?! No more madness because you have yourself an organized little wrapping station to help you out! You can also put those scissors and tape on tethers if needed and they will stay close. Just don't cut the tether and you'll be good ;)

The phone/ email is a necessity, at least email, however I found signing up for a Google phone number was pretty great. It is free, I got to pick a number and area code I wanted (except it wouldn't let me pick Hawaii-yes, of course I tried!) but I got a free phone number.

That pretty much brings me to my last two rules to follow to avoid craft-shop madness. These are Web-based Programs to improve time management/organization and Advertising. Web based programs, depending on your needs and those offered by various programs and websites, can rally help you manage your time and orders more efficiently. My cutie told me about a year ago about a site called https://www.toggl.com/. Awesome! They are great and though I keep meaning to upgrade to a paid account, I haven't yet, but I definitely plan on it! This is quite a find of a site and they offer an opportunity to create projects and then easily manage that project, including keeping track on how much time is spent on a particular project, and also the specific areas of the project that take up the most time. This is priceless for someone like me! I am always in need of the time it takes depending on the project. How long does it take to make a woven rug? How long to make a custom dress? All valid questions as the time involved in a project helps determine the price of the finished product, but also because in many cases, as much as I would have thought I had an accurate time estimate, I have found myself way off in some cases. It's hard to say but now while utilizing the toggle program, I can easily keep track of all projects. In fact, one of the things I did was use Toggl as a organizational project tool for custom orders so instead of using an excel document to keep track of custom projects, Toggl has just recently replaced the excel doc and it has worked so far. So, if you are a small business owner with limited funds, and funds go so quickly when you get down to the finer details, every little bit helps including finding free or very well priced programs that can and will make a world of difference to your functionality.

I also really like Google Picassa which is a photo site and if you have a Google email account then you can use Picassa and upload and share photos with others. I have used the Picassa for years to show not only my Craftzies photo collection of mostly made and gone items, but I also use one for showing fabric samples, and another that still hosts all 730+ sewing patterns from the collection I borrowed from a friend (see earlier pattern post) so I have found Picassa to be an excellent resource for those that need a way to host images. Customers can easily look through sold items in a persons Etsy shop to see past items, however if those items were sold at a market or given to a friend or family member, those photos never make it to the sold Etsy section of my shop. With the Picassa craft photo page I can host up to 500 or so photos of items that have come and gone that never made it to the sold section of my shop. A page with current fabric samples up is a huge plus as well since you are limited on how many photos you can send someone, whether on Etsy or via email so having a photo portfolio customers can look through is a helpful reference for me. I am not sure how often the customers view those portfolios, but I have them and customers have access to those links via my Etsy shop announcements and also here on my blog so I do try to make them accessible.

Advertising is the last one and has been a tough one for me because I haven't really had the funds to advertise before. Don't get me wrong, I firmly believe in advertising and many people have told me, and rightly so, that I need to utilize social networking sites such as Facebook in order to advertise and as much as I would love to and do agree, I just haven't gotten to it yet. This is a great idea though and I should have done it years ago. Many people also pay extra money in order have their items featured in certain areas on Etsy and this is a great idea, and many say it's worth it. I never bothered, instead just opting to use the photos of my items when listed as my advertising. I also don't list multiples of an item, even if I have more than one made, because I would rather list each individually so I spread out the photo exposure the listing of the item receives. That and I put my business cards up, I try to get to posts here on this blog, and I chat with people once in a while online and in person and that has helped spread the word.

So, to end this post in a positive light, when things go bad, keep it going and get through the awfulness, and then make haste in organizing the areas that just aren't working for you because if you don't do it soon, disaster will strike and you will wish you had! Have a lovely day as the winter holidays approach! I have lots of fun posts coming up including Chewbacca Slippers! You know they're out of sight! ;)

Sunday, September 18, 2011

DIY Halloween Costumes-Adult Car Air Freshener


Your Halloween is going to smell great!


A few years ago my boyfriend really wanted to go as the Car Air Freshener for Halloween but they only had the munchkin version available so that left only one choice, to make him one instead. All in all it was a pretty simple costume to make but that might be because I passed the project onto his mother once I was finished making the tree part of the costume and she spray painted the text on from stencils. She did a really great job with the spray paint and I will have to confirm but I believe the white lettering you see in the images took one can of white spray paint.


I modeled the design more off of the baby car freshener costume than the traditional car freshener image, the differences being a simpler design for the shape and I also went with a white string for hanging at the top, as opposed to the green string. Since my boyfriend was going to be in the costume at work and at parties, I left the costume open more towards the hips-legs area whereas the childrens version is sewn on the sides, and more towards the feet. Here is a link to the baby car freshener costume so you can see the differences for yourself: http://www.buycostumes.com/Little-Trees-Car-Freshner-Infant-Costume/21185/ProductDetail.aspx

Materials:
3.5 yards forest green colored felt
1/2 yard stabilizer
fabric glue
Forest green colored thread
1 yard white piping /clothesline-type rope *The shop I purchased the materials from had really thick piping available by the yard in their upholstery section.
Newspaper/ craft paper *this paper is going to be used to make the tree pattern so I recommend something on hand like newspaper. If you are using small pieces, you will need to tape the paper together so that it equals the same amount of green felt you purchased
Scissors

Materials for the white text design on the front *If substituting the spray paint technique for another alternative (perhaps white paper, sticky label paper, white felt or vinyl could be considered substitutes) you can leave out the following materials
Letter stencils *you can find these at craft shops, art supply shops, or you can make your own.
White spray paint
Masking tape
Poster board
Exacto knife

Steps:
1) Unfold the green felt and fold it in half the long way so that it is 5 ft, 16” in length (half the full length-3.5 yds) and the width is much shorter-depending on what you purchased, it will most likely be about 45”+

2) Take your pattern paper (taped newspaper, etc.), fold it in half the long way as you did with your green felt earlier, trace and cut 2 paper pieces (front and back) for the tree similar to this image:

3) Lay this pattern piece on top of the folded felt and cut the felt *make sure you test your paper pattern in relation to where your arms are and how tall you are and such, and make any changes to the tree design that you need prior to cutting your green felt pieces

4) Cut a small hole at the top through both side of the felt to serve as the hole for the white string to go through

5) Turn the felt piece so they are facing each other, and the inside fabric is facing out. Sew along the edge from where your shoulders-arms are going to be all the way up and around to the other side *test what feels comfortable once the costume is on before sewing the sides too much

6) Turn the costume inside out and tie the white rope material through the hole

7) Create your stencil by copying the text onto a piece of poster board and then using the exacto knife to cut out the text. Set the stencil where you want your white lettering and blocked design and tape the pieces down onto the felt

8) Spray paint the white design onto the green felt *Please do this responsibly, both because spray paint fumes are hazardous and because you don’t want to ruin your costume, make sure you take great care to cover all areas of the green felt except for the areas you want in white. I recommend using an old plastic dry cleaning bag.

9) Once the spray paint has fully dried, all you need to do is cut out an area for your head *test before you cut and remember, cut smaller and enlarge as needed. 


10) Once you have the face cut out, measure the hole you cut for the face and take the stabilizer and draw the same hole shape onto the stabilizer. Draw a shape around your face circle like the one in the image below (that's right..I said face circle ;), and then cut the piece of stabilizer out and ever go lightly glue the piece of stabilizer to the underneath part of the inside face-head area. That dip at the top part of the stabilizer will help hold up the top of the costume so the white string will be easily visible and not flop over. 

You are officially finished! 


In the end we ran out of spray paint or we would have added the white text/ design on the bottom. 

So, there you have the DIY Car Freshener in the adult version! He had a lot of fun wearing it and even wore it again a few years later so when that happens, it’s always a good sign in the way of costumes. I think if I were to make it again, I would probably go with white felt for the white design as opposed to the spray paint but the paint version was used when making this one, so if you have spray paint already and are feeling game, go for it! It worked for this one ;) 

All you need now is a pocket full of real pine scented car fresheners so you can play and smell the part. Happy Crafting!

DIY Halloween`Costumes-Bride of Frankenstein Mummy Wrap Dress

Happy Pre-Halloween my fellow Crafters! 

As Halloween is right around the corner, I am happy to announce that my first DIY Halloween Costume post is officially here. To make it easier on all of us I am going to break this down into a series of posts, listing a new costume idea each week leading up to Halloween. And then, if and when we run out of costume ideas, perhaps we will move onto fun accessories and party ideas! If you have any cool ideas you would like to include, feel free to let me know, I love new ideas! 

Last year I was pretty open to costumes I would make for people and I made some really great ones, many of which I would not have thought of had they not been requested by customers. Those costumes ranged from infant/ toddler to adult in theme and size, and include costumes such as the Mrs. Fox Dress, the Magenta costume from Rocky Horror, Baby Frog costume, Male and Female Garden Gnome costumes, (toddler) Pebbles Outfit, Bride of Frankenstein Mummy Wrap Dress, and Steampunk Zombie Bloomers to name a few. Other costumes made prior to last years Halloween Craft Madness include an Adult Car Freshener, Ladies Star Trek Dresses (incl. next Gen), an Alien costume and many more.

That is quite a list I know! I would like to include matching outfits to compliment the Mrs. Fox dress and the Pebbles costume, so until I get those whipped up, we will postpone the Mrs. Fox and Pebbles for a little bit while I work on those. One of my favorite outfits from last year was the Bride of Frankenstein Mummy Wrap Dress so let’s start there.

Bride of Frankenstein Mummy Wrap Dress


The customer that requested this Bride of Frankenstein Mummy Wrap Dress really had a decent idea of what she wanted for this item when she contacted me and that was very helpful as I had never made anything like this before. After discussing the wants and not-wants of the dress she envisioned, I sent her a few fabric patterns I had in my pattern stash that I thought might work to see what dress style she thought would work for the dress, with the addition to it being mummified in the end of course, and she picked the style of the red dress in this pattern below:


She also wanted a V in the front, as well as the shoulder straps. I went with a very soft off white thermal material for the dress shell, or base of the dress. This fabric was a great choice. I happened to have it in stock already but it proved to be soft and comfortable, not too heavy, and it would feel solid and offer substance as a dress shell, all of which I wanted. Below I have included the materials I used. You can judge for yourself what you need for your costume based on this list. I found many materials such as lace, yarn, small amounts of silk, and items of that nature worked well in small amounts tucked and sewn into the cheesecloth so feel free to be more creative with it than anything. Since I have a sewing doll I found it useful to tuck and pin in materials as I thought they would work and then I would step away every so often and gauge the design as I went.


Materials:
2 yards of a base fabric in white or off white–soft knits recommended *this fabric will be used for the dress shell.
3-4 yards of white cheese cloth material (length depends on the size you need and on the width of the cheesecloth-some stores offer it in a very narrow width in which case you might need more)
Additional notions such as chunky wool pieces, lace or silky fabrics to add throughout the dress (these can be sewing extras and scraps and I would recommend finding things you can use as opposed to purchasing whole skeins of wool yarn and such)
14” white zipper
White thread
Scissors and measuring tape


Here are the steps to help you along with your own dress project:
1)     1)  Cut three pieces of the knit fabric you are using for the dress shell. Cut one piece for the front, and 2 pieces for the back. The shapes should look something like this:

*Determining the size you should cut for the front and back pieces is really determined based on your measurements. Whether you are using a pattern or creating your own, you are going to want to compare your measurements with those of the pieces you are going to be cutting. I always recommend adding about 1-2” extra at each seam and sew it down as needed. Just remember, you can always make it smaller, you can’t always make it bigger.

2)   2)  Sew the sides and pin the back pieces together from the bottom up to where the back zipper will end-a general guess is fine but I like to pin the back and wait until I have resized and such before I actually sew this back piece.

3)      3) Add the cheesecloth sleeves and V neckline in front.

4)      4)  Cut out a few chunks in the dress shell around the waist and the back and add cheesecloth and trims to the exposed areas, and then to other areas throughout the outfit. 

5)      5) Once I had the notions sewn down, I folded over the top of the dress and sewed, folding over and sewing one more time.  

6)     6) I rouched the middle bust by adding a seam in the middle front four inches down from the top, backstitching only one end so as to gather that area. Once you have gathered the fabric, sew it again to reinforce the rouched seam so it will not pull through.
7)      I pinned the zipper in, measured 14” from the top back of the dress down and sewed the lower back dress pieces together.

8)      7) I added the zipper. *A zipper foot always helps with the zipper process. If you do not have a zipper foot, I always recommend hand sewing in the zipper first, however loosely, and then once you get the zipper exactly as you want it, reinforcing the hand stitched areas with the sewing machine.
9)     8) For the final step,  fold over the bottom hem to the desired length, sew, fold, and sew one more time.

So, there you have it! Your very own Bride of Frankenstein Mummy Wrap Dress. Before I shipped the dress off I made one last addition, one you do not see in the photos above, in which I added a small little tab on the lower sides of the dress. This cinched the lower half of the dress up a bit. Not too much, but a little bit so it was a little shorter than what you see in the photos. It sort of carried over the cinched look throughout the design. In sending out the customer, I included a note in which I said if she found the dress too short, all she had to do was cut the tabs I added on the sides and the dress would fall longer. If you feel so inclined, I found it was a nice addition.

P.S. In the photos I took, the dress looks a little bit stretched, especially in the lower half but it was a smaller sized dress on a bigger sized sewing doll so that’s why it appears like that (size 6 dress on a size 10-12 sewing doll).

So, who’s ready to make one now?! I had so much fun I would do it again! If you have any questions, definitely let me know. If you don’t sew and want one of these made for you, please contact me via www.Craftzies.etsy.com in regards to an order.

Happy Crafting and if you have any questions feel free to ask! The skeleton hands added to the dress were actually hair clips. The skeleton hands were found at a local $1 store and I just hot glued the hands to hair clips and wha-la!

New details as of Ostober 14th, 2012: Woot! I have my first Bride of Frankenstein Mummy Wrap Dress of the season up in the shop! It's a size lg/xl and here is the link if intersted- https://www.etsy.com/listing/111319617/bride-of-frankenstein-mummy-wrap-dress

Alright, that one sold but here are more photos. I was very happy with it...


I only had one creepy skeleton clip left over from last year when I shipped it but I did manage to find more so I think I might drop a set in the mail to her. It's more of a precaution as I had a skeleton hand pop off when I made the last dress so just in case you start to fall apart during this years Halloween events, you can still count on a few creepy hands to keep it real.

Here are some photos of the second one made this year. This one was a size 4 and due to the size, was modeled on my mannequin. It was a custom order but I plan on making a few more this next week that are not yet custom orders so feel free to let me know if you would like one made. They also come with a creepy skeleton veil, a total of three skeleton hand hair clips, a big bag of extra wrappings and sewing kit in case you want to add to your creepy self...


More sizes coming this nest week so definitely check the shop or here as I will update as the crafting continues!

I hope you're having a fabulous day and thanks so much for stopping by ;)

-Lindsay 

Sunday, August 14, 2011

Pattern Madness

I am so excited to finally publish this blog post! To you dear reader, I recognize that this is simply a blog post on Pattern Madness. For me, this post symbolizes some serious crafting freedom, a major sense of crafting accomplishment, space in my sewing studio, and finally, the opportunity to focus more on sewing and offer some amazing new (and old) patterns. Sewing has always been a passion of mine, and a little over a year ago, for a short period of time before the location closed down, I volunteered at a place called TechShop. It was a large warehouse in which they offered the tools and materials for woodworking, welding, industrial sewing, robotics, 3D machine, and a number of other great stuff to make just about anything your crafting heart desired! I dreamed of learning welding and turning my mostly awful wood working skills into skills that made furniture I didn’t have to hide in the attic when people came to visit, but most of all, my interest was in the industrial sewing section. BEAUTIFUL! What fun for me! I was used to working with a really wonderful sewing machine, and though my pfaff 1122 is quite a super machine for my sewing projects thus far, an industrial machine that sews leather, heavier fabrics and not to mention stretch fabrics was definitely something I wanted to get my hands on! I was in crafting heaven and I hadn’t even gotten in there to start working. Not only did the craft area have a number of sewing machines but they also had an entire wall of shelves filled with pattern boxes. And yes, inside those boxes were hundreds of sewing patterns!

The rule was you couldn’t use the sewing machines until you had been instructed in using the machines, and yet sewing classes weren’t being held regularly and the sewing lady and I were just not connecting time-wise. To make use of the time however, I went through the patterns and there were some immediate favorites for sure! I emailed the sewing woman and asked if I could put together a digital copy of the patterns for her, and also borrow some of those favorites I had found. If I had a collection like that I would want a digital copy, especially if they were now being used in the Techshop for classes and such. Why not make copies and get a digital copy going so people can see what patterns are available without pulling out each and every box down? I figured TechShop probably had an old usable computer kicking around the huge warehouse in which we could access a pattern collection, and since I had already donated one a few weeks ago, we could even use that one for the sewing section. All we had to do was pop in a usb key really when we wanted to see what patterns were available to use. here are a few photos of some of the boxes once they officially reached my house.


I mentioned the digital copy idea to the sewing lady and she liked the idea. I said it would make having classes, and even using the patterns in a library-borrowing status in the future more functional, and so I began borrowing about a dozen patterns at a time and scanning them. When I was there for my 4+ hours each week volunteering time I would scan the front and back of the patterns there as well. I was about 1/3 of the way through the scans when they announced that they were going to close (as in immediately), but the sewing woman was a sweetie and allowed me to hold onto the collection for her so that I could finish the project!


After actively scanning the copies and then making my own copies of the actual patterns, I am proud to announce that I just recently returned the collection to her, and I am as happy as can be! In the end there were 42 boxes and about 735 or so patterns ranging from designer vintage vogue patterns to new womens, mens and children, housewares, pets, and accessories. For now, all of those patterns are being hosted on picassa @ http://picasaweb.google.com/106680090666649009492/SewingPatterns#  (if this link does not work for you, email me with your email address and I will send you an invite to the link). That space will not host that entire collection forever, but if you feel like seeing the pattern collection of a sewing woman crazier than I am, for a little while longer at least, here you have it! As time goes on I will begin to upload my own sewing patterns so the new collection reflects those that I currently have available to me, as the collection I have listed now has recently been returned to her, minus my fabulous new copies of my favorites of course. I certainly did not copy every pattern, but I did copy an awful lot. I couldn’t help it really! I just had too many favorites. In the end, this past week was spent sleeplessly and feverishly copying patterns as the rush was on to copy the final ones I had pulled out and put into my ‘desperately need to copy’ pile! Here are just a few picked at random...


Having access to the collection was a wonderful opportunity for me, and my Sophia clothing shop has been based almost entirely on patterns from her collection, so the potential for new designs is very exciting for me! I will have a number of new patterns coming soon as well so you will certainly have the fun of exploring many of those with me in the near future. As Fall approaches, I have many new items that are needed including holiday dresses, Fall work clothes, and a great deal of outerwear including a Ladies Raincoat (for our Portland Monsoon season!) and a Mans’ full length outer coat. Some highlights to this borrowed collection are a full professional copy of the McCalls 4425 Vintage Sarong Dress, Advance 9279 which is the cutest little Tea Dress (which some women online have also said makes an excellent cocktail dress), and even the Simplicity 1447, which is an asian inspired 1955 vintage wiggle dress pattern!


I will be offering the custom made dresses in my Sophia shop as soon as I have a chance (www.Sophia.etsy.com), and I will be offering copies of the patterns on Craftzies as I have large prints drawn up at the print shop. The McCall’s 4425, as well as many others, will be copies as the originals are so old you want to work with a copy anyway, and this way we can all enjoy them.


Since this collection came to me, not only have I copied countless patterns, but I have also made a number of items from some of those patterns. Not a ton, but a few. One of those is the Tron Dress.


This dress was made from a vintage McCall’s 9707. I felt it turned out pretty well. I originally cut the pieces of the sleeves but found them to be rather small in relation to the size of the rest of the dress and so I dropped them for the first test dress until I have a chance to redesign the pattern for the sleeves. The only real way to see what size a garment truly will be is, and how it fits and such is to make a copy, and this is usually done using muslin or similarly inexpensive fabric.  

I also have The Pearl, and the pattern is offered in a number of styles, but for the test, I went with the natural printed fabric in the style show. Both this dress and The Tron were made out of really comfortable, breathable cottons and are comfortable for hot weather, work and play!


I also have created a number of patterns on my own, drawn from various top, skirt, and dress patterns, one of those being The Victoria, which is the sweetest little party dress, and is made with the highest quality navy blue silk duponi I could find. I love this dress! It comes with detachable shoulder straps, a detachable halter strap, and can also be worn strapless.


And so, on this lovely, relaxing Saturday, just 2 days after sewing pattern lady picked up the collection, I feel fantastic! I feel free in so many ways. A year ago I was presented with a wonderful opportunity from a crafting perspective, and now today, not only did I make some amazing copies of some fabulous clothing patterns, but I now have a new crafting studio that I have, up until now, not been able to work in since moving in last year (!!), but I have also purchased a number of new sewing machines, so now I can sew just about anything! I have a new pfaff serger I have not used, a pfaff tipmatic/ triptonic (a beauty of a machine, hence her name of ‘pretty girl’) and what I have dubbed the Tank, an old all solid metal pfaff sewing machine, vintage, strong, and named as such for a reason! That along with my super sweet pfaff 1122 which just sews just about everything I have put through its chompers, I am all set ladies and gentlemen! I am ready to sew for you, for me, for all of us!!!

 Here are a few new projects I have lined up as we move into the cooler months. My sweetie needs a long wool coat so I figured I would try my hand at that now that I have a decent pattern for an outer coat. Being from the east coast originally, we find that the winters are pretty mild in comparison, however it does get a bit cooler in the winter, it can rain quite a bit when it wants to, and also when he wears suits for more formal outings, a long wool coat that will go over his suits is definitely going to come in handy.


 I also need a new winter coat. I hardly ever wear one, opting usually for a sweater and or a raincoat, or a light casual jacket when I'm running around out there during the day, but when the holiday parties roll around, I always find myself without a nice long coat that will go well with whatever dress I picked out for the event. And it's winter in Portland so chances are it will rain and there I am with the most gorgeous holiday dress...in the rain.

In any event, the pattern madness was super fun and ever so exhausting, but I would do it again in a heartbeat! Last Fall I barely got through the Halloween costume season and didn’t even have a chance really to sew anything for the holidays-etsy shops, custom orders, family or otherwise, so this year I am trying a new approach, one where I get a jump start and keep going so we can all enjoy the holidays, including myself! In fact, that brings me to what I think will be my next blog post, Halloween Costumes. Last year I was pretty open on what I would make for people. This year, I am going to be a little more selective on what I will offer and basically just pick my favorites from last years projects. I already have the Garden Gnome costumes listed in the Craftzies shop to start. In order to make it a bit easier for everyone, I added a Costume category so locating those will be easier when maneuvering the Craftzies etsy shop (www.Craftzies.etsy.com). Until the Halloween post is up, I leave you with something to look forward to! September’s Customer Appreciation Gift Set is going to be a free Garden Gnome Costume (male or female-you pick!) so definitely check over there as we gear up for Halloween! 


For questions on any of the patterns, or even on Halloween costume inquires, shoot me an email @ Craftzies@gmail.com, or CraftZOMG@yahoo.com, or shooting me an email via etsy!

Have a great day & happy crafting!