What's Crafting?

What's Crafting?
Click here for this weeks updates...

Search This Blog

Wednesday, September 25, 2013

Halloween '13! It's going to be a good one...

                      
                       (turns up Monster Mash…)

Bride of Frankenstein Mummy Wrap Dress

Today marks the start of my Halloween Costume season and I am super excited. I never like to inundate my viewers with holiday themed items too early in the season however from a crafting perspective, with Halloween a little over four weeks away this is the perfect time to think about what costume you want to rock and still have time to order before I’m out of sewing power and we’re all having fun celebrating!


So here is Part I and I say that because I have (pulls out list...) five more costumes for the little ones and four more Game of Thrones costumes still to come. The kids costumes that are still awaiting photos are Little Zombs (zombies of course), Mini Mummies, Itty Bitty Witches, Stinky Pirates, Fire Breathing Dragons, Godzilla Monster! and then a few capes and crowns. 


For the Game of Thrones costumes I have the light teal and gold filligre neck brace costume coming up from season 2, I have the Blue Earth colored dress from season 3, I have the peach and white renaissance inspired dress with the black necklace from season 3, and a Jon Snow costume. Ohh, and the Khal costume is mentioned below as matching the khaleesi costume and I am finishing up the final touches there and I will add photos soon of course. Some of the accessories are drying (pushes fan closer) but I think things are looking good so far. 


Custom orders and requests come first and I am limiting myself on listings for custom orders in relation to my crafting progress.  

So, with that in mind, here is Part I of Halloween '13!

Star Trek

This year things are a little different here at Craftzies so let me give you a quick guide so it is fairly easy for you to order and maneuver the Craftzies etsy shop and ebay shop. This last year I also started selling a few of the costumes on ebay and it seems to me that some people prefer etsy; others just have more experience with ebay. Honestly, whichever you prefer and the prices are comparable so whatever works for you. Listings on ebay do not stay actively listed in the shop for the long term like etsy so more items are available in my etsy shop. 

If you are interested in an item and would like one in a particular size or style feel free to ask. The best way to reach me is via etsy message. Here is the link to my etsy shop where you can see what costumes are available and send any questions if needed -> www.Craftzies.etsy.com 

Mrs. Fox costume 

A number of costumes you will see in the shop are Ready to Wear and the photo you see is the item you will receive though in some cases in order to keep things rolling I am using stock photos that I already have. Therefore, please read the listing information to make sure the item you are purchasing is not a custom order for someone else, and the easiest way to determine this is in the original listing on etsy you will see I have a note at the top of the description similar to this:

**This is a custom listing for Amber. If you are not Amber please do not order this item. TY J

If you do not see this type of note, then it is a Ready to Wear item and you are free to order it and it will be shipped out within a day or two. I am also noting Ready to Wear in the description notes to help keep everything as organized as possible there. One last thing before you see the costume list below and that is that there are a few still awaiting a few photos. I am finishing up the final crafting on a few but instead of waiting on this post I just figured I would go ahead and give you an idea of the costumes available minus a few photos that are of course sure to come within the next few days (all will be finished and photos up by the 1st at the very latest. I know it's not a TON of time but I am admittedly a bit busy this season-thanks to all of you of course ;)

Costumes @ Craftzies this year ->

For the Little Ones->

Space Travel  Robes - I received a few requests for these in different sizes so I have a few coming up. You know who you are and I will probably be using the stock photos I have but those will be ready to ship and in some cases the customers requested the inverse on the robe colors. If interested in your own set for your little one now is the time to let me know the size needed and I can make this in larger sizes, I am going to say up to a 6x. $35 for the little sizes, $47 for the kids sizes up to a 6X. I have had adults ask about larger adult sizes and the price runs $125 for a set. I know it seems high but when the fabric itself runs about 3+ yards for the natural and brown fabrics, the materials price is about $95. I will of course consider making it for you however you might find a better price than this out there.


Pebbles & Bam Bam’s - I admittedly thought that I had more of these in stock from last year but amazingly enough it looks like they were all sold and I ended the season last year fresh out of stock. So right this moment I only have a few,  one that appears at first glance to be a 3T with navy fleece bloomers and then a 9 mo. Bam Bam but I will of course confirm size and offer measurements in the listings. Both come with accessories and photos will be up tomorrow. I am only making a few of these this year but as soon as I have the other sets finished I will list them. I also have a photo of the fabrics available for the Bam Bam’s this year as the fur prints change with availability throughout the season. The price per set is $35 + shipping. This costume and price bracket are for children. I do not make the adult versions.


*Note: the fabric currently in stock for the Bam Bam costumes this year is made of the print in this listing -> https://www.etsy.com/transaction/98485974 

*The kids costumes that are still awaiting photos are Little Zombs (zombies of course), Mini Mummies, Itty Bitty Witches, Stinky Pirates, Fire Breathing Dragons, Godzilla Monster! and then a few capes and crowns. 

and then for the adults I have ->

Audrey Hepburn/ Holly Go Lightly inspired sleeping Masks and Tassle Earplug or Tassle Earring Sets - $25 for the mask, $32 with the Tassle Ear Plug Set, $37 with the Tassle Earring Set.

*I currently only have 1 set of the Sleeping Mask and Tassle Ear Plug sets available in the etsy shop ready to ship. More materials arrived and more will be added in the next few days. If you would like a set feel free to message me on etsy and I can notify you when new ones have been listed. 


Mummy Wrap Dresses - I have 2-3 to be listed right now, 1 is a size lg-xl and the style is slightly different than my norm so I definitely need to add photos. The others I have ready to list are in a size sm-med and then a med-lg and those are made in the traditional style you see here ->  http://craftzies.blogspot.com/2012/08/halloween-happenings-2012.html 

Both dress styles come with a creepy skeleton hair clip veil, a set of two creepy skeleton hair clips (those are clipped on at the chest or shoulder area in the photos, they are detachable if you want to move them around), and a bag of extra wrappings to finish off the costume with some trailing fabric pieces and such. The price for these is $75 + shipping.


Witches Hats, Brooms and Dresses - all sizes, inquire for details. Sold together or separately. Hats are $20, brooms are $12 and the dresses are $45. $75 for the full set with hat, broom and dress in your size.


And then I have some Game of Thrones inspired costumes->

For those of you who have not had an opportunity to watch seasons I-III, here is a link for you ->

http://iwatchgameofthrones.net/game-of-thrones-season-1-episode-1-winter-is-coming

*Normally I would be deterred from sites like this because of the pop up ads but it works and I didn't even need to download anything, I simply scrolled down to where the video window was and hit play. A 2-part pop-up came up but when closed you will find the video is playing. Enjoy!

Blue and Gold Khaleesi Gown from season II - This gown has a price of $105 + shipping  and the link to the blog post can be found here -> http://craftzies.blogspot.com/2012/10/game-of-thrones-costume-remake-making.html


Dothraki Riding costume for both Khaleesi and Khal -This comes with everything including accessories for both except for the male khaki pants/ capris. These are $95 each or a set of $185 + shipping. Here is a link to how I made the Khaleesi costume for this - > http://craftzies.blogspot.com/2013/08/constructing-wild-dothraki-khaleesi.html


Renaissance Inspired Gowns - $75+ depending on the style, materials desired and size. 


*Game of Thrones inspired costumes still being finished -> The light teal and gold filligre neck brace costume coming up from season 2, I have the Blue Earth colored dress from season 3, the peach and white renaissance inspired dress with the black necklace from season 3, a golden yellow renaissance dress similar to that shown in the show, and a Jon Snow costume. Ohh, and the Khal costume is mentioned above as matching the khaleesi riding costume and I am finishing up the final touches there and I will add photos soon of course.


Khaleesi inspired necklaces in style I above and style II below


Final Halloween notes: For some reason, the etsy ‘custom request’ option is not working well for me so if you are a person who has put through a custom request that way, you will find I will put the request through on etsy in similar fashion to the other Custom listings where I make and then list the item (with the note in the description that the item is for you) or in some cases such as the Game of Thrones inspired costumes, send you a custom listing for what is essentially a pre-order where you order and pay for the item and then I make it and ship it out when finished.

Custom Orders & Timing -1.5-2 weeks for orders placed before the 1st of October. If ordered after that date then 1.5 weeks before the item is ready to ship. You will see updates in the listing itself and I am putting up listings as I go so it is first come first serve in that regard.

Shipping - I am shipping as often as possible. My post office just changed their hours and cut upwards of 17 hrs a week. This not only means the longest lines ever but it also means items are in a lot of cases put through the machine as well as it takes a day or two it seems to update the tracking numbers. I take items this time of year to the post office every other day at least, and quite honestly I want all of your packages out the door as soon as possible as it is peace of mind for me as well so I do sometimes drop items sometimes twice a day as needed as the holiday is a very busy time for me. I do sometimes forget to update an item shipped-a bad habit as I am in constant crafting motion to keep it all going-but I promise I will make more frequent updates so we are all on the same page with your orders ;)

One last thing I would like to mention before we start this Halloween season is that you are all really great. You are all so friendly and supportive and also patient. I mention this specifically because I do receive so very many emails and orders and requests this time of year that I do work overtime and try to get back to all messages however I am in the shop, purchasing materials and at the post office a great deal so some responses can take a few days. It might also be because I do not yet have an answer in which case I am thinking/ researching aspects of the order so I can work out an answer. As Craftzies is ‘the little shop of everything,’ you can count on there being quite a range in questions ;)

Thanks for stopping by and if you have any questions or costume requests feel free to message me over on etsy @ www.Craftzies.etsy.com. I am in the shop today for ..let's just say a long time lol, but I will return tonight to answer all emails and list the costumes on etsy so if you are waiting to hear back, I will be adding costumes today and tomorrow. By Friday I should have the rest of the photos up as well. Until then, here is the link to last year's Halloween costumes and you will find more photos and costume ideas there as well -> http://craftzies.blogspot.com/2012/08/halloween-happenings-2012.html

Lindsay ;)

Monday, August 19, 2013

Constructing a Wild Dothraki Khaleesi costume-Season I


For my Game of Thrones junkies out there, this just might be a fun blog post for you. It definitely was for me. This costume has taken quite some time to put together but I am finally finished and even have a DIY instruction offered below. A few quick things to consider before you set out making your own costume is I recommend utilizing what you have at your disposal in the way of materials before you hit the craft shop. I know you will be creative but never the less I wanted to mention it because in the end you will find a lot of materials are needed in order to create this costume so use what you’ve got to start. Keep in mind also that this is most certainly a wild dothraki costume so a bit of ragged wildness is expected. Other than the boots, which I am not making, here are the images I was working off of ->


The interesting thing about these images is the tops are different, the first being more of a grey and the second brown. It does look like the twine braid that runs across the top into neck ties at the back is similar if not identical on both. The second image has done away with the hanging woven piece in front, the two belts and the hand wraps but the rest is the same. Once I obsessed over these images I decided that these are the pieces I wanted to include in the costume ->


Costume pieces: woven top + woven front piece / pants/ skirt/ waistband/ 2 belts/ brooch/ hand wraps


That is pretty much everything but the boots. Below are the materials I needed for the entire project, and below the materials list you will find I have broken down the construction notes for each of the pieces individually. I am also including in parenthesis at the end of each instruction segment the materials needed for each costume piece.


Materials Needed: Sewing machine, scissors, brown thread for the pants and a light colored thread for the waistband (however if you are only hoping to purchase one color thread go with a brown as the only part where it would really matter is the side seams on the natural colored waistband and those are turned in so it hardly matters), Brown fabric for pants, brown fabric for skirt pieces, cream/ natural for the waistband, gold paint, marker, glue, hole punch, outer woven fabric for the top, lining fabric for the top -especially if going with a burlap fabric (burlap is super itchy on your skin-you don’t want to be all red and itchy at your event ladies. You can probably use some extra fabric, you really don’t need a lot. You might also find you can use an old t-shirt or something of that nature for the lining-it doesn’t matter what it is really, you just want to keep that burlap from actually touching your skin), polymer clay, baking dish and a small amount of tin foil, paint brush, brooch backing, strips of a dark, leather like fabric for the hand wraps (you can use scrap strips of fabric left over from your skirt for this-see instructions below for details), brown ribbon or thin long strips of fabric (for lacing up the back of the lower skirt panels + for lacing up the back of the woven top + for blending in with the woven top and woven front piece to give them that wild look), elastic for the pants waistline, belt hardware for both belts-these are going to be D cell metal hardware or something of that nature (these are optional as you can just tie or sew them together in back or fasten some type of loop but I used them), sewing pins, metal snaps and or hook and eyes for closure at the front bodice, 2 medium strips of a dark leather-type fabric for the hand wraps, plyers and eyelets for lacing up the back and for attaching the woven front piece) optional-I had them and they worked well but you can fashion something else to work instead if needed), brown fabric dye-I went with dark brown dylon, bucket, gloves, and a sewing needle for the small detail work.


Making the Woven top + front woven design: You are going to want about 1 yard and a half for both this and the front woven design that hangs in front. Any extra string or yarn fibers at your disposal will also work well such as my random collection of woven fibers.


You also need a pattern guide for the piece for the top I imagine. This is what I went with and then I cut it down slightly as needed based on the khaleesi measurements I am given. Some tucks and such will be needed to make a nice fit.  You are going to want four pieces, two for the front and two for the back. The back center seams with have eyelet holes and lacing and the inside front will have hidden snaps to keep it closed. You can also use hook and eyes in place of or in addition to the snaps as desired. For the back center seams, for each side, fold over about ½” and sew, trim and fold over again and sew the seam down once, with about 1/3” between the two seams. This will help stabilize this area, especially since it is a bit of a ragged weave we are working with, and you will add eyelets and lace up the back later on. The eyelets are optional of course however I did use them. If you do not have access to eyelets and a plyer punch then you can snip little holes and hand sew around the little circles so as to stabilize the areas for the lacing.


Once you have your base top made measure from the start of your right side at the top all the way around the bodice and up into what you imagine are long ties, long enough to use for tying the top up at your neck. Measure the other side and these will determine how long you need your wild twine made. Add about 5” to this length to compensate for the braid and then take those strands into three different sections and either tie off onto something or tape down and then braid really long ties. Once you have finished knot the end and then make the other piece. If you need to, put your braided trim in the dye lot in order to get the desired color. Next align it with the bodice as shown and hand sew the braid down at the top around the bodice on each side, allowing for the braid trim to go upward so you will be able to tie the braid at the back neck as shown in the photos.  Add the hidden snaps as needed, place the brooch to the front and your woven khaleesi top is finished! Here is a photo of the top design with braid attached.


As I was weaving the fabric for my original khaleesi top I just happened to be making a blouse out of an interesting weave and realized if dyed brown, it would work rather well as a khaleesi top as well so I used the scraps and made a second top in similar style to the first. The pattern and construction of both tops were the same, the only difference was the grey top was with fabric I made on my weaving loom and the brown one was a soft ecru colored weave I dyed brown. Sew all pieces together before dying the materials and construct the braids before dying them as well. While that was drying I braided and dyed the neck ties and then added those to the top and the right and left of the laced area at the center back. Add the additional notions as desired and you are finished.


Materials needed: sewing pattern-> cut something like what I have shown in the drawing above, woven fabric, scissors, lining fabric (if needed), string + twine + yarn (any fibers to weave into your woven fabric to give it more of a wild look and also for stringing up your braided hem and neck ties), and possibly a brown dye and a bucket to dye the woven piece in the end, though I can’t say if this is going to be necessary.


Making the Pants: This is a style similar to stretch pants and I went with a jersey fabric in brown. A stretch cotton will work well too. These are essentially riding/ traveling styled pants and worn with boots so they can be shorter, longer, a little baggy in the legs, your choice really. I went with a stretch pants pattern I found in my stash and found them to be a bit bigger than expected but they’re stretch pants and mostly covered up so don’t sweat it, you’re going to do a great job. Cut the pattern pieces, cut the fabric. Sew the two back pieces together at the center vertically. Do the same for the front pieces. Then align the front and back at the waistline seams and then align the side seams and sew vertically down the leg. Repeat with the other side, trim the excess and repeat the sewing once more. The fold over the waistline 1” and se, trim the excess, align the elastic inside the next 1.25” fold over and sew a seam around the waistline once more, sew up the elastic to the other side as it meets, close up the seam. Next sew up the bottom hem on the pant legs, trim and sew up once more and you are done with these. If you have a pants pattern or a pair of pants you can use as a pattern for your riding pants then you are in luck. If not then any general pattern should work for this costume piece. 


Materials needed: an estimated 1.5 yards of a brown fabric or the amount called for by the pattern you have selected. I went with a jersey fabric but the choice is yours. You may prefer to go with a cotton stretch, or even just decide to go with an old pair of pants. Slimming down an old pair of khakis and dropping them in a brown dye lot just might do the trick here but it depends on what you have on hand. 


Making the Skirt: *Before you cut the lower skirt panels for this costume piece see the Making the Belts section below as you will be cutting three long strips of fabric for the two belts prior to cutting the skirt pieces here. Save the scraps for your hand wraps-details below. 


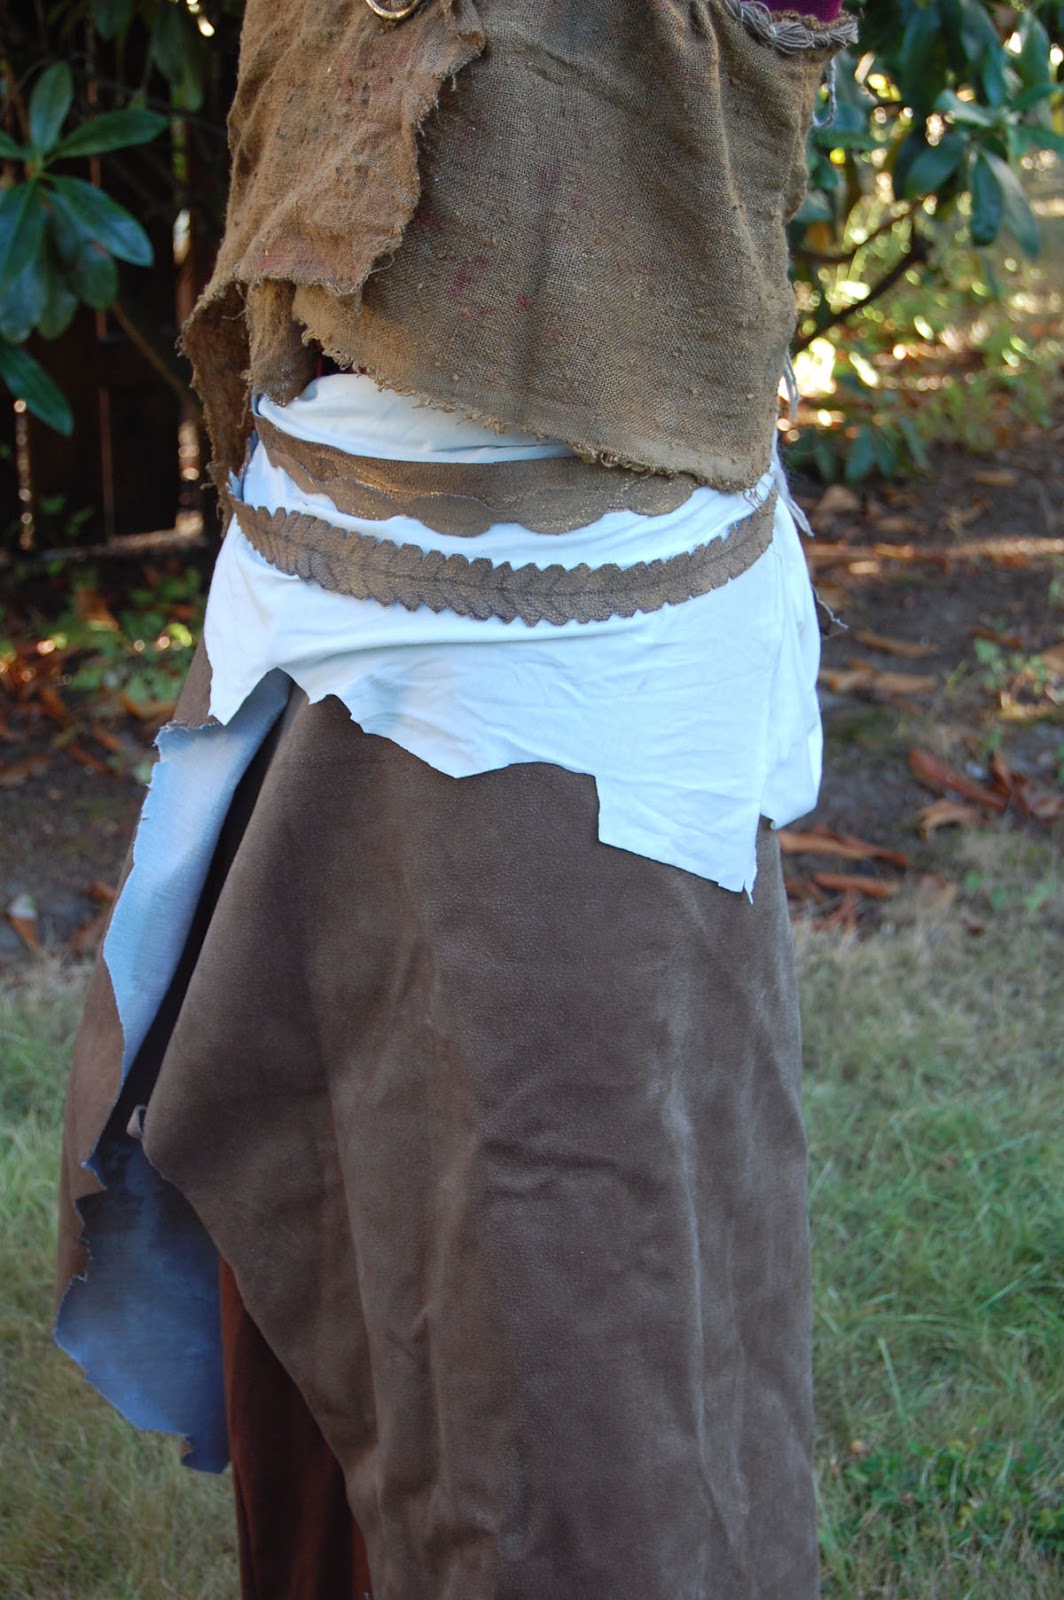
I call this piece a skirt but they’re probably more like..dothraki riding chaps more than a skirt. They are however very easy to make and require very little sewing. You need about 2 yards if you are around a size 12 or so, possibly more like a yard and a half if you are a smaller khaleesi. The skirt material I selected was sort of like a suede cloth but it had a bit of texture to it and the color was a bit more of what I wanted. It was a tough match when fabric hunting so I think I will be replacing this fabric for future orders with a suede cloth fabric. There is not much sewing for this part of the costume, I simply held up the left side of fabric above my waist and wrapped it around my hips and toward the back. I made a note of where the center back was and then cut the vertical seam down the back in a ragged, uneven way and then did the same for the other side. I left them longer as my customer is a tall Khaleesi but I would say leave them longer and trim them down as needed once you have the pants and boots on. Best to wait until you have the pieces together before cutting away areas so you don’t cut too much away.


For the yardage amount needed, measure your waist and add 4” to one piece and 6” to the other. You will be putting these pieces together with the left side going under in front and the right side on top with the fabric torn away and ragged, pulling out a bit so the underside shows a bit of white. Pin and then sew the front layering of the skirt pieces together. For the back you will be layering the pieces so that the right side is closest to your skin and the left side is out (the opposite layout as the front) and then for the back you can either sew a seam just like you did for the front, or in my case, since I want my customer to be able to adjust the sizing a bit as desired, I am adding eyelet lacing in back so she can lace it smaller or bigger. This area will not be visible as the waistband will fall over the lacing in back. For the underside of my skirt panels, the fabric that I used had a white color and I wanted it darker so I colored it with the coffee dye. It didn’t have to be too dark but I just wanted something a bit darker than a white or natural so the light discolored look for the underside worked well in the end.


Materials needed: about 1.5 + yards of fabric (but I recommend measuring yourself at the hips in front around to the backside and adding about 6-8” additional in width to determine the amount needed). You can then either go with this amount recommended and cut the skirt pieces shorter or double the amount for the longer skirt version. I doubled the amount in the costume I made and had enough to cut the fabric strips for the belts.

Making the Waistband: For the natural colored waistband measure your waist and your hips all the way around. Take the fabric and cut two pieces of fabric for your waistband, one for the front and one for the back. You will want it so the front piece is slightly wider than the back but both will make up the hip measurement you took. Once you have cut those pieces lay them out individually and cut the sides of each on a slight angle like this -> 


Sew the side seams and then add two small ties to the underside of the waistband at the hips-sew them to the center of the seams-and then cut two more strips for each side and these will be sewn to the top of the skirt so when worn, the waistband will tie to the skirt via small hidden ties. You will find this easy to slip on over the skirt and fold the inside seam inside. The majority of the waistband will fall outside over the skirt and the belts will then be added. Once you have the skirt finished and then have placed the waistband over the skirt you will want to cut the waistband in a ragged manor as shown in the images. I recommend leaving the inside seam straight across as we will be using this same waistband in a later costume so for the inside seam of raw edges fabric, keep it straight across and you won’t need a new waistband when we move onto new costumes. For the fabric yardage on this, you really need a rather small amount and I found I had some already in my fabric stash that was the appropriate size. Definitely check out the remnant bins at the fabric stores to see if they have a piece large enough in the color you need for this piece.


Materials needed: scissors, thread, sewing machine, natural colored fabric that has the width of your hip area across in front -measure hip to hip + 4” to determine the width needed for the front panel and then for the back deduct those 4” and a length of about 22”-28” in length. Cut those pieces out and sew up the vertical seams. Turn right side out and this piece should be fine to use, simply touch up with a pair of scissors as desired but this is a pretty easy piece to make.


Making the Belts + hand Wraps: *Before you cut the lower skirt panels cut three long strips of fabric for the two belts. I cut three fabric strips of fabric (from the skirt fabric before I cut those pieces) and each was about 1” in width. Two will be for the top belt, the third will be for the lower belt.  For the first belt take one of the strips of fabric and cut out a design like this one shown and then take glue and glue this piece on top of the other piece so it looks like in the image above.Then treat it with a gold wash of paint once dry.

For the second belt take a marker and draw a boomerang shape down the strip of fabric. Cut the side seams out slightly so it starts to actually look like small boomerangs (yes, your hands are probably tired by now. Take a rest, have a cookie). Then once finished cutting out the edges take your marker again and draw a dark line down the center of the belt through the boomerang shapes. The boomerang belt will also be treated with the gold paint but instead of a gold paint wash as done with the other belt, I went with a very light golden glaze and then touched up the inside of the boomerang shapes with gold paint-a small brush or the corner of your larger brush or even a q-tip in a pinch should work for this part. In the end since we are sort of faking the design of the second belt, my intent here is to have the black marker still show up a bit through the touches of blotched gold paint. For the paint used I went with the gold metallic Dorado Martha Stewart craft paint. I used a permanent marker and it smelled like soy sauce on the belt afterwards. This should go away once treated with the gold paint, mine did. If you decide on the hardware pieces for the one end you will find sewing the end up on a machine or hand sewing the tiny area will be necessary.

For the hand wraps, use the scraps you have left over from the skirt fabric and make yourself 2 medium sized strips of fabric that are about ½” wide and simply wrap around your hands, tucking the ends in as you would a bandage. If you need to darken your hand wraps then using some extra dark dye from the mix you made up and paint them, and if you want a little bit of a sheen to the pieces you can spray them with a bit of a clear spray, rough them up a little bit more and then they should look perfectly worn and ready for wearing!

Materials needed: three long strips of fabric, black or dark brown marker, scissors, gold paint, gloves, paint brush, an area large enough to glue, dry and paint your belt pieces, D cell or other metal hardware for the belt ends so as to adjust-this is again optional and keep in mind you might find you have the hardware you can cut off of an old bag or fasten one from fabric scraps and such. I know you can be crafty. You will also want some extra scraps from the skirt fabric to use for the hand wraps so save those scraps until you are completely finished.

Making the Brooch: Making the Brooch was an interesting experience and I don’t usually work with polymer clay but I didn’t know how else to do this so I picked up one of those small clay packets while at the craft store and it was about $1.25 or so in price. It offers a small amount of clay but I didn’t need much. You are going to need a pan to make the clay pieces and you definitely want to lay down tin foil before putting the pieces in the pan because the clay will stick to the pan and there you will be at 2 am trying to pop baked clay out of your pie tin. On the up side I now have a new pan to craft with :p 


You will also want brooch backings and I made myself this image guide for my brooch design, you might find this a helpful guide as well. I made 2 that were too big so then the guide was made and the third turned out the best and most accurate. So roll out your round circle to scale and then mush the top ever so slightly so it falls a little more flat around the top. Place the tin foil in the pan, heat your oven and follow the directions that come with your clay.


Once finished remove from the heat and let them cool completely. Glue the pieces carefully to the round circle, propping them up so they stay in the right place while drying (styrafoam or tin foil work well for this) and then glue the brooch facet to the back. Let the glue dry and then either paint or spray the brooch with gold-make sure you cover the facet opening with tin foil before painting so you don’t accidentally seal it shut with the paint, and then try it on your top. If you find it work well except that the lower left side needs some support then remove the brooch, turn it over and glue a small hook to the back of the lower half of the brooch. Let it dry and then when you place the brooch onto the top once more, hook a bit of the woven material into the fabric and that will help hold that lower area of the brooch down. *Don’t forget to place your brooch on a sheet of tin foil before painting or spray painting, you don’t want it to stick to a board after all of that work!


Materials needed: polymer clay, brooch backing, gloves, glue, gold paint, paint brush, tin + tin foil + oven to bake the clay pieces. *little tin foil or styrafoam pieces to hold the brooch pieces up while drying.
That’s about it really. You might be tired but you do have a khaleesi costume and it was a lot less tiring than wandering lost in the desert. The sweat, dust and blood are all you so feel free to deck your costume out once finished. My only suggestion would be to only get the lower half of your waistband dirty because we are going to make another khaleesi costume at some point and you just might want to reuse that waistband, in which case we will be flipping it around so the straight inside seam will be on the outside. That costume has a much cleaner appearance so we don’t want dirt on it. The choice is yours but you will find as we progress that a lot of these costume pieces show up again in a different way in which case saving the pieces will be very helpful for future costumes.


Happy crafting and if you have any questions or suggestions feel free to chat!

Lindsay ;)