

Happy New Year everyone! I thought despite the cold
and the rain in the great Northwest this time of year, I would share
with you a fun little sewing project and we can all make some Hawaiian shirts!
So, who is in the mood for a luau? We’re certainly not there weather-wise but
that does not mean we cannot plan ahead. This rainy day project might take you
a few days or even weeks anyway so while we dream of dreamier weather let’s
craft our way to fabulous outfits so we’re fully prepared for when the summer
months are upon us. The one thing to remember with making a Hawaiian Shirt is that it is very similar to making a dress shirt. There is actually more sewing
involved for a Hawaiian despite the more relaxed look because of all of the top stitching
involved, but we’re not going to let that hold us back are we?
I take my sewing very seriously for this project
though because well, simply put, I don’t like to waste my time or materials if
I am not going to make the perfect
Hawaiian shirt. You see, it has to be ‘wear-worthy’ as I call it. I am all for
handmade clothing, but you cannot have a botched job of any kind here or it
will never be worn. You can even have
it so in the end you only hand wash it and never put it in the washing machine.
Fine. But make it wear worthy. Take your time and you will be the best Hawaiian
shirt maker the world has ever seen. You might want to print out these
directions so that you can follow along and cross off the stages as you go
through the process at your sewing area, that is perfectly fine with me. I want
you to have the confidence you need for this project because this is not your
average ‘rainy day craft.’ This is shall we say the ‘Big Kahuna’ of sewing
projects here so grab the materials listed below and let’s get started!
I admittedly
started a little while back on this project so that I could share with you a
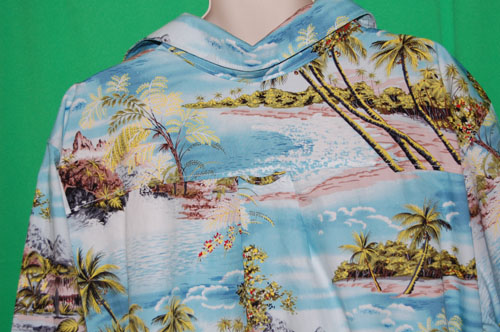
detailed attempt on my part at making a Hawaiian shirt. I will show you two
Hawaiian styled shirts I have recently made. These are made by first creating
my own sewing pattern for them and then making a shirt based on that newly
created sewing pattern. Both shirts have been patterned off of a red Hawaiian
shirt so in the images below you will see the original red shirt as I take a
pattern from it to use towards making the two new shirts, the first with a
black and white print, and the second made with a tropical print. The finished
shirts are made ever so slightly differently in that with the second shirt I
enlarged the collar a tiny amount and then I also left the lower side slits
opened slightly as well. Those are choices you can make for yourself as you
work on your own Hawaiian shirt, and I have included directions on adding the
side slits below if desired as you will sew the lower side seams slightly
different if you do decide to go with that style.
Alright, so here are the materials you are going to
need. Go ahead and get these and we’ll get started here.
Materials:
2.5 yards of fabric (you may need slightly more or
less fabric depending on the size of the shirt you are making and if you are
going with a patterned fabric. You are welcome to draft up the sewing pattern
first and then take it into the shop when purchasing your fabric and determine at
that point based on the fabric you pick how much fabric you will need).
½ yard interfacing
Thread
Scissors
Buttons (8-9 count depending on size and spacing of
buttons however I always plan on 9 and then if I have an extra I sew it on the
inside lower front of the shirt as a backup in case a button is lost in the
future).
Sewing pins
Sewing machine
Sewing needle to stitch the buttons on
Iron/ Ironing board to press fabric while working on
your shirt
Sewing
pattern
-or-
(*materials needed for making your own
sewing pattern) paper, pencil, measuring tape, and Hawaiian shirt to use as
a pattern for your new shirt
Making
a Hawaiian shirt pattern from an old Hawaiian shirt
Some of you out there might find you have a sewing
pattern for a Hawaiian shirt already in your possession. I happen to have one
but I decided I wanted to take the measurements from an original shirt as
opposed to using a pattern for this project. The choice is of course yours and
you may find the directions in regards to the top stitching order for your
Hawaiian shirt I have below useful, however for those of you who happen to have
a shirt you can use for this and do not have a sewing pattern at your disposal
already, you will want to start here and grab the materials needed in order to
make your own sewing pattern. I have found it somewhat difficult to find
Hawaiian shirt patterns in sizes above a large and even then they end up on the
smaller size so this would be the main reason why you would want to create your
own sewing pattern.
With that in mind let’s get started. Take your tape
measure, white paper, pencil, and the original Hawaiian shirt you are using for
a pattern and begin by laying the shirt out as flat as you can so the back is
facing up, flat on the table. If you don’t have white paper then you can use
brown kraft paper perhaps or even old wrapping paper.
Before you begin to measure your original Hawaiian shirt take a look at how the collar area is constructed. Here are a few images to help you along...


Pay attention and follow the guide laid out below and
you will do a fabulous job at making a new Hawaiian shirt. There are a lot of
details however and once you have gone through the process of creating a new
pattern I always recommend marking each pattern piece as I have below with the
pattern name and number and additional details, and storing in a large zip lock
bag. Index cards also make excellent note cards and I use these frequently for
notes to my ‘future-crafting’ self. I also like to take a fabric sample of what
materials have been used for the project and staple it to a card and store it
with the newly made pattern in the ziplock bag. It helps when going through the
patterns and trying to keep it all organized later on. Also, the index card
with the fabric swatches helps remind me as to what pattern it is and I
frequently place this card at the front of the ziplock bag so when riffling
through patterns I can easily identify what pattern it is.
Sewing
Terminology & Helpful Tips-Just a quick note here
for those that are unfamiliar with the sewing terminology used below. I try to
make my directions as simple and easy to follow as possible however you will
need to know that when I say to baste
an area I mean to sew a straight stitched line close to the fabric edge. You
will also need to know that I always recommend sewing each seam a total of
three times if you are not using a serger, then I like to sew the seam once,
trim the fabric excess, sew another straight seam, and then finish the sewn
seam by way of a zigzag stitch in most
cases. You will find handmade clothes will hold up a lot longer if you do
this to the seams. The magic touch on clothes laundered that are handmade is to
not put them on high heat in the dryer. Lastly in regards to the terms I use
when sewing the shirt, you are going to recognize that to topstitch an area
means just that, to add a sewn straight seam to the top of your seams. The visible
stitching around the collar of a mens shirt would be a good example of top
stitching. Topstitching is not hard, though it does require a lot of careful
sewing as those stitches will be highly visible on your new shirt and you will
find it very helpful to press areas of your fabric prior to sewing so your
finished stitches are as perfectly straight as you can make them. I find
topstitching on a wider stitch helps with getting a straight edge so I always
increase the stitching width on my machine for these topstitched areas. I find
a width of 3 out of 5 on my machine works well. One last thing I do while
sewing these shirts is as I construct the new shirt I am always comparing one
side to the other to ensure the shirt is even on both sides. It is very helpful
to do this when hemming the bottom of the sleeves so you are sure the sleeves
are the same length, and when sewing the bottom hem as well. You will find
comparing the sides and seams while working to be rather helpful as well so I
do not mention it below but I highly recommend you do this as well to ensure
your shirt is well made when you have finished.
Below is the list of the pattern pieces you will
need for the shirt pattern.
Hawaiian
Shirt Pattern Pieces: #1-9
Hawaiian Shirt Pattern Piece #1 Back Upper A
(details: Cut 1 on fold)
Hawaiian Shirt Pattern Piece #2 Back Lower B
(details: Cut 1 on fold)
Hawaiian Shirt Pattern Piece #3 Back Center Loop
(details: Cut 1) *(optional)
Hawaiian Shirt Pattern Piece #4 Front Panel (details:
Cut 2)
Hawaiian Shirt Pattern Piece #5 Front Panel Strip
(details: Cut 1)
Hawaiian Shirt Pattern Piece #6 Collar (details: Cut
2 of fabric, 1 of interfacing)
Hawaiian Shirt Pattern Piece #7 Neckband (details:
Cut 2)
Hawaiian Shirt Pattern Piece #8 Arms (details: Cut
2)
Hawaiian Shirt Pattern Piece #9 Pocket (details: Cut
1)
As you draft up each pattern piece, here is a simple
guide to follow:
Hawaiian Shirt Pattern Piece #1 Back
Upper A (details: Cut 1 on fold)-You are going to want to
include a ½” seam allowance to all sides for this piece and include short dash
marks ½” in from the cutting line on the pattern piece to indicate the seam
allowance. When drafting this piece you can go with a half piece and mark “CUT
ON FOLD” in the center lengthwise if desired. Score your pattern piece in the
center with a little snip to indicate the center. When cutting your fabric
piece do the same as well.
Hawaiian Shirt Pattern Piece #2 Back
Lower B (details: Cut 1 on fold)-Include a ½” seam
allowance to the top and sides of this pattern piece, and 1.5” in additional
length to the bottom hem. *If using a fabric print, cut out this panel by
aligning the print with that of the #1 panel which will be sewn directly above
this one, making up the entire back panel of the shirt. When drafting up this
piece you are going to want to include 2” additional on each side, ½” seam
allowance for the top seam, and 1.5” for the lower bottom hem. When drafting
the pattern piece you can use a half piece of pattern paper here as well and
mark “CUT ON FOLD” at the center vertically if you choose to. Score the center
top and bottom of both the pattern piece and the fabric when cut so as to
indicate the center when sewing this piece further.
Hawaiian Shirt Pattern Piece #3 Back
Center Loop (details: Cut 1) *(optional)-This is a
very small rectangle piece and I usually just skip making the pattern piece for
this but if you do, be sure to include a little note to yourself on your index
card that you still need this piece cut and top stitched. It should be about
3.5” in length and no more than ¼” in width once folded, pressed, folded again,
pressed and top stitched. Once finished,
put aside until you are ready to add the center pleat to the top of the #2 back
panel B piece and continue further.
Hawaiian Shirt Pattern Piece #4 Front
Panel (details: Cut 2)-I like to cut the pattern piece for the front left side specifically so I can
mark out on my pattern piece where the pocket is to go. I also include 3.5”
seam allowance to the center front, which, if I were drafting the left side
specifically, will be 3.5” seam allowance on the left side. I mark CUT 2 on this
pattern piece. I also include 3/4” seam allowance around the upper cutting line
when drafting this piece, ½” seam allowance on the right hand side, which is
the side seam, and then again a 1.5” seam allowance for the bottom hem. I
include dash marks to indicate the proper seam allowances and also the side and
center front areas on the pattern pieces. I also mark the appropriate area in
which the pocket will be added. This is optional but everyone likes a pocket on
a Hawaiian shirt. When marking where the pocket will be I also include a little
note on my index card that this will only be included on the left hand side of
the shirt. When working on a project like this I find I put it aside and come
back to it over the course of a few days so reminders never hurt.
Hawaiian Shirt Pattern Piece #5 Front
Panel Strip (details: Cut 1)-Take the last pattern
piece you drafted up (#4) and measure the length from the center front top to
bottom hem. Draft the pattern piece by cutting a strip that is of the same
length of this length measurement taken plus ½” extra for the top seam
allowance, and 2” in width. Add dash marks ½” in for the seam allowance on the
pattern piece and when cutting the fabric, fold in and press the sides ½” prior
to sewing this piece to the front.
Hawaiian Shirt Pattern Piece #6 Collar
(details: Cut 2 of fabric, cut 1 of interfacing)-Open the shirt you are using
as a pattern and flatten out the collar area as best you can. Lay this
flattened collar piece out on your pattern paper and sketch dash marks around
the sides of the collar. If you find this difficult then you may find pinning
the collar to the paper first helpful and then drawing around the collar to get
the correct cut. Include a 1” extension outward for the bottom hem (area where
the collar will later be sewn to the neckband) and ½” seam allowance outward
from the sides and top of the collar (which will later be the bottom part of
the collar when finished and folded over). I like to mark the center with a
small score mark on both the pattern and the fabric pieces when cut. *Make sure
to cut the fabric with all patterns facing the correct way. In regards to the
interfacing for the collar, I use 1 piece of interfacing as I don’t want the
collar to be too heavy, it is a relaxed and comfortable Hawaiian shirt we are
hoping for after all, but if you would like to double up, you are welcome to,
in which case you will fold your piece of interfacing before you cut the collar
piece out.
Hawaiian Shirt Pattern Piece #7 Neckband
(details: Cut 2)-Once you have drafted your collar piece above, take the width
of the lower cutting line and a length of 2.5” in length. When drafting up this
piece make sure that the length extends 1” longer on each side than the length
of the bottom hem of the collar piece you drafted up. You also want to make
sure that the center front area of this neckband piece is curved in slightly on
the upper corner of the center front
area on each side and that you have then included a additional ½” seam
allowance around the top, and a 1” seam allowance for the bottom hem.
Hawaiian Shirt Pattern Piece #8 Arms
(details: Cut 2)-Fold the arm area of your original Hawaiian shirt and lay it
out over the pattern paper and sketch around the perimeter with dash marks.
Include a ½” outward seam allowance to the top curved area of the pattern
piece, a ½” seam allowance outward for the inside seams, and then include an
additional 3” in length to the sleeve, however where you added the dash marks
on your pattern piece to indicate where that bottom hem fell, I want you to
mark this line as the fold line, and then include a solid line vertically from
the bottom hem, and then again once more 1” from that solid line.
Hawaiian Shirt Pattern Piece #9 Pocket
(details: Cut 1)-I like to wait until I have finished every other part of this
shirt before adding the sewn pocket, including
cutting the fabric, but the choice is yours. If you are cutting the fabric
out ahead of time then I recommend cutting it big so you have a bit of extra
fabric for trimming and matching the pattern up correctly without the finished
pocket ending up to small. I do however cut the pattern piece itself for the pocket as I am drafting up the rest of
the pattern, I simply prefer to wait until I have finished sewing the seams and
such for the shirt before cutting the fabric.
The pattern piece for the pocket should be 4.5” in width and 5.5” in
length. I will include a set of dash lines ½” in from the cutting line all the
way around the sides and bottom hem. I will include a note around the top
horizontally to FOLD HERE so I know when cutting my fabric that I will have
folded over the fabric on that line.
Getting
Started Sewing: Step 1
Now we have drafted up the pattern, cut those pieces
out, and cut the fabric for all but the pocket, and we are going to get started
sewing. The first thing I am going to do is take panel #2 and add the pleat. I
am going to do this by folding over the fabric on each side equally from the
center upper front outward by ½”out from the center front score mark. Pin, and
then baste this pleat down, and then add the Back Center Loop (#3) as shown in
the image below and baste this piece down as well. Baste the entire length of
this seam once more close to the edge, trim the excess and then align with
Panel #1 and sew together. Repeat the seam and then add a zigzag stitch if you
are not using a serger. Trim the excess as needed from the inside seam and
press with an iron and then top stitch the seam a ¼” above the seam. Fold
this back panel piece down the middle vertically and line up the sides. Trim
and excess fabric on the sides where the back Panel Upper and Lower (1 & 2)
were sewn together.

Take the panel #3 Shirt Front right and left sides
and sew the side seams and shoulder seams together *making sure you leave 3.5”
openings on the bottom of the right and left hand sides if you want the opened
sides. This step is optional but I do include the opening side seams for the
lower half of the Hawaiian shirts if desired by the person who will be wearing
them. Some people like them and it requires more care when constructing, but
the choice is yours. In the case of the tropical shirt, I have included the
opened seams and I have prepared these seams by folding the side seams in ¼”
and pressing along the side all the way up the fabric. Trim if needed and then
fold and press the seam over ¼” once more.
Open the pressed seam up one fold, match the side seams together of
Panel #2 with that of Panel #3 and sew the seams together up until where you
want the openings to be, trim if needed, repeat the stitches, and then for the
lower half of the opened seams you want included, you are going to want to make
the tiniest of corner clip marks on the inside on each side of the opening,
fold the previously pressed seams down again and if needed, press down once
more with the iron.

Now, before you jump ahead and sew the side seams up and
around the opening on each side I want you to lay your shirt out flat and only sew a topstitched seam on the left hand side of the shirt starting at the bottom hem on the left side
(when laid out and facing you) and up around the top and then stop. Backstitch just a tiny bit, but do not topstitch the inside seam to the
right on the left side and the left on the right side as you will topstitch the
inside seams later on from the
inside bottom hem on each side all the way up to the bottom hem of the shirt
sleeve. Repeat the topstitching to the other side in similar fashion as the
opposite side and the top of the right hand side of the shirt opening (when
laid out and facing you) and then put this piece aside.
Constructing
the Collar: Step 2
The collar may be one of the most intimidating areas
of a shirt and precision does make perfection in this particular area. If you
can keep in mind the correct angles of the collar, the proper seam allowances,
and also the idea that the collar when finished is supposed to meet up in the
end as in this image here (IMAGE) with a neckband that will be shaped with a
curve around the upper area, flat across the bottom, cut big at first and
trimmed down to size as you work on it, and that the neckband is supposed to
extend 1/2” outward from the collar itself when finished, you are golden! I
like to cut this piece big as you see here in the photo and then trim and work
my way down to size as I as I find it easier. With the collar and neckband
pieces, I want you to cut a little on the big side if needed because in the end
we do trim everything down to size so your shirt will end up the same size of
the shirt you took the measurements from.
Do pay very clear attention to the following directions though, and go
slowly. This is not a speed contest, this is the construction of a Hawaiian Shirt
for those lovely relaxing weekends and balmy summer days. There is no need to
rush…


Sewing pins are your best friend for the
construction of your collar and if you haven’t pulled them out before now, you
will want to now as we construct the collar. If you are totally worried you
will mess up making your first collar out of real materials, jut remember making
a paper version to start out never hurt anyone, and second, have no fear, this
is going to look fantastic and you’re doing such a fabulous job so far you do
not need to worry, this is not nearly as hard as I make it sound, I just don’t
want you to wonder off for a cookie and a cup of tea and then come back only to
sew everything together in the worst possible way. A cookie and a cup of tea
does sound awfully nice though doesn’t it?…
(wanders
into the kitchen)
(wanders
back again with tea and cookie in hand)
Ok, so let’s check where we are so far. You have
your sewing pins on hand then yeah? You have your collar pieces ready to go?
Those will be panel #6 & #7, and you will have a front and back piece of
fabric for the neckband piece, both with the print facing up the right way when
flipped over to the other side? Ok, good. How about the collar itself? You have
a front and back fabric piece and also the piece of interfacing? The collar
pieces are also with the fabric print falling the right way? Ok then,
excellent! Let’s continue.


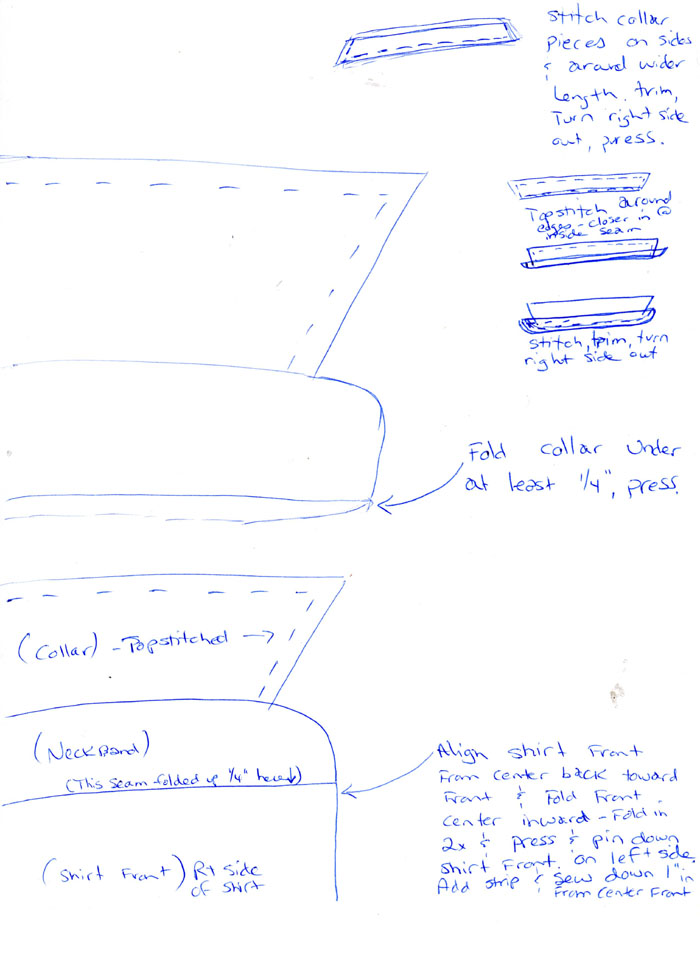
Take the collar pieces and once aligned the correct
way, sew the sides and outer seam. Repeat the straight stitch on this and then
turn it right side out and press. Go back to your original shirt and compare
this collar shape to that of your original. Make sure you have the correct cut
and if you need to, flip the collar back inside again and modify as needed.
Flip it right side out again, press flat and then top stitch ¼” all the way
around the outside of the collar. Lay your neckband piece out flat with the
collar again and trim the neckband piece so it is 1” longer on each side than
the bottom hem of the collar. Take the front and back neckband pieces and place
them wrong side facing up with the collar tucked in right side up and pin and
then sew all the way around the inside of the neckband including down and
around the curved area. Repeat the sewing for this seam and then trim the
excess. Turn the neckband out the correct way and press flat. Then fold up and
in ½” and press flat.
Take the #5 Front Panel Strip and if you have not
prepared this piece by folding and pressing the edges in ½” on each side do so
at this time. Align the collar piece with that of the shirt itself and fold the
front shirt panel on each side over and press down the front on each side where
the shirt and outer edge of the neckband on the collar meet. Fold over the
excess fabric twice, pressing down with the iron each time, and trim if needed.
Pin the front down on both sides if needed, and then on the right hand side,
align the #5 Front Panel Strip on top of the right side of the shirt and press
and pin this strip as shown in the image below. Topstitch the outside seam which is ¾”-1” in from the
center opening all the way down the front of the right hand side (when in front
of you) and then tuck the top of the shirt into the neckband of the collar
piece and press and pin down on both sides. Once aligned, topstitch all the way
around the bottom pressed hem of the neckband 1/4” above the folded seam. Press
once more and then beginning at the bottom hem of the left hand side of the
shirt, top stitch ¼” from the folded seam at the center front all the way up
the front of the shirt, up and around the top of the neckband area and then
back down the right hand side of the shirt over the front strip you added
previously, ended at the bottom hem.
Here are a few illustrations with handwritten instructions to help you along...

Final
Steps: Step 3
The exciting news is we have made fabulous progress
and the hard part is really close to being finished at this point, if not already
over by now. We still need to add the arms so let’s get those added and we will
feel much better with the time this fabulous Hawaiian shirt has taken us to
construct. Take the sleeves and lay each one out wrong side facing up and fold
up the bottom sleeve hem 1” and press flat with the iron. Do this one more
time. You do not need to pin, I just want you to have a pressed outline of the
bottom sleeve hem before you continue as I have found it helps a great deal
before you add the sleeves. Next, lay your shirt out flat and your sleeve
pieces and align them so the center top of your sleeves meets the center of the
shoulder area of your shirt. *Make sure you lay your shirt out first for this
as the shoulder top center is not where the shoulder seams are but slightly
above so laying them out correctly helps identify this area on the shirt itself
better. Pin and then stitch the arms on. Trim the excess, repeat the sewing and
then where the arm seams meet on the underside, close the inside seams up.

Turn
the shirt right side out and starting at
the bottom hem on each side, topstitch ¼” in on the inside seams all the
way up the sides until you reach the
inside bottom hem of the sleeve. Fold the sleeves up and under twice, trimming
if necessary and sew the bottom hem. *I like to topstitch twice around the
sleeves but you can decide what works best for you. *I also like to fold and
press the sleeves once more and then check by turning the sleeves inside out
quickly to check that the stitches I am about to make will cover the seams
properly on the inside. You may find once you have pressed the sleeves up twice
that there is a slight trim needed to the bottom hem in order to even out the
sleeve hem on the inside before you add those final stitches to the bottom hem
of the sleeves. Sew the final stitches for hem of the sleeves. On both shirts,
I added a second line of stitching slightly above my hem as I personally like
the look of the double stitched seams but you can determine for yourself later
on if you find it necessary.
Here is an illustration that might help if you are having a tough time here...

Next we have the pocket and you are going to want to
place your finished pocket center with the front panel. Prepare your pocket by
cutting out the fabric in the appropriate size and with any fabric print taken
into consideration at this time. Take the pocket and fold over the backside so
it is laying over the front and sew the side seams about ½”. Sew a repeat seam
on each side and trim. Turn the pocket right side out and press. Sew the
topstitching for the pocket across the top at this time, add another line of
stitching below if desired, and then
fold up the lower hem of the pocket about ½” and press. Align your pocket with
the front panel and press, pin and then sew the pocket down starting at the
upper left and going down, around and up the other side so you finish sewing at
the upper right hand side of the pocket. *I see a lot of shirt pockets with an
angled pocket stitch in front and if you are planning on this style then you
are going to want to use either a blue sewing fabric marker or fabric chalk and
draw the lines on with a ruler before sewing so you get the right angles.

Align your shirt up the front and pin the bottom hem
where the right and left side of the center meet. Fold your shirt in half and trim
the bottom hem of the shirt all the way around, making sure the center front
and center back are even. Also make sure if you have added the opened side
slits to your shirt that the newly trimmed bottom hem on the sides are equal in
relation to each other as well. Press the bottom hem up ¼” and turn the shirt
inside out and sew the bottom hem up once. Turn right side out, matching all
seams so you ensure everything is even and falls the same length on both sides
before you add the final stitches, press down and then sew the bottom hem down.
Repeat with a ¼” seam above or below if desired.
Now we are nearly finished and allow we have to do
is add the buttons and button holes to the shirt and we are officially
finished. Before you make your button holes you will want to have your buttons
on hand so you know the size needed of the button holes. By comparing the
spacing of the buttons on your original Hawaiian shirt, you will see where the
button holes need to be on the right side of your shirt (when laid out in front
of you/ left side when worn). I find it useful to go back at this time to your
original sewing pattern you created for yourself and add the proper spacing for
the buttons onto the #5 Front Panel Strip piece for future reference. Later on
you will want to know the appropriate spacing and you may not have the original
Hawaiian at your disposal so taking a second to include it to the original
pattern you created helps a great deal. Make a small button hole slit where
indicated to the right hand side of the shirt (this will be the left hand side
of the shirt when worn/ right side when laid out in front of you). Move your
sewing machine dials so you are on 1 width stitch + button hole/ zigzag stitch
and sew each button hole as needed. Now simply sew the buttons on with your
sewing needle and you are officially finished!
Lint remove the shirt inside and out to remove any
excess threads, iron it so it looks all nice, and you’re all set!


Now that you have successfully made one, don’t you want to make
another? The second will be easier the next time around I promise, simply
follow these steps once more and you will again have success with your Hawaiian
shirts!
This fabulous Hawaiian shirt is for my boyfriend. I
feel like a new styled sarong dress or perhaps even a sarong skirt is in order
for me and then we’ll be all set for summer! I feel some luau styled party
invites coming soon too…
Until then-Happy sewing, Happy luau!
Lindsay ;)
No comments:
Post a Comment