
Happy Pre-Halloween my fellow Crafters!
As Halloween is right around the corner, I am happy to announce that my first DIY Halloween Costume post is officially here. To make it easier on all of us I am going to break this down into a series of posts, listing a new costume idea each week leading up to Halloween. And then, if and when we run out of costume ideas, perhaps we will move onto fun accessories and party ideas! If you have any cool ideas you would like to include, feel free to let me know, I love new ideas!
Last year I was pretty open to costumes I would make for people and I made some really great ones, many of which I would not have thought of had they not been requested by customers. Those costumes ranged from infant/ toddler to adult in theme and size, and include costumes such as the Mrs. Fox Dress, the Magenta costume from Rocky Horror, Baby Frog costume, Male and Female Garden Gnome costumes, (toddler) Pebbles Outfit, Bride of Frankenstein Mummy Wrap Dress, and Steampunk Zombie Bloomers to name a few. Other costumes made prior to last years Halloween Craft Madness include an Adult Car Freshener, Ladies Star Trek Dresses (incl. next Gen), an Alien costume and many more.
That is quite a list I know! I would like to include matching outfits to compliment the Mrs. Fox dress and the Pebbles costume, so until I get those whipped up, we will postpone the Mrs. Fox and Pebbles for a little bit while I work on those. One of my favorite outfits from last year was the Bride of Frankenstein Mummy Wrap Dress so let’s start there.
Bride of Frankenstein Mummy Wrap Dress


The customer that requested this Bride of Frankenstein Mummy Wrap Dress really had a decent idea of what she wanted for this item when she contacted me and that was very helpful as I had never made anything like this before. After discussing the wants and not-wants of the dress she envisioned, I sent her a few fabric patterns I had in my pattern stash that I thought might work to see what dress style she thought would work for the dress, with the addition to it being mummified in the end of course, and she picked the style of the red dress in this pattern below:

She also wanted a V in the front, as well as the shoulder straps. I went with a very soft off white thermal material for the dress shell, or base of the dress. This fabric was a great choice. I happened to have it in stock already but it proved to be soft and comfortable, not too heavy, and it would feel solid and offer substance as a dress shell, all of which I wanted. Below I have included the materials I used. You can judge for yourself what you need for your costume based on this list. I found many materials such as lace, yarn, small amounts of silk, and items of that nature worked well in small amounts tucked and sewn into the cheesecloth so feel free to be more creative with it than anything. Since I have a sewing doll I found it useful to tuck and pin in materials as I thought they would work and then I would step away every so often and gauge the design as I went.

Materials:
2 yards of a base fabric in white or off white–soft knits recommended *this fabric will be used for the dress shell.
3-4 yards of white cheese cloth material (length depends on the size you need and on the width of the cheesecloth-some stores offer it in a very narrow width in which case you might need more)
Additional notions such as chunky wool pieces, lace or silky fabrics to add throughout the dress (these can be sewing extras and scraps and I would recommend finding things you can use as opposed to purchasing whole skeins of wool yarn and such)
14” white zipper
White thread
Scissors and measuring tape

Here are the steps to help you along with your own dress project:
1) 1) Cut three pieces of the knit fabric you are using for the dress shell. Cut one piece for the front, and 2 pieces for the back. The shapes should look something like this:
*Determining the size you should cut for the front and back pieces is really determined based on your measurements. Whether you are using a pattern or creating your own, you are going to want to compare your measurements with those of the pieces you are going to be cutting. I always recommend adding about 1-2” extra at each seam and sew it down as needed. Just remember, you can always make it smaller, you can’t always make it bigger.
2) 2) Sew the sides and pin the back pieces together from the bottom up to where the back zipper will end-a general guess is fine but I like to pin the back and wait until I have resized and such before I actually sew this back piece.
3) 3) Add the cheesecloth sleeves and V neckline in front.
4) 4) Cut out a few chunks in the dress shell around the waist and the back and add cheesecloth and trims to the exposed areas, and then to other areas throughout the outfit.
5) 5) Once I had the notions sewn down, I folded over the top of the dress and sewed, folding over and sewing one more time.
6) 6) I rouched the middle bust by adding a seam in the middle front four inches down from the top, backstitching only one end so as to gather that area. Once you have gathered the fabric, sew it again to reinforce the rouched seam so it will not pull through.
7) I pinned the zipper in, measured 14” from the top back of the dress down and sewed the lower back dress pieces together.
8) 7) I added the zipper. *A zipper foot always helps with the zipper process. If you do not have a zipper foot, I always recommend hand sewing in the zipper first, however loosely, and then once you get the zipper exactly as you want it, reinforcing the hand stitched areas with the sewing machine.
9) 8) For the final step, fold over the bottom hem to the desired length, sew, fold, and sew one more time.
So, there you have it! Your very own Bride of Frankenstein Mummy Wrap Dress. Before I shipped the dress off I made one last addition, one you do not see in the photos above, in which I added a small little tab on the lower sides of the dress. This cinched the lower half of the dress up a bit. Not too much, but a little bit so it was a little shorter than what you see in the photos. It sort of carried over the cinched look throughout the design. In sending out the customer, I included a note in which I said if she found the dress too short, all she had to do was cut the tabs I added on the sides and the dress would fall longer. If you feel so inclined, I found it was a nice addition.

P.S. In the photos I took, the dress looks a little bit stretched, especially in the lower half but it was a smaller sized dress on a bigger sized sewing doll so that’s why it appears like that (size 6 dress on a size 10-12 sewing doll).

So, who’s ready to make one now?! I had so much fun I would do it again! If you have any questions, definitely let me know. If you don’t sew and want one of these made for you, please contact me via www.Craftzies.etsy.com in regards to an order.

Happy Crafting and if you have any questions feel free to ask! The skeleton hands added to the dress were actually hair clips. The skeleton hands were found at a local $1 store and I just hot glued the hands to hair clips and wha-la!
New details as of Ostober 14th, 2012: Woot! I have my first Bride of Frankenstein Mummy Wrap Dress of the season up in the shop! It's a size lg/xl and here is the link if intersted- https://www.etsy.com/listing/111319617/bride-of-frankenstein-mummy-wrap-dress
Alright, that one sold but here are more photos. I was very happy with it...


I only had one creepy skeleton clip left over from last year when I shipped it but I did manage to find more so I think I might drop a set in the mail to her. It's more of a precaution as I had a skeleton hand pop off when I made the last dress so just in case you start to fall apart during this years Halloween events, you can still count on a few creepy hands to keep it real.
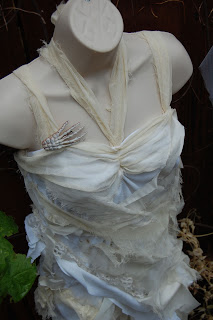
Here are some photos of the second one made this year. This one was a size 4 and due to the size, was modeled on my mannequin. It was a custom order but I plan on making a few more this next week that are not yet custom orders so feel free to let me know if you would like one made. They also come with a creepy skeleton veil, a total of three skeleton hand hair clips, a big bag of extra wrappings and sewing kit in case you want to add to your creepy self...


More sizes coming this nest week so definitely check the shop or here as I will update as the crafting continues!
New details as of Ostober 14th, 2012: Woot! I have my first Bride of Frankenstein Mummy Wrap Dress of the season up in the shop! It's a size lg/xl and here is the link if intersted- https://www.etsy.com/listing/111319617/bride-of-frankenstein-mummy-wrap-dress
Alright, that one sold but here are more photos. I was very happy with it...


I only had one creepy skeleton clip left over from last year when I shipped it but I did manage to find more so I think I might drop a set in the mail to her. It's more of a precaution as I had a skeleton hand pop off when I made the last dress so just in case you start to fall apart during this years Halloween events, you can still count on a few creepy hands to keep it real.
Here are some photos of the second one made this year. This one was a size 4 and due to the size, was modeled on my mannequin. It was a custom order but I plan on making a few more this next week that are not yet custom orders so feel free to let me know if you would like one made. They also come with a creepy skeleton veil, a total of three skeleton hand hair clips, a big bag of extra wrappings and sewing kit in case you want to add to your creepy self...


More sizes coming this nest week so definitely check the shop or here as I will update as the crafting continues!
I hope you're
having a fabulous day and thanks so much for stopping by ;)
-Lindsay
Nice post! Halloween is my favorite holiday and i really look forward to it. Now, I am looking for cool homemade halloween costume ideas to use this year and you just gave me an idea. Thanks for sharing!
ReplyDelete