Tuesday, August 28, 2012

Halloween Happenings 2012


Halloween Happenings 2012!

It’s not just Garden Gnomes & Game of Thrones…


Can you believe Halloween is right around the corner?! I’m already scared ;) 

Craftzies Halloween Costumes-Quick Guide & Updates (details and more photos below)

Halloween Shipping: *All costumes in the states are being shipped out USPS Priority 2-3 day delivery. International shipping for Halloween orders is finished. You are free to order however I cannot guarantee that your packages will arrive in time for the holiday.

Pebbles & Bam Bam- custom orders are finished. I have a few left over as non-custom orders in the shop and may have a few more but what you see is what you get on those. I have a few custom orders still to be listed but other than a 0-3 month Bam Bam and a few extra Pebbles tunics kicking around the shop, they are sold out. Photos here though :)-
http://www.craftzies.blogspot.com/2012/09/pebbles-mix-match.html

Mr & Mrs Potato Head-one of each were custom orders and I still have to list a custom Mrs. Potato Head as a custom order but other than that, these are no longer available for this Halloween.

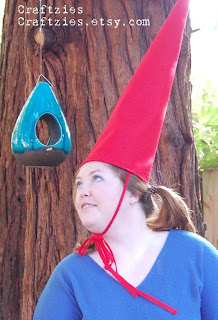
Garden Gnome costumes-I still have about 8 adult male gnome costumes in the standard red hat/ black belt colors. Not all have been listed in the shop but they will soon. I also have about 8-9 female gnome costumes in the red/ polka dot apron style, some but not all are listed in the shop. Details and more photos here-http://www.craftzies.blogspot.com/2012/09/garden-gnome-halloween-costumes.html

*I do have larger sizes for the male & female gnome costumes as well so if you need a larger size you do not see in the shop, let me know, it is most likely finished and ready to ship I just need to add the listing to etsy for you.

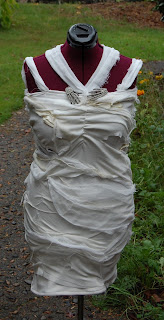
Bride of Frankenstein Mummy Wrap Dresses-I have made two of these this year and I have at least two more that will be listed this week, neither of which are custom orders so if you want one, feel free to send along your size and I can whip one up for you :) Here are more photos and details to get wrapped up in... http://www.craftzies.blogspot.com/2011/09/diy-halloweencostumes-bride-of.html

Game of Thrones - I have one more blue and gold Princess Danni Dress coming up as a custom order, and I am hoping to make two more as non-custom orders so if you are interested, let me know :) I also have a few more costumes coming up so stay tuned, they will hopefully be spectacular!!! (yes, I am forever hopeful ;)  here are some photos and additioanl details while you wait... http://www.craftzies.blogspot.com/2012/10/game-of-thrones-costume-remake-making.html

A little over a month ago FAB Publishing printed the craft book Garden Gnomes and I am excited to have been a part of that project. If you have or are thinking of picking up that crafting book you will find the Craftzies instructions and pattern for the male and female Garden Gnome Costumes for both adults and children listed there ( http://www.craftypod.com/2012/06/06/introducing-indie-craft-books-from-fabulous-publishing/ / my blog post here: http://craftzies.blogspot.com/2012/07/woot-crafting-book-has-arrived-go-fab.html ).


Costumes in the shop this year:


Garden Gnome Costumes: I created these costumes a few years back when searching online for funny Halloween costumes and they have been a hit ever since. These are hilarious and my favorite Halloween costume so if you are looking for a funny costume this might be the one for you and yours. The hats and men's belt are made with felt, and the women's apron is made with a cotton polka dot fabric.  the standard colors being a red hat and a red and white polka dot apron for the girls and a red hat with white silky beard and black belt with yellow buckle for the guys. You can check out all of the details in this blog post: http://www.craftzies.blogspot.com/2012/09/garden-gnome-halloween-costumes.html

Here are a few images of the Garden Gnome Costumes
(Can you tell we were having fun being weirdos in our backyard? It was rather difficult to find images where we weren't laughing too hard. Our neighbors must think we're the strangest...)


Mummy Wrap Dress: This is another favorite costume of mine and one I made 2 years ago for a customer requesting a custom Bride of Frankenstein Dress. Details and additional photos here- (http://craftzies.blogspot.com/2011/09/diy-halloweencostumes-bride-of.html

Below are a few images of the Mummy Wrap Dress
(more can be seen in the link provided above)


Pebbles & Bam Bam: These were quite a hit last year and I just had to make a few more this year as well. Last year I listed the Pebbles costumes as sets, this year since I have a variety of different bottom colors/ styles I am going with the Pebbles Mix & Match and you can find the tops and bottoms listed separately in the shop and additional images and details here: http://www.craftzies.blogspot.com/2012/09/pebbles-mix-match.html
The prices is $17 for the green tunics and $8 for the bottoms, which equals $25 per set and each green tunic includes a bone hair clip accessory.

Here are a few images of the Pebbles & Bam Bam Costumes


The Bam Bam costumes are $25 for the baby/ toddler size sets and include a small round hair piece and a stuffed bat for play. The larger sizes are in some cases slightly higher in price but also include the accessories.

Holly GoLightly Sleeping Mask & Ear Plugs: Inspired by the sleeping costume Audrey Hepburn wears in the movie Breakfast at Tiffany’s, this sleeping mask features a sleeping mask, ear plugs, and is an easy and fun costume that works for the holiday and also makes all your holidays to come dreamier…

Price for the mask is $25, price for the set is $32 including the ear plugs. Here is the listing to order your own mask: https://www.etsy.com/listing/102347897/breakfast-at-tiffanys-inspired-sleeping/Here is a link to order the set: https://www.etsy.com/listing/108012226/breakfast-at-tiffanys-inspired-sleeping/ Here is a link to the blog post, including more images: http://craftzies.blogspot.com/2012/06/inspired-by-holly-golightlys-sleeping.html )

Here are images of both the mask and ear plugs.


Renaissance/ Game of Thrones inspired costumes: I love the renaissance costumes and along with a variety of other costumes mentioned above, you will see plenty of designs for the Game of Thrones / Renaissance fans out there so keep your eyes peeled, crafting mischief is a’foot ;) Prices will vary as will the costume pieces for this grouping. You will however see a lot of dresses, capes & armor-plenty of outfits for boys, girls, women and men, as well as a bounty’s worth of accessories to help make your Game of Thrones costumes rule!

You are going to L-O-V-E the costumes for this section! (so excited!)

 Here are a few images of a cape I made a while back to give you an idea of some of the lovely items you will find in the shop ever so soon! I'm not planning on making white capes per say, but you never know...


the first dress from the Game of Thrones series this year...


I have one more of this dress planned as a custom order, and up to two more that I will have finished in time that are non-custom orders at this time. So if you want one, it's a possibility ;) More photos to come!


*Other fun Halloween spookiness...
(yeah, that’s right folks. Flying monkeys scare the living daylights out of me!!! Happy now?! lol…(cries)…

And then something new-

Isn't this to die for?! (and then live forever...)

http://indulgy.com/post/eosATJTyU1/vamp-bite-cupcakes

Lindsay ;)

Sunday, August 26, 2012

DIY Chewbacca & Big Foot Slippers


DIY Chewbacca & Big Foot Slippers
or (Holy CHEWBACCA this Post is FINALLY FINISHED!!!)


I think the title sums it up pretty well. Let’s get started because I totally love how these turned out and I know you are excited to hear how I made myself one fine & uber fuzzy pair of Chewbacca Slippers & Big Foot Slippers so you can go craft yourself up a pair as well! These can also be modified to make Panda Slippers, Killer Rabbit Slippers, Abominable Snowman Slippers, Narwhal Slippers or even one fine pair of Unicorn Slippers for those of you looking to change the look a little bit. We can go over a bit of that in the end but for now we’re going to make ourselves some Chewbacca Slippers!

The first set of slippers were made for my boyfriend for one very good reason, he just had to have Chewbacca Slippers! Unfortunately, not only were they not available for purchase for adults, but I read online that when made available, they are only going to go up to a size 12 men’s, and he is a size 15 so that wasn’t going to work at all. That left me no other choice but to make him a set of slippers myself.

I purchased a pair of children’s Chewbacca Slippers off ebay and cut the heads off and sewed them onto the slippers. If you plan on doing this I recommend you wait until the slippers have arrived before picking up brown faux fur to match. I finally found a decent match on fur color @ Joannssort of. It didn’t match perfectly but it matched a bit better than the images indicate. If you do not want to order Chewbacca Slippers just to cut the heads off (I realize it seems a bit ridiculous but I wanted my first ones to be perfect!), I have added details on how to make the heads yourself below if you would rather.

I really wanted to offer 2 different ways in which to make these, the first being where you essentially cover a pre-made pair of slippers, and then for the serious crafters, an all out fully handmade pair of slippers for those that don’t like the idea of buying pre-made slippers and Chewbacca Heads and such. Below you will find instructions for both to help you along as well as instructions for making the Chewbacca heads and ways in which to cover a different slipper style than the one I have in the instructions. 

May the (Crafting) Force Be With You…
Lindsay ;)

DIY Chewbacca Slippers 
(using pre-made slippers as a base)
Materials:

Scissors
1 med-large sewing needle
Brown thread
1 pair of slippers (to cover with faux fur)
½ yard brown faux fur
Set of Chewbacca heads
Here is a pair of slippers that look similar to what I used as a base pair of slippers for the project. If you have a different styled slipper, see below these directions for help on altering the style.
http://www.s2999.com/chewbacca-slippers.html This link shows what the original slippers look like. If you like the white/ black eye look it’s pretty easy to replicate by simply cutting out a small oval shape for the eyes and then stitching a small round piece of black fabric in the center of each white piece.


Instructions:
Take the pair of slippers and a piece of paper (newspaper works). Starting at the top of the slipper, hold or pin the paper down and then work your way down to the toe and pin down. Go back up to the top and pin down the sides. Cut the paper out ½ extra to allow for the seam allowance. Then work your way around the sides and then down around the base of the slipper. You are going to want to trim the paper as you go, but make sure you keep about a half inch of paper around the edges. Trim little cuts in the sides as needed so as to round out the curved areas. On the slippers I picked up, they also had a back heel and side area on them so I did the same as the front and sort of molded out a paper version of the piece I needed, leaving a half inch of fabric for the seams on all sides. I started by pinning the paper at the heel and then pining around the sides. You are leaving a half inch at each seam so that you can tuck in and sew down the faux fur.

Once you have a paper copy made lay the faux fur out on a fold and cut out 2 of the large slipper pieces. Ad you added the small cuts to the paper version to get the rounded areas to curve in, you are going to want to do the same here, but wait until you have started sewing down the faux fur down before you cut the sides. Thread your sewing needle and starting with the top of the slipper, take the front faux fur panel for the correct foot, fold over the faux fur about half an inch and lay it over the slipper at the top where the top of the slipper starts. Sew the faux fur down across the top of the slipper and down the sides. When you sew the fur down make sure you keep all stitches very tight on the inside so when you slip your feet in your toes don’t get caught up in big hand stitches inside. No one wants that. My toes don’t even like thinking about that so take care to not have big stitches on the inside.

I also found I didn’t want big stitches on the outside unless I pulled fur out from underneath the threads. In many cases though slipping the needle through one side and then back in through the foamy slipper part and then out the other side in a different area worked the best. This will take time to hand sew but work your way down the sides, keeping the fabric folded down the sides as well. Next begin to hand sew the fabric down starting in the front center top and working my way down the front of the slipper until you reach the toe. Sew the front toe area down and wrap the fabric up and under a half inch. You may have to trim some of the faux fur at this time. Once you have the toe area sewn down work your way around one side, folding and sewing the hem of the fur up and under. As you go, make small incisions like you did with the paper version so the edges round more easily. Work your way down and around one side until the fabric is all sewn down and then go back toward the toe area and do the same thing down and around the other side. Once you have done that, fold and sew down the extra pieces of faux fur to the heel area, and then do the very same thing to the other slipper.

Once your slippers are well covered in faux fur you are going to want to take your Chewbacca heads and sew them onto the top front of your slippers. As you do this, take care not to have any large stitches on the inside of the slipper so as to avoid getting your toes caught up in the slipper. Repeat with the other foot and wha-la! Your Chewbacca Slippers are now complete! 


Making changes to a different styled pair of slippers
If you have a slipper style different, you are going to want to alter your pattern slightly. For the pair above, instead of separating the front upper piece with a side/ heel piece as shown below, you will want to have upper slipper probably all one piece. I would start by measuring the length of the foot, adding 1” for seams, and pin the fur in the center of the fabric to the top of the slipper area. I have marked that area with an asterisk in the image below.
Next I am going to cut 1” out from where the seam is around the top of the slpper and around the sides and close down the heel. Pin the fur at the heel areas and then begin to flatten out the fur starting at the asterisk top and moving your way down the top towards the toe and pin at the toe, trimming the fabric at least ½ so you can tuck the fur under and it won’t come up and fall apart on you later. I recommend pinning and working your way both from the heel in and trim the tow outward evenly so you can trim, snip and fold up so it’s clean.


DIY Chewbacca/ Bigfoot Heads
(to add to slippers or something equally awesome ;)
Materials:
Scissors
med-large sewing needle
Brown thread
2-4-5” diameter circle pieces of brown faux fur
Small round black pieces of fabric to serve as eyes-the size of a dime or slightly smaller
(optional) small white oval shaped fabric pieces

(optional) small tufts of a lighter brown faux fur for the very top of the Chewbacca Heads


Instructions:
Take one of the pieces of faux fur and wrap it into a round shape about the size of a tennis ball or slightly smaller. Figure out where the eyes are going to be on the front top and sew them on. If you are adding bit of a different colored fur on top add it at this point. If you are adding plastic eyes follow the instructions on the package but essentially you will make very small cuts in the fabric, put the eye on the outside and the backing on the inside and you have eyes. Once you have added the eyes and any extra fur to the Chewbacca head you will want to tuck the ends of the fur into the back so you have a little round fur ball and sew the back up. Repeat with the other Chewbacca head.
*Here is a link to a search on Chewbacca Heads to help you along


Complete DIY Chewbacca/ Bigfoot Slippers


Materials:
Scissors
1 sewing needle
Brown thread
Paper
½ yard brown faux fur
Set of Chewbacca heads or see above to make your own
1/6 yard or less-1”-2” thick foam (measure out length and width of each foot and purchase the correct amount based on those measurements)
Batting 1/3 yard *perhaps slightly less depending on the size you need
Soft fabric for the inside of the slippers-you can use suede cloth for the base of the slippers, or a cotton fabric or even a thinner faux fur or fleece really. I would recommend however it not be a slippery or stretchy fabric as such a lining can cause you to slip and we don’t want that.

Instructions:
Okay, so before we get started I just want to say a few quick things on making slippers from scratch. Sometimes, if you are not careful, they can turn out absolutely terrible. I am speaking from experience on this one but the good news I have worked out some fundamental flaws from the past ‘slipper makings’ and now I think I have it down. I will also say this. I was not thrilled with the quality of the original children’s Chewbacca Slippers that I ordered. They looked really cool, but they just didn’t feel all that substantial. I know because I slipped my feet in to see how small they were when they arrived and the foam lining with the thin lining fabric needed a little bit of an upgrade in my opinion. So therefore, don’t worry if your new Slippers turn out less than perfect because they will be much higher quality than the children’s version sold online. How about that for an incentive? ;)


With that being said let’s get started. Take the foam and put your foot on it and trace with a marker around your foot-either one will work-about ½ outward from there for a little wiggle room. Next cut the foam foot piece out, lay it over the other piece of foam for the other foot and cut that one out so you now have a foam piece for each foot. Once you have the foam pieces cut out take one of the foam pieces and the paper and place the foam foot in the center of the paper and wrap the sides of the paper up and around Take the brown fuzzy fabric and lay it out wrong side up-*but make sure the grain for the fabric is facing forward toward the toe. 

Lay the foam over the faux fur, and wrap the fur up and around the foam about ¼ and then cut around this perimeter all the way around the foam slipper. Flip this piece over right side up and then cut another piece for the other foot.
Now you have 2 foam pieces and 2 bottom fabric pieces. Place the bottom faux fur pieces aside and one of the foam pieces. Take the other foam piece and lay out a fabric you are using for the bottom inside lining and cut out ½ wider than around the top of the foam piece. Flip this piece over and cut out another piece for the other foot. Now you need to cut 2 pieces of fabric for the top half of the slippers, as well as a matching piece of batting for the inside of each foot. All pieces for the slippers are now cut. 


Take the brown fuzzy fabric and lay it out wrong side up-*but make sure the grain for the fabric is facing forward toward the toe. Lay the foam over the faux fur, and wrap the fur up and around the foam about ¼ and then cut around this perimeter all the way around the foam slipper. Flip this piece over right side up and then cut another piece for the other foot.

Now you have 2 foam pieces and 2 bottom fabric pieces. Place the bottom faux fur pieces aside and one of the foam pieces. Take the other foam piece and lay out a fabric you are using for the bottom inside lining and cut out ½ wider than around the top of the foam piece. Flip this piece over and cut out another piece for the other foot. Now you need to cut 2 pieces of fabric for the top half of the slippers, as well as a matching piece of batting for the inside of each foot. All pieces for the slippers are now cut.


Take the pieces you just cut out for the top of the slippers and sew the batting along the straight edge of the underside of the inside lining piece. Repeat with the other foot piece. Next take the top piece and place it so that the top piece and lining piece are facing each other right sides together (the batting will be on the top of the inside lining piece) and sew along the straight line. Flip the pieces over so the faux fur side is right side up and the inside lining piece is inside (and batting hidden inside) and stitch around the sides and around the front of the slipper top and then repeat with the other foot. Then take the inside bottom foot piece and sew the top piece to the inside lining piece. 


Place the slipper tops aside and take the bottom faux fur pieces and begin to sew little gathers around all edges of the bottom piece except for the inside foot area so you are essentially making a little fabric bowl for your foam foot piece. Repeat with the other foot.


Once you have the foot pieces made for each foam piece, place the foam pieces inside the faux fur to test the size. If they fit you’re good. If the foam pieces are a little big, trim so the foam pieces fit inside perfectly and then remove the foam pieces.
Next you are going to want to take the top piece to one of the slippers and the matching bottom faux fur foot piece and line it up so that the top piece is wrong side up and the bottom fur piece is right side up and then begin to sew around the edge of the slipper from the toe outward toward the heel, leaving about 2-3” towards the heel and then sew back on your original stitches back toward the toe and up and around the other side, again leaving a bit on the other side toward the heel because you are going to want to have enough room to fit the foam piece inside and then sew up the heel area. Before adding the foam insert flip the slipper right side out and take a look at those seams. If you need to repeat your sewing of the inside seams flip it back inside out and sew inward from the original seams you sewed about ¼ in and then flip it right side out again. Repeat with the other foot and then add the foam.


Once you have the foam pieces inserted then sew up the heels, pinch in the edges of the fabric and sew the heel seams clean. Once finished, sew the heads on and you are all set. Woot! You have yourself a new pair of slippers. Don and model

You are officially finished! You're so crafty....
Lindsay J

Modifying slippers are as easy and changing the heads and base fabric. The best way to get ideas is to search the internet...

For example:
Killer Rabbit Slippers: https://www.google.com/search?q=killer+rabbit+slippers&hl=en&rlz=1C1CHKZ_enUS434US434&prmd=imvns&source=lnms&tbm=isch&sa=X&ei=BLU7UIKsOeGzyAGFsoHgDg&ved=0CAoQ_AUoAQ&biw=1527&bih=877

Unicorn Slippers: https://www.google.com/search?q=killer+rabbit+slippers&hl=en&rlz=1C1CHKZ_enUS434US434&prmd=imvns&source=lnms&tbm=isch&sa=X&ei=BLU7UIKsOeGzyAGFsoHgDg&ved=0CAoQ_AUoAQ&biw=1527&bih=877#hl=en&rlz=1C1CHKZ_enUS434US434&tbm=isch&sa=1&q=unicorn+slippers&oq=unicorn+slippers&gs_l=img.3..0j0i24l6j0i5i24l3.51547.57742.0.58490.23.16.7.0.0.0.96.1402.16.16.0...0.0...1c.GiaGvdkrADw&pbx=1&bav=on.2,or.r_gc.r_pw.r_cp.r_qf.&fp=fda717838f05e3f&biw=1527&bih=877

*Nothing decent comes up for Narwhal Slippers people...)


*Other Chewbacca / Bigfoot things I like (for inspiration and all ;)

(this next one was weird)
and the Chewbacca Messenger Bag
http://majorspoilers.com/wp-content/uploads/2012/07/image004.jpg


and then the slippers in the link below are the cutest 
(as is the little munchkin modeling them :)

http://markgillianaksel.blogspot.com/2011/07/jellies-jams-and-bigfoot-slippers.html

Thursday, August 23, 2012

Sophia Mini Movie


Hello Everyone! I recently made a mini movie on a variety of handmade clothing from my Sophia site and wanted to share. Sure some would say perhaps it’s more of a slide show but I’m going to call it a movie (it is video software after all that I’m trying out) and you’re all just going to humor me. You’re lucky I left off the clapping and rounds of applause at the end, it really was a toss up but who wants noise when they can silently look at pretty pictures online right? You’re welcome ;)


Here’s a link to the site: www.SophiaDeLaMer.etsy.com

I just wanted to add a quick note on some of the images. Though I now have a few mannequins in which to display items, some of the images are from earlier on when smaller sized items may not have fit my sewing doll, in which case you see the items displayed open & unzipped (such as the It’s Raining Buckets Rain Coat when on the sewing doll) or elsewhere such as hanging up or laid out on a table. Photos of better quality are always a priority and you will see new images added as more items are made. In the mean time, I hope the images shown help show some of the items you can have custom made from the shop.

Any questions definitely ask and have a sweet day ;)

Lindsay