What's Crafting?

What's Crafting?
Click here for this weeks updates...

Search This Blog

Thursday, September 25, 2014

Dreaming Up a Dragon Scale Tunic

When I set about constructing a Dragon Scale Tunic in similar style to the one worn by Khaleesi in season I of the Game of Thrones Series I knew it was not going to be an easy task. Now that I have finished constructing one I will admit that it was a very time consuming process. It was a fun one but it did take a while to dry so if you are thinking about constructing your own the instructions below should help you out but do keep in mind a few days in a dry place is definitely going to be needed before this is ready to be worn.

I really wanted to do this piece justice. The original is magnificent and I asked myself a million times I was going to be able to replicate it. In the end the only way I could think of was to take strips of suede cloth and cut the zigzag on the ends and sew it to a base layer. It seemed rather exhausting to me but I just could not find a fabric, print or otherwise, that seemed to work so I did just that.

Materials list:
-> base fabric used was comprised of both a light colored tan knit and a basic cotton. I would recommend using both and you will want 1 yard of the knit (give or take a little), and 
-> 2.5+ yards of suede cloth fabric. 
-> thread
-> scissors
-> wide band elastic-2"+ wide, 1 1/2-3/4 yards (*wide elastic that is 2"-2.5" in width is fine. If you have both I would recommend going with the wider elastic for under the bodice and the wide back strap. Slimmer -> elastic  can be used around the waist. 
-> sewing needle
-> a whole bunch of paints, I really like the Martha Stewart metallics but go with what you've got. 
-> paint brushes (painting this tunic once sewn becomes a messy project so you will also want a messy space to work, gloves and old clothes. Plan on hanging or laying this out for a day or two to dry out before using. 

Costume pattern pieces:
You are going to want two identical panels of solid cotton for the right and left side of the tunic, I will refer to these as the side bodice panels. These panels will extend from the back shoulder area around the front and down the front sides of the tunic. You also have a front bodice panel. You have two side panels. Your last piece is going to be the back horizontal panel. The scale overlay is additional and goes over every piece listed above except the strip that goes across the back. 


Instruction: 
Cut out a front panel piece for yourself out of knit fabric and add an additional 5-6" at the top before you cut the fabric. There will be a nice shape constructed of this piece but due to the dragon scale overlay added first, this can be a bit of an oversized rectangular piece, about 12" x 22" or something similar. 

You then want to cut out a piece for the side front panel. This piece will be rectangular and will start from the bottom hem in front where it will meet the center front panel and then goes up to the shoulder and then around the back half way down your back. You can guess and cut this piece big but keep in mind you want to add a 1/2" seam allowance for around the inside shoulder area and you want to assume that the top of the shoulders will extend outward about 3.5-4" from your shoulders. That means you want to cut a rectangular piece that is as wide as your shoulder extends outward + 1/2" seam allowance for the neck seam + 3.5-4" additional for the shoulder extension outward. Again, cutting big and trimming it down as you work is going to be very helpful when constructing this costume. 


Once you have the shape of one side then you will flip it over and lay it out over the other piece of fabric and cut the other panel. This base gets nipped at a lot once the scales are on it so there is no need to perfect at this point with the base.

Then you want to cut out two side panels an put them aside. 

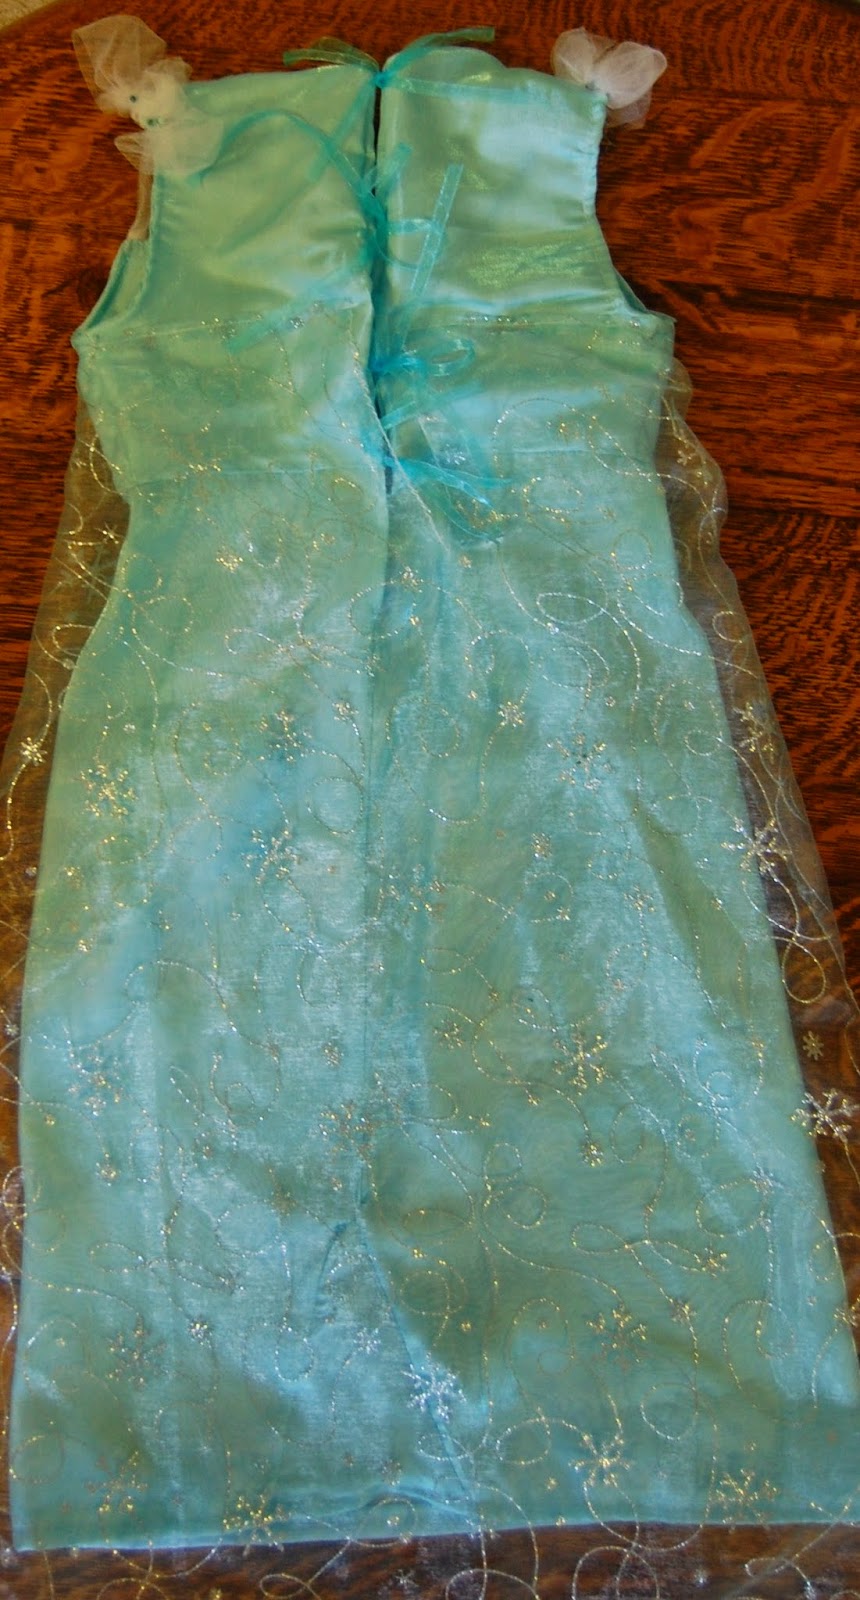
Now that you have all of your base panels cut except the back center piece you will want to take the suede cloth fabric and cut strips and snip out some scales.  I cut the strips about 4" wide so I could have sharp dragon scale points to one end and the other end would be up enough so it could be tucked in under the layer of scales directly above.


This is what you want your scale strips to look like. Cut out a lot of these strips, each one being as long or slightly longer than each base piece added. Cover all of your pieces with the scale layers, working from the bottom up and when you add another layer sew it so that to sewing stitches are showing. I had about a 1/2" between layers, in some cases perhaps slightly more. The ideal scale for this type of tunic is going to be with a zigzag pattern to the scales of half an inch apart, go with moderately tight cuts. Around the sides of the tunic I went with larger scales however the tighter the scales the better it looked overall. 

Attach the scale panels to the base everywhere. You also want to continue the scales about 4" past where you are going to fold over the bodice. You will cut the area and sew it down on the underside once it has been painted but for now assume a few additional inches for now. Around the top shoulder blades going out on each side add a very narrow scale strip. Not only will this mark for you where the shoulder blades should rest on your shoulders but similar to the images. Take the center bodice panel and cut yourself a piece that is slightly more narrow around the waist than the top. Slim out one side and then fold at the center and trim the other side to ensure the sides are equal. The layers with the scales are going to be rather slippery and difficult to sew together. 


Despite my best efforts the center bodice and side front panel were sewn together a little off, the layers slipped a bit and in the end it became curved and slightly off center around the lower front. I just went with it and didn't fuss to much but just a warning there, slowly sew these vertical seams and when sewing and trimming to get a tighter fit be sure not to do this and it should work out a bit better. In the end if you want to even out the bodice so it looks like there are no vertical seams then you will want to take some of the extra scale pieces and tuck them in under the scales and glue or sew them in. I did not do this however this would be the best way to make the front appear seamless. Sew the additional scales in by hand or glue them with fabric glue. 

After you get the shape to the center bodice then you want to sew it to the front side panels. Attach at the front bottom hem and work your way up. Sew until you reach 1/2" upward of where you want the bodice to come up to. Do not worry too much about this area. It does become a bit more workable as you work on it. I just say this because I did have a difficult time at first and then just went with it. Using the knit fabric for the center bodice helped me alter the slant of the center front a bit and manipulate the scales so they fall well. 


Add the side panels to the front side panels and add the back center panel to the left side. The right side will eventually get a hole cut and/ or an eyelet added and lacing to close up the back on the right side. You will want at least one hole cut on the upper and lower corners of the elastic back tab in back on the right hand side. If you do not want holes for lacing then I would suggest velcro to hold the back in place in which case you will want it facing on the backside of the elastic back tab and in the inside of the right side of the back of the tunic.

On the inside seams trim any excess. Fit it to your body and see how it works. If there are any areas that need to be tightened up do so now except the extra few inches you left at the top of the bodice. This next part is optional but I lied it. Take your wide elastic and make a casing out of extra fabric. Attach it at the upper side on a slightly downward slant and bring it around the front and sew it to the other side in the same way. Take a tape measure and measure from the back side area of one side of your waist all the way around to the opposite side. Cut a piece of elastic and make a casing for the elastic. Attach the elastic around the inside of the piece, starting at the back side-about 3" in from where the back panel begins. Sew the elastic in around the inside of the lower waist. Take your thread and sewing needle and hand sew the casing to the tunic in various areas so that the elastic will pull the lower waist closer to you while it is being worn. By adding both of these elastic panels you get a bit of lift to the upper bodice and a decent amount of shape to your torso. 

Take a strip of elastic that is about 6" or so and use a bit of the suede cloth fabric and make a fabric casing. Sew the casing on the back left side to the back-side. Sew a vertical stitch to hold the elastic in place inside the casing but leave it open on the right side.


Now it's time to paint this thing. Take the paints and dyes you plan to use and gloves, a messy place to work, and set up a place to hang and dry it for a while. If you go with a black or dark color for the outer fabric then you can skip darker paints and instead just lighten the ends of the scales. This is what I will be doing as a test when I make the next one. I would also recommend bringing a bunch of extra scale remnants with you when you go to paint the piece because painting a few extra scale pieces that you can use throughout the costume if needed when finishing it up will come in handy. You may want these to make the bodice seams seamless or for adding a few pieces to extend the torso if needed. By adding the elastic to the waist so that it hugs your body brings the tunic up a bit so plan on it being a little longer and you can easily snip out scaling as desired later on once painted. 

With this first one I used a tan suede cloth and dropped it in a few darker colored dye buckets like brown and purple just to get some initial worn out looking hues to it. This took days to dry but in the end it did tone it up nicely. Then I treated it to a series of different pigments, and I spread color throughout. So I would pull out the emerald green and paint some in different areas as I imagine a dragons varying coloring would be. If your base scale fabric is black then leave it black around the narrow dragon scale marking the shoulder areas. If not then add black paint. I added black paint. Then I would mix in some gold, lift those scales up and get color underneath. Add some silver in, some burnt sienna, mix in some gold with a bit of sparkle blue. Just mix it all in. Anywhere there were sewing stitching marks, and you are bound to have a few, just paint over them. 


If you do a decent job the first time you may find you do not need to go back and treat it again. I treated mine a series of times, allowing the fabric dyes to soak in and dry and then adding the various paints. 

Once your piece is entirely dry then you want to tilt the bodice into a slightly slanted position and hand sew the inside down. Fold over and hand sew the inside neckline going up to the shoulders. If you care to you can continue to fold over and hand sew to get the edges a bit more tame but I just left mine a bit ragged. Cut small holes or add eyelets and lacing in the back to pull the back a bit tight and lace it up.


Happy Crafting!
Lindsay 


Monday, September 22, 2014

In a Quarth State of Mind


A few years ago I crafted up a Game of Thrones Khaleesi Quarth Inspired Gown where I added instructions and crafting tips on how to make the costume yourself. Over the years that post has collected a great deal of add-ons in which I discussed details in relation to selling the item. That blog post was way too long so I decided to split it up and this post will be on the sale of the item where as that post is on the construction detail.

If you are looking for the blog post on how to construct the costume yourself then this is the link you want -> http://craftzies.blogspot.com/2012/10/game-of-thrones-costume-remake-making.html


If you are considering ordering the costume from me then this is the blog post you want. I have sold many of these of the last few years and in a variety of sizes. Construction has changed ever so slightly over the past few years to the point where I have a materials standard I go by. All costumes are dyed in the same light blue fabric dye colorant, made of the same materials and in the same way. The only differences you may find between costumes would be that a costume for a smaller size will have slightly slimmer shoulder blades and belt, and if a very small size, will usually have a fin of extra fabric added to the lower back of the gown, hidden under the cape and this will help with movement around the lower skirt when walking.

The costume comes with the blue and gold gown with the attached cape, the gold shoulder blades, matching belt and a set of foam stone garlands that hang in front. The foam stone garlands have earring facets on the end in which to hang the garland off of the belt. I include extra gold twine in case you need it however you should find that if you are planning on tying the garland to the belt once it arrives that there is enough twine on the end in which to tie the facets to the belt. This is for the adult costumes. For children’s costumes, which are at times sold when a customer contacts me, I do not include the earring facets on the end. I leave the ends with a little bit of extra gold twine so that they can be tied to the belt once the costume has arrived. This is safer for the little ones.


Sizing: When placing an order I ask for a few details so that I can make your gown the correct size. I ask for your clothing size, your measurements of bodice, waist and hips, and your height. When it comes to the style of this gown, you can expect it to seem a tad bit oversized initially and that is because this gown is a shift styled gown, meaning it falls straight down with no real shape to it until you add the belt. This gown needs to be wide enough so that you can pull it over your hips easily and have room in the leg area to walk. I have on many occasions received comments such as “I want this really form fitting, really tight in the bodice” and despite such requests, that is again simply done with the belt added and based on the style of this particular gown, I can only slim it down so much.

Size varies by US, UK, Euro for the most part so I may clarify your size if internationally located. In some cases I may confirm measurements if I want to just make sure. Please understand that my ability to make the right size gown is based first on your size and measurements sent. The rest is then up to me.

*click this image to enlarge


Construction Time: Unless listed as a ready to wear item in the listing, all gowns are custom listings and take 1.5-3 weeks to make. The listing you are ordering will say how long your wait time is, it may only be a week depending on the season and my current orders. Currently it is set at 2 weeks or sooner-as of 9/22/14. If this changes I will notify you both here and in the listing itself so it is clear to you when placing an order as I know many of you are coordinating with conventions, parties and the like throughout the year.

In order to cater to the vast majority of customers I needed to establish a standard in relation to what I offer for this costume meaning that I needed to decide how I was going to construct this costume for the general public. I decided to leave the sides and front bodice open low as in the original. This way it is as the show and the customer should know that if they find it too revealing when it is on, they will be expected to sew up the sides and bodice ever so slightly themselves.


I put every single costume made on a mannequin that is size appropriate to the measurements sent so that I can see how it falls and fits with belt and everything together. I pull the belt tight and lace it and then add the wings to the underside and in many cases, sew up some of the sides and bodice based on customer requests that come in. Customers in many cases send requests such as “please sew up the sides and front a bit more for me” and things of that nature. When on the mannequin and belted I do my best to make these openings perfect however I cannot guarantee that they will be exact to what you want. In order to cater to the vast majority of you, and with my best intentions at heart, you may still need to pick up a sewing needle and a bit of thread and make a few alterations here or there. 

Due to this, I sell this costume lower than others despite the hand dying, hand painting, hand cutting and overall blue feet and gold t-shirt stained self, so that you don’t freak because you paid $300+ for a costume and had to pull out a sewing needle and tack up the bodice slightly. This is my way of compromising with my customers a bit I suppose. This small amount of hand sewing to alter the gown is not difficult. It only takes a few minutes to alter these areas, and that is if they are even necessary. The way I look at it, if Don Draper (yes, from Mad Men) can sew a button on a shirt then a customer can alter a few areas if she feels she needs to, none of which is more challenging than sewing a button on.


Alterations: If you find your underarms are too low and revealing you will want to sew them up by hand sewing from the bottom of the area upward toward your shoulder. You will pinch the fabric seams together and sew upward, ¼” inward from the outer edge. Sew up to where you want the arm opening to be. Do the same with the other arm opening, comparing it to the other side to make sure they are even.

With the bodice you will do the same, pinching the seams together from the lower area upward until you want the opening to be. If you want the outfit to be revealing while also not having a wardrobe malfunction, you will find there are a number of items on the market such as body tape in which to hold costume areas in place. I have not used these before but I know they are available at shops like Joanns and probably even the drug stores in some cases.

If you find your cape is not falling smoothly in back then you will want to carefully snip out the hand sewn thread that has held the wings onto the gown  (not the cape-just the gown), reposition the wings, and tack on once again. The cape is connected to the gown at the shoulder blades but is again attached to the gown by way of small fabric wings sewn on the underside of the cape. This is similar to in the show with the purpose of keeping the cape from pulling out too far from the gown. When attaching the wings to the gown keep in mind that they are attached to both the outer sheer fabric and the lining.


I like to mention this about some slight hand sewn alterations you may need for the sole purpose of being up front with you on what you can expect when your costume arrives. I want you to be happy with your order and I want your costume to fit well. No one wants to be running around in a nightgown fit for an elephant and so it is the intent of this blog post to offer you details on what you can expect when your order arrives.

If however you have any issues with your order please let me know. I had a customer once leave a comment in which she wanted a return and never got one because she felt the costume was too big. Despite a sizing issue, I am always left in a state of wonderment over this since in reviewing the details, she had been offered a return from the very start, all funds including the payment to ship the item back were sent. I also had a customer say once that she never received her item and it was too late for a refund. This is absolutely not true. There is no way someone could be in business like I am, working online in such a transparent manner and have a bad business rap like that. If, and in that particular case, the postal code was entered wrong and the post office shipped it to..well, I’m still not sure?, the customer had the choice of a return (goods might still be MIA but I would return funds as her item was never received and the post office wasn’t sure where it was), or she could be offered another costume. She picked the costume choice and her new costume was again shipped out, this time with a check that the postal code issue didn't happen again. 

And so in short, not to make it sound as though I am perfect because none of us are, if you have any concerns as to whether you will receive a costume when you order one or in time for an event, the answer is yes! Despite being beholden to the postal service just like everyone else, I am very familiar with shipping within the United States as well as internationally. I know their shipping details very well, I know how long it will take me to make a costume in the heat of summer or throughout monsoon season and have it ready to ship, and I know how long a package should take for a costume to arrive. 

This is the very first costume I made. I would today consider this to be a larger size, more like an xl, and this was before the bottom hem was finished. When constructing the first gown I wanted it to be flowy and big enough to fit on my sewing doll. It fit, even if it appears a bit oversized. The images shown on the plastic mannequin are of smaller sized costumes in which the gown is too small to fit on the sewing doll. 

Pricing: Pricing for this costume is $135 + shipping for the entire costume in the adult women's size. For baby khaleesi costumes the price is $45 up to a size 2/ 2T, and $55 for a size 3 to size 7/8. Junior sizing is the same as adult pricing.

For those interested in separate costume pieces, please contact me for a custom listing. The gown is available without the shoulder blades, belt and garland for $105 (just the dress with the lining and the  attached cape). Separately the belt is $40, the shoulder blades are $25, and the foam stone garland set is $23.

Shipping: All packages shipped within the United States are shipped out usps priority 2 day delivery (once finished and packaged, which is part of the construction time), except for locations such as Hawaii and Alaska, in which case the shipping time will be more like 4 or so days for delivery. All international orders are shipped out first class if they are under 4 pounds. I ship to Puerto Rico but it takes 8-10 days to arrive. IPO's take longer and depends on your location but you knew that already.

If the package is more than four pounds then it will have to be shipped usps priority. There is no tracking offered for international packages unless the customer wants to go with usps express. A few countries offer tracking with the service of usps priority, however most do not. If you know for a fact that your country will offer tracking for priority packages, then you are free to upgrade to priority shipping (instead of express) and I will provide the tracking number once your item has been shipped. In most cases for shipping upgrades I simply send you a shipping listing to order on etsy for the additional funds. 

All khaleesi gowns weigh a little over a pound so they are shipped first class. First class does not provide tracking of any kind, and all I have to provide proof of shipping is the receipt and customs form. If a package has not arrived it can be tracking by way of the customs number. This is done through the postal service and may take a few days possibly in order to find out if it was marked received or returned, or in a strange case I suppose, marked lost. If the postal service says that the item was lost or returned, the customer will be offered a return or I can make and ship a new costume and I will handle the ‘finding and return’ of the original costume with the help of the postal service. 

If however your costume was marked as received by your postal carrier, then I will not be held responsible, just as I am not responsible for any sales or taxes imposed on your package from that of your own country. This has not come up before but if it did, that is my policy. In regards to taxes , here in the US we do not have it where, if we were ordering something internationally, you would have to pay a tax on the item. I do know however that certain locations like the United Kingdom do and in many cases, a customer will not receive their item in their postal box but instead receive a note saying they must go to their local postal shop and pick up the package while also paying the tax on the item. These are the circumstances I am referring to in which I have no control and can only offer you information as I have received it from customers or the postal service prior to your order.


For usps express shipping -> This service provides tracking for the package, which seems to be updated every few days as it passes through postal check points and then at customs. It is then up to the policies and procedures of that country’s customs department to upload tracking details.  You can expect express shipping in the US, which is usually 1-2 days for arrival, to have a tracking number and I always allow for the package to be marked left at door so that the customer needs to be mindful that their package will be left at their location if they are not at home. The customer can expect to pay a total of around $25+ for express shipping. Rural areas throughout the country and locations like Hawaii and Alaska should assume an additional day or two for delivery.

For international orders with the request for express shipping please note that shipping is subject to your country’s customs and delivery times. This is the same as first class and priority international shipping however the price for this shipping service is around $50+ to ship expedited. The rate of time on average seems to be around 8-10 days to locations like the UK, perhaps longer to places like Italy. I personally am not entirely convinced that express packages arrive any faster but some customers do want tracking, while others want the package faster that regular shipping time as they know their package will arrive quickly. I would say based on experience that in the states express shipping is very quick and is as close to overnight delivery that the postal service provides. For international orders however, I do wonder at times so I will offer it if the customer wants it, however I honestly cannot promise that the package will arrive in the exact time they say it will.

For domestic US shipping the rate is $12 (or less) for priority 2-3 day with tracking. Some states such as HI may take a few additional days for delivery.

For International shipping the standard rate is $18 to Canada and $20 elsewhere (or less) for First Class (no tracking available) with an average delivery process time of approx. 12 days. The postal service says the shipping time is less that that however my experience has been that it takes a little longer. The postal service estimate is based on what they expect customs will take for delivery and every country is slightly different with their policies. 


Final details: I used to include a sewing kit with every order however I worried that including it was slowing down the packages at customs so I do not include them anymore, just a small little notions bag with some extra thread and gold twine if needed. Please keep in mind that you may need a sewing needle, scissors and some thread to make minor alterations once your costume arrives.

Can you get a custom costume still in time for Halloween? 
Yes! ;)

I think I covered all of the details however if you still have any questions please let me know on etsy at www.Craftzies.etsy.com and you can find the costume for sale directly via this listing -> https://www.etsy.com/listing/196755374/game-of-thrones-themed-princess-daenerys?ref=shop_home_active_2


Lindsay J

Monday, September 15, 2014

Halloween '14

I love Halloween! It is such a fun and creative, festive holiday and when else can you wear pixie wings and witches hats and well, whatever you picked as a costume?! I live in Portland so maybe more than one would think, but never the less it is still a fun holiday.

I am still working on finishing some costumes, and will be for a few weeks now, but never the less I did have a chance to list a few new costumes on etsy today. Here are additional photos of some of those items.

Here is photos of my personal favorite, the Purple Fairy Princess Dress and matching Wings.

The above image is of the front with little lacing-looking detail at the bodice.

At the back I added fins that pop out and four sets of ribbon bow lacing for closure.

I made a set of wings to go with...

Inside the sleeves are little purple lace strips to give off a cute look. They move around a little when the fairy princess moves about.


This is a little Green Fairy with wings...

The fabric is a silky rayon/ poly blend. I had some left over from a top I made. I like the soft, weightlessness this fabric offers. Very comfy for little fairies.


The sash has a small amount of beading for accent around the front waist and wings with fabric accent for detail. These wings go on with ribbon bows around the arms. 


I love that big bow in back. Too cute!


The size of this dress is a 3t though without the sash it has the potential to reach a 4 in size though I do have measurements in the listing on my etsy site. 


Please excuse the little bit of blue padding popping out the back. The back is a lot less slouchy when it's on a human child.


I made an Elsa inspired Princess Gown in a size 2T.


The cape was hand dyed to match the blue dress


The colors in the images change slightly though the images outside show the truest color, light blue with white lace at the bodice. The tulle at the shoulders is white with a small amount of hand beading added.


I cannot adjust the height of the arm on this stand but the dress falls 23" in length.


The back closure is via ribbon ties long enough to tie into bows. Adding ties makes the dress a little more adjustable in size around the midsection, it makes for really cute bows and it is easy to close up.

Here are photos of the Stinky Pirate Baby Costumes ->


These are ready to ship and available in a variety of baby sizes from Newborn to 12 month. The set includes the striped bloomers, the white tunic, the red sash and the eye patch. You tie the eye patch so it fits well. The bloomers have elastic around the waist and legs and the tunic has raw edges around the sleeves, and laces around the top center. The sash shown is a red silky fabric with a small yellow diamond print added. I also have a red solid cotton sash if you would like that as well, and I can make additional sizes as bloomers or as capris. The capris look the same only without the elastic around the legs.


I recently made a few Bride of Frankenstein Mummy Wrap Dresses. This one is in a size Ladies 4-6 available as a ready to wear/ ship item. 

The costume includes the bag of extra mummy wrappings, a hair clip veil and a set of two skeleton hand clips.


This one shown below was made as a custom order and the skirt is longer and more similar to the original. it has a nice little hidden slit up one leg for easy walking purposes though I doubt anyone but you will notice with all of those wrappings. The dress with the wrappings falling long is a total 60 in length. That is from the center bodice so you very well may have to trim the ends if you find it is too long. 


Here is a link to a past blog post on how to make your own and additional images of this costume. http://craftzies.blogspot.com/2011/09/diy-halloweencostumes-bride-of.html

Here are a few links to other costume posts if you are looking for ideas for costumes. 

Game of Thrones Blog Posts ->

Khaleesi inspired Silver Satin Wedding Dress 


Khaleesi & Khal inspired Wild Dothraki Riding Outfits


Khaleesi Quarth inspired Gown


Khaleesi inspired Blue Warrior Travel Outfit and Battle Leathers


*I finally finished the Khaleesi inspired Dragon Scale Tunic. 


Here is the post with those details and additional images ->

http://www.craftzies.blogspot.com/2014/09/dreaming-up-dragon-scale-tunic.html

Additional Halloween posts: 


My etsy shop is www.Craftzies.etsy.com. 

Lindsay :)