In honor of Khal, the man of few words, here are the basic instructions on how I made a Game of Thrones inspired Khal costume.
Many thanks to Khaleesi Tara and her Sun & Stars as
they requested a matching set.

Any questions feel free to ask. This time of year I
am super busy with costumes so I like to divert all messages to either questions
here on the blog or via etsy @ www.Craftzies.etsy.com.
Thanks so much for stopping by and happy crafting!
Lindsay
p.s. Please don’t mind any tape that is showing in
the photos. It turns out it is really quite difficult to keep slippery
costumes up on plastic mannequins, especially when they don’t have a backside
:p
Making The Khal
The costume pieces shown are the fur pelt, the Khal Warrior Top, Dothraki Riding Chaps, Waist Wrap, Tribal Pelt (front black feathered panel), Silver Belt, Arm Guards + hand wraps, and Blades. *The Blades are not shown with the warrior top. Khal is going to put the costume on, mark where the cuts should be for his size and such and then score the slits and then the blades will slip inside the top.
*materials used are broken down by costume piece
below.

Pelt-A
small amount of fabric in a long rectangular shape will be needed. Fold up the
bottom all but 3 or so inches up, sew the side seams and then fold over the
top. For the pelt shown I then made a bone tooth from polymer clay with a hole in
the top and then tied the tooth to the front to act as a button and tied a
black satin rope for the handle. Once Khal receives his costume he will be able
to adjust the rope as desired.


Materials:
small faux fur type fabric, thread, rope for the handle and if desired to make
the tooth, polymer clay in white or natural color, tin foil and a baking pan,
oven and follow the directions on the packages for the clay, it is usually 275
for 15 minutes. Remove it from the oven, let it set for a while as it will be
slightly soft once removed from the oven. Paint it as needed with gloves on,
paints you want to use-I used gold, brown, a dash of white, black, natural, and
such, and then flat surface to take the excess paint and allow it to dry.
String or thread to attach the button to the pelt.

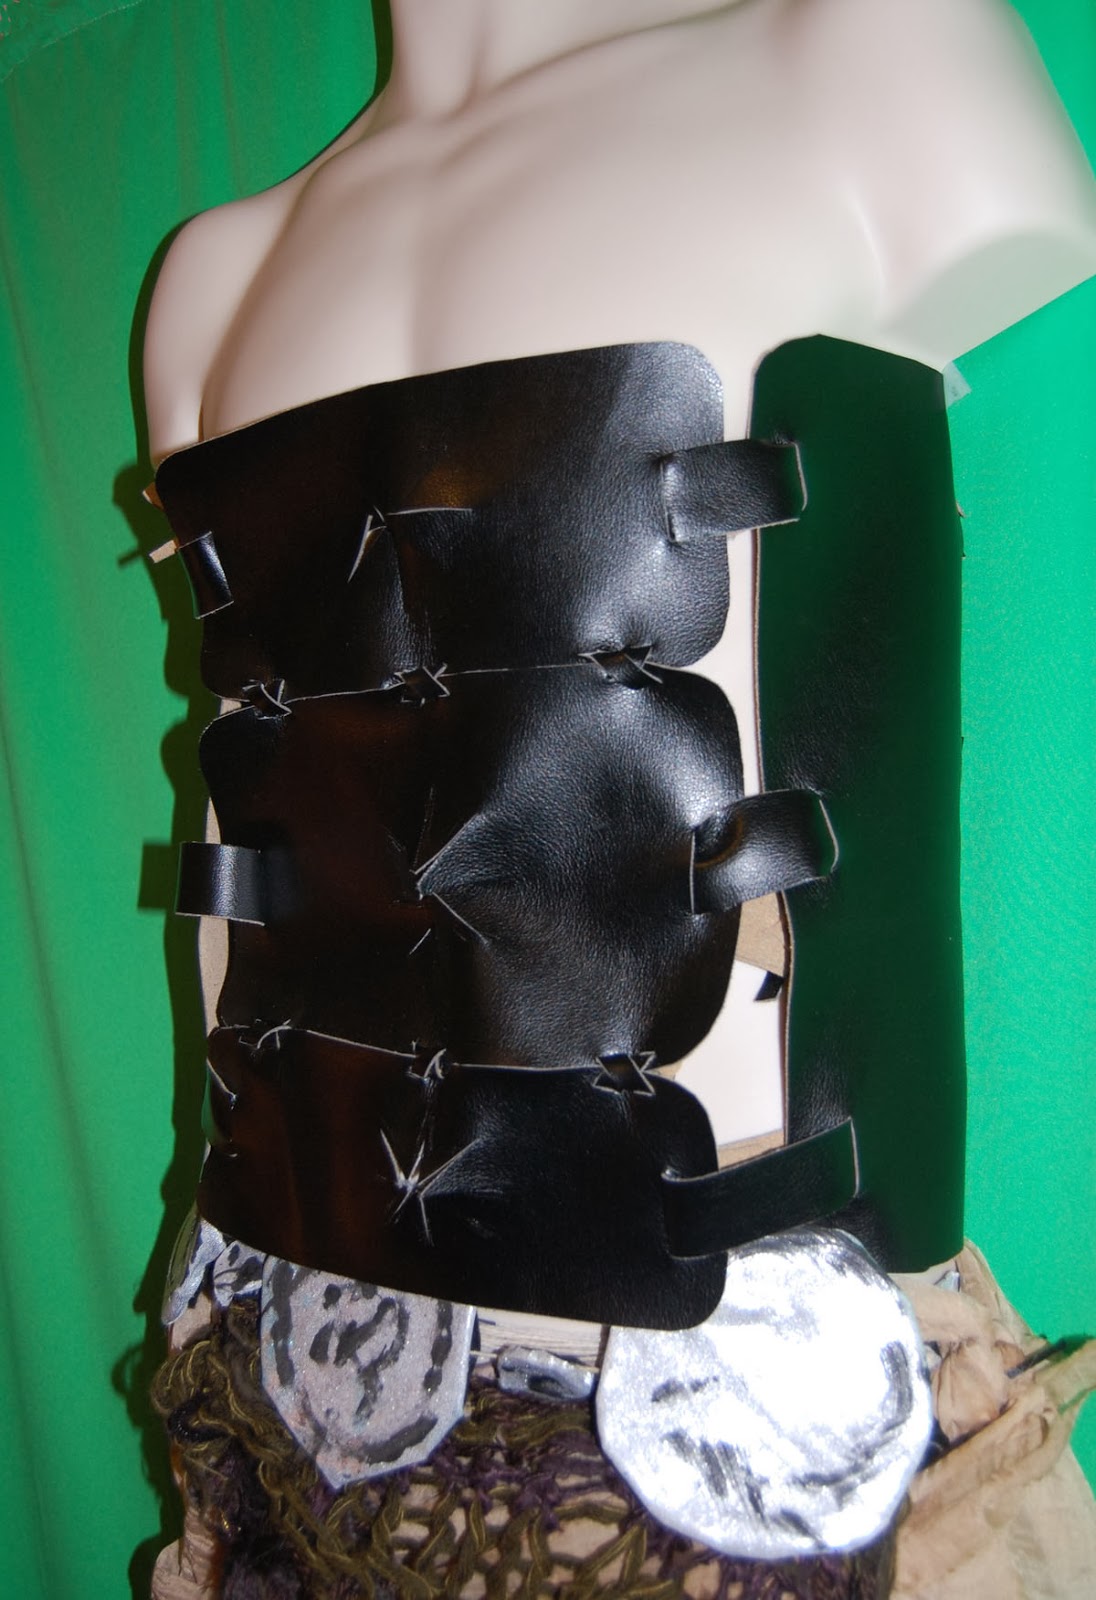
Khal
Warrior Top-leather or pleather type material. If
you would like something man made you can go with a suede cloth fabric and you
will usually find it in the upholstery fabric section in a variety of colors.
For the one shown here I went with half a yard of reclaimed leather. Follow
along with an image online such as this one ->


You are going to want three rectangular leather pieces
that run the front, and those are scored with a star pattern in the center of
each piece. Cut those out and then cut two small cuts on the left, center and
right hand side of the bottom half of the top front panel, the top and bottom
of the center panel, and then the top of the bottom panel. Cut out a few long
thin ¼” strips of the fabric and then bind these pieces together as shown in an
X mark and tie the ends in back to bind them. Once you have the front as one
piece, cut out a large piece of the fabric for the sides.


Cut slits at the top,
center and bottom on the right and left hand side of each of these side panels.
Those slits will be bigger than the ones you cut to bind the X for the center
panel. These cuts will be about ¾” wide and cut vertically. The cut out strips
of the fabric that is also ¾” wide and pull the strip through the slits so the
ends are on the backside. Leave the ends about 2” in length on each side and do
this for all of the new slits so you are binding the side and front together.
Once finished turn the piece right side down and take the ends and line them up
so they are in a loop (imagine making Christmas tree ornaments made from paper
hoops?), and then use some of the slim ¼” wide black twine you cut earlier and
bind the loop together. Do this for all of the areas that are on the inside
areas-the areas where the side and front pieces need to be bound together.


Now
you will want three long strips of fabric that is ¾” wide-just like the strips
used to bind the sides and front together, and you are going to bind the back
together. You will do this by slipping the strips over the base fabric and into
the slit you cut. Then you will fold the piece back and cut a small piece and
bind the piece together. Once you have one side finished so the strips are
bound and the other side is open still, set up the other side in the same way
as you did with the other side. Try the costume on Khal and see how it fits and
then once on, size the back strips that run across the back as needed and then
bind the opened side the same way as you did with the other side originally.
Here are some images to help you along with these instructions.


Loop A and B together on the back side and then cut
a small incision on both and bind them together with the same strips of
material used to make the X marks in the front center piece earlier.
When you go to bind the straps in back you will want
to slip the strip in the back on one side, loop it to the back again and cut a
small incision and bind the strap to the side panel. Do this two more times
down the side and then once on, determine the length of the back straps and
then either bind the other side in the same matter or add a material such as Velcro
to close the top up around the side.
Materials:
black fabric to serve as the black leather (about ½ yard should be enough
depending on the fabric width. You do want to have the fabric wide enough to go
around Khal’s back + about 8” extra for binding purposes in back), exacto
knife, scissors *optional but I did use them to curve the edges of the leather
pieces, cardboard or other base to protect your table top when cutting with the
exacto knife.
Silver
Belt- The belt is constructed by cutting out about 7-8
circles, about the diameter of the bottom of your standard coffee mug. The cut
out about 8 or so small circles. For each circle cut, also cut out a back piece
of felt that is just smaller than the cardboard piece. Heat up your glue gun,
slip a layer of paper or cardboard under your working area to keep the surface
free of hot glue, and then lay a corner of your silver fabric out right side
facing down. Place the large round circle on top and about 1.5” out form the
edges of the fabric and cut a large round circle. Do this for each round
cardboard piece you cut out and then lay the cardboard in the middle of the
cardboard piece and glue the silver fabric down to the underside of the
cardboard.

Let dry and then lay out the silver pieces face down and glue the
string down to the back side center of each circle piece. Depending on the
space available you may have to let a few of the silver circles and rope to dry
before you can move them and continue to glue your belt together. Once this is
dry then you are going to want to seal the backside of each silver piece with
black felt and glue so each has a finished back with your glue gun.
Once dry
then you want to turn the belt right side up and add a little black paint to
each silver piece. Let dry and then, depending on the glue you used, you may
want to spray the silver pieces with a clear spray as I did so the black paint won’t
rub off if you get a bit of drink on your costume ;)

Materials:
Cardboard, scissors, silver fabric, hot glue gun, string/ twine, black felt,
black paint, paint brush, clear spray. Cardboard or paper to keep your surface
clean and free of hot glue.

Tribal
Pelt - The tribal pelt was made with a variety of various
threads that I knitted, dyed back and then tied black feathers and little gold
bells to. This is attached with a black twine and is a separate piece. Black
pipe cleaners from a craft store will help stabilize this piece if you need and
if you don’t knit then you can go with a strip of black felt and cut holes in
it.

Materials:
knitting needles, fibers / yarns, thread, bells, black feathers.
Waist
Wrap -This was a simple piece of sheer fabric that I
dyed in various brown pigments, allowed to dry and then tied up in a squnched
up manner so it is a bit of a rippled fabric. I left the edges raw and this can
be pinned or tied at the hip.

Materials:
chances are you don’t have buckets of fabric dye in your garage so I suggest if
you do want this costume piece you simply pick up a long rectangular strip of
fabric and tie it at the waist. For color a sand colored fabric will do nicely.
Dothraki
Riding Chaps-for those you are going to need 1 yard
of fabric and a pair of scissors, thread and lace if desired. These are
essentially two ragged long pieces of fabric where you wrap each panel around
each hip and attach a slight overlay of the fabric both in front and then in
back. For my costumes I add grommets and lace the back but if you are looking
for a quick costume you can staple the front and back and it’s just a slip over
the head piece for your Khal.

Materials:
1 yard suede cloth fabric, thread and a sewing needle, scissors *if you
have sewing machine then you will want
to overlap the fabric seams in front and back and sew together. Add grommets in
back and lace if desired.
Arm
Guards-For these pieces you are going to want
to take the extra fabric you have at your disposal and wrap the fabric around
your wrist + arm a bit. With one hand hold the wrapped fabric piece and either
by hand with a sewing needle and thread or with a sewing machine, sew the wrap piece
of fabric at a few points throughout to hold it in place. Cut a hole for any
fingers and alter as desired to make the pieces perfect from there.

Materials:
scrap fabric, thread and sewing needle or sewing machine.

Khal
Knives/ Blades-The blades were one of the toughest
parts of the costume and though many of you will decide to purchase some and others will go an entirely different route in the construction process, I will
share how I made the set you see below. In hind sight I don’t know if I would make them this way
again, though I still have not come up with an alternative so suggestions are
certainly welcome. If any of you make them out of a different material and
would like to share please do. I originally planned on these to be made of a
grated plastic but that just did not work at all. I should have made them out
of a stiff felt I suppose but after a few ideas didn’t pan out I decided to
make two polymer clay rings, slightly smaller than a napkin ring, and then
baked those and they ended up oval shaped. I made two foam pieces to serve as
the handles and glued those into the rings with a hot glue gun.


Then I cut out
four pieces of cardboard and cut out two long blade pieces. Take one of those
pieces and cut the area that will be glued into the handle down so it fits into
the ring/ handle and let it dry. Do the same with the other knife and let dry
completely. Then take the other two pieces and fold the end that will fit with
the handle and other side of the blade and fold over the end about ¼” and glue
the folded edge down and up against the other side of the blade. Once this sets
then go back over the piece and seal in any openings on the sides of the blades
so it is sturdy. Once the glue has set then paint the blades, spray them with
clear spray if you think it will be needed and you should be all set. Once you
have your khal warrior top and blades finished you will want to cut two slits
in each side panel of the top so as to hold the blades in place.
Materials: foam for the handle, cardboard for the
four blade pieces (two blades put together to make one blade in the end, you
will want one blade on each side of the warrior top), various paints and paint
brushes for the blades, hot glue gun and glue sticks, clear spray if desired,
cardboard for keeping your surface clean from the hot glue gun and scissors and
cardboard for the blades.

Final crafting notes: *I did not make a pair of khaki pants/ capris for this
costume but I am sure Khal has a pair of pants he can wear that will work just
find for this costume. My final suggestion when binding the Khal Warrior top would be to not bind the pieces together too tightly. You want movement between the pieces so it will have a little bit of give as Khal moves.
*Be careful with glue guns, they can get really hot! *Always use paints and especially spray paints in a well ventilated area and with a decent surface cover. * Gloves are always recommended. Your manicurist will thank you.