What's Crafting?

What's Crafting?
Click here for this weeks updates...

Search This Blog

Sunday, July 28, 2013

Obsessed With a Dress: Part I

When I am not crafting items you see here on the blog and on the Craftzies etsy shop I am either dreaming of or sewing dresses. Or I am buying fabric or patterns for said dresses. I am such a girl, I love dresses!

The other day I had a few minutes to take a look over the blog posts I have shared with you within the last year or so and I realized that despite my obsession over clothes (and dresses in general), I have posted very little on the subject. Ohh sure there have been a few here and there but in comparison with the other posts, there has been very little. So here is part I in a very long line of dresses I love and how I have gone about making changes, remakes, etc. They might help you in your sewing projects or maybe they will just inspire you to go sew yourself something new. In the mean time here are some pretty photos of a new dress. I present to you...

The Elle -> 


I am in total like over this dress and I used the pattern here for the top and the base skirt, and the changes I made were I did not add the chevron design to the waistband and I left off the top skirt because I really did not want the accent in the lower area. Seriously, some girls just can’t wear a skirt like that. The chevron waistband panel was left just flat fabric because again, I do not need chevron waistline. I also shortened the skirt to knee length. I really like this pattern-very nice. The pattern is Vogue V 1016 with Guy Laroche as the designer.


I made a test copy out of a wretched green material before I broke out the good fabrics and I was very happy that I did. The fabric I used for the final dress was a really nice black coach fabric from Mill End for the base of the top and skirt and then an ever so soft polka dot tulle which was used for the top layer of the bodice and the top layer of the skirt. The top layer of the polka dot skirt had to be added ever so carefully. It took me about 2 weeks total to go through the test and then finish the final dress and a lot of careful hand sewing needed to be added to make it perfect. I put the metal zipper in by hand as well at first as I find with two layers of fabric in back can easily get messed up in the machine so if you are making yourself a similar style do take care.


So one of the things that I find really annoying when I read through instructions is when they get to the more difficult areas they just add ‘put it all together and you’re done’ and there you are wondering if maybe they could explain in just a tad more detail?..just a little?...

So with that in mind here are the changes I made to the original pattern in a little more detail if interested because I did take my time but I am happy to share with you what I did and how so your new dress looks great too. How are we all going to look fabulous if our dresses are a flop huh?! So go get sewing and feel free to message me @ www.Craftzies.etsy.com or @ www.SophiaDeLaMer.etsy.com with anything, I pop in daily and will help where I can.


Changes I made to the original pattern:
I started by cutting the pattern out and looking at it along with the directions. You are going to want to take all of your measurements, and below I will be having you take measurements of 1” above your bodice, bodice, upper waistline, mid-waist, lower waistline, hips, length you would like your dress. I also like to have measurements that are taken from side to side, both in front and back. This helps when making everything fall perfectly. When you think about your body shape and how you are proportioned, it makes sense to take measurements from side to side of your bodice and waist and hip areas because the width of your front measurements across are not going to be exactly equal to that of your back measurements.


I started with a test because I like to do this for a new pattern, especially one where the final dress is going to be worn to something like holiday parties like this one was. Either way, test or no, you are going to cut out the top bodice pieces. You need a lot of layers but because I was not adding the chevron tops stitch to the waistline I skipped the light padding called for in the pattern. I think the pattern calls for this not just for structure but I have found it is very difficult to sew two slippery pieces of fabric together in a top stitched manner without something to tack the pieces together while sewing so the light padding will help when top stitching a chevron design. So if you are doing the chevron design, I would recommend following the directions for those areas.


 I also realized when I took a look at the waistband piece that because I was not adding the chevron top stitch, that meant the waistband piece was going to be way too big so I definitely needed an alteration there. In order to compensate for this take your tape measure and measure your waistline half way around from side to side, starting where you want the seam to be on your new dress. Measure half way around in front a number of times as you go down your waist. So start measuring under your rib cage half way across and then as you work your way down to your waistline. You also want the hip measurement when measuring but since both of these skirts I was adding to the dress were lightly gathered I wasn’t too worried about the dress fitting around the hips. Do keep in mind however I have not used the top skirt that came with this pattern though, it might need a measurement comparison before determining if a size alteration is needed. Probably not, it was a good pattern, but I always like to check just in case.

So once you have your detailed waist measurements compare those to the pattern and make any alterations as needed when cutting the fabric pieces out. You want your measurement numbers to match up essentially so you will compare the pieces that equal the full waist segment-plus assume seam allowance-and then compare with your meaurements-also assuming seam allowance. A lot of sewing patterns include details on altering sewing patterns as needed to fit more perfectly so you may find some details there. If you really need help with scaling patterns up and down according to size give a shout out, I might just put up a post to help you out but there are probably a ton out there already. In any event, once you have the waistband perfectly aligned as needed then cut all of the waist pattern pieces (lining, etc,) in the same way and baste as directed. Put this piece aside and then get started on the bodice of the dress.

For the skirt I used the same pattern as the bottom only I was ever so careful because I was working with a flat non-stretch cotton for a base fabric and then a super soft, free flowing and ever so stretchy tulle on top so I really had to be careful in adding these pieces together but my advice is to work slowly and you will get it. The most challenging part of this altered dress was setting the skirt in to make the full dress. In doing this you are going to want to make the waist band, then put together the top bodice center and back pieces. Follow the pattern and you will do fine but do take care when fitting the top center bodice in with the shoulder strap that you fit the top up to yourself with the neck strap pinned in and see how it fits. 


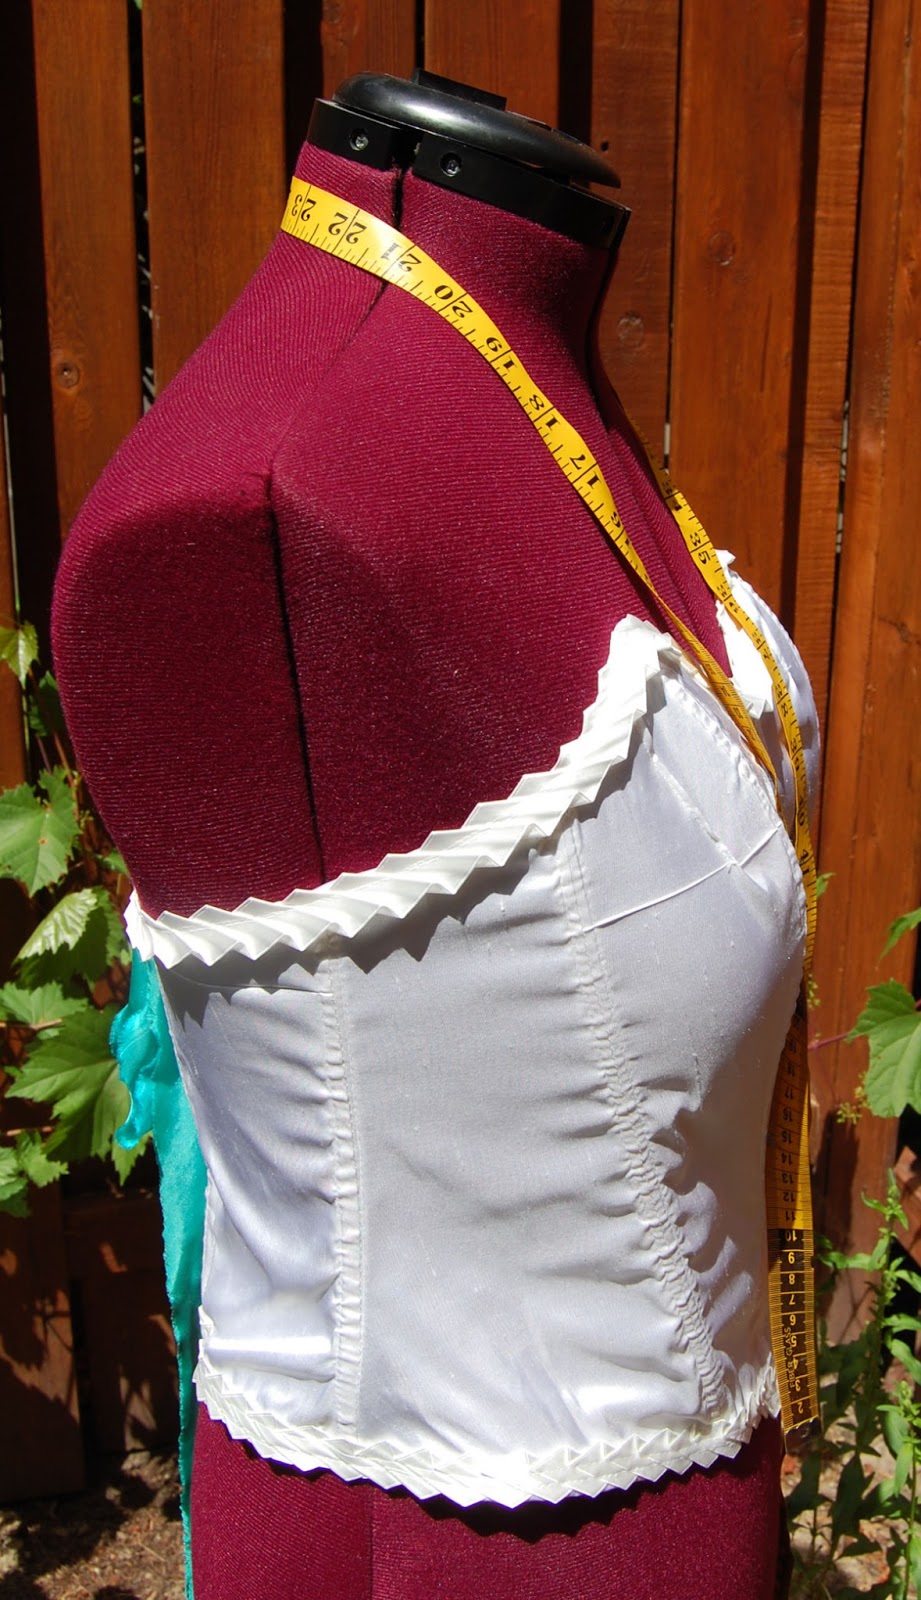
In the image above I have added arrows to indicate the areas you are going to make sure fit well with your body shape before finishing with the sewing machine. You are going to want to fit the top perfectly to your bodice so it’s not too open in front. That is why when you are taking measurements we are so detailed, specifically for this dress because I want the bodice to be perfect or I won’t wear it (and I do want to wear this! ;) So my advice here is to pin the pieces and carefully set it up to your body and see how it fits. Tuck in the areas specifically where the arrows are shown in this image before sewing it with the machine and you will have the perfect fit. You will probably find you aren’t going to wear a bra with this dress so you really want the top to fit well.

Once you have the top and waistline altered and tested and made into one piece then you are going to want to make the skirt pieces, put them together and then add both of those to the dress. This is going to take some CAREFUL work and was probably the most challenging part when constructing the dress, especially because of that light as air tulle on top. Two gathered skirts getting sandwiched into a flat waistband is no easy feat, especially since any screw up on my part would be so very noticeable. So, In short, be careful here. Lay your top piece out flat on a cutting board or other flat surface and then take the skirt and match up the center front of both top and skirt so they are aligned well. 


You are going to be sliding the skirt up into the top waistband, pinning at the center front and then carefully pinning the skirt into the waistband every few inches, pinching p and in so when you flip the dress inside out you see where the seams are going to be. Now for this, because I really really wanted to be careful I hand sewed the seams and then flipped it right side out and tried it on. It worked! So do that, test, and then sew the waistband down on the inside. You will find you have to trim off a bit of excess upper skirt material once you have it sewn together but that’s to be expected. Simply trim, turn right side out and then continue with the pattern directions. They will lead you through the final steps of the hem, the notions for the zipper in back and the notions for the neckline. For this I added a hook and eye but because we are all way different in where we want the closure you can certainly opt for a different type of notion such as a button and button hole, longer ties, the sky’s the limit really…


The bottom hem of the top tulle skirt was so lightweight I hand hemmed the bottom. The zipper was put in with a hand sewn zipper and then reinforced once more. You don’t want a weak zipper, it keeps that dress on (!!) but in detailed dress making my experience has been that you can’t expect to get the perfect dress without pulling out a needle and thread as you go along.


Happy sewing and have a fabulous day! I am going to have custom dresses in this style on my Sophia site in a few days here so if you are interested in one feel free to message me via www.SophiaDeLaMer.etsy.com. Don’t forget to send detailed measurements, your general size as well, your height and the length you would like your dress to be, and the color/ colors you are interested and I will message you back with details. The price per custom dress in this style is $145, shipping will be $6 in the states, $12 internationally. *Custom orders will take 2 weeks before ready to ship for this item.


Lindsay ;)

Sunday, July 14, 2013

Weaving Something New


A really nice customer messaged asking if I would make her a runner woven rug in earth tones recently and I couldn't refuse. So I geared up the loom and got to work. Here are some photos of the rug finished ->


She picked fabrics with the colors of off white, natural, beige, tan, khaki, light forest green, olive, brown, dark sage, and blended fabrics of various prints that had those colors mixed in though I only added in a dash here and there for some variation.


The difference with this one was that I warped the board, removed the twine from the loom and dyed the twine in a tie dye style and then once dried (and that took days to dry because you know it started to rain the moment I dropped it in the dye lot) I wound the loom and got started weaving. While the warp was drying I got to work on making the fabric balls. Since the customer wanted all natural colors and a woven rug 7’ + rug in length I had to make a TON of fabric balls. Days later I had made upwards of 12 large fabric balls for the woven rug and I warped the board to the longest I am able and the entire warp only made this one rug. In the end it went to Canada and the price to ship was $41 and it went usps priority because it was too heavy to ship any other way. I think that shipping price is way too high but at the same time I cannot do anything about those prices, that is something completely out of my control.


I named this woven rug Sand Bar Summer and all of the materials were cotton with a tie dyed twine of natural and light olive green. The final length was seven feet +.  I think in the future I might experiment with other tie dyed warp colors. I like making the earth toned rugs but I also like to mix it up so making the colorful one right after was a nice change, especially since you feel like you have been weaving forever once you reach the end of the runner. Seven feet might not seem like a lot but it is when you are weaving it up from strips of fabric.


This next woven rug is my latest and is not a custom order, just a regular ‘buy it if you like it’ kind of item. I just listed it in the shop a little while ago and I really like it. It too was a bit of an experiment in that I used a modge podge of fabrics for the waft. The warp however was a striped mix of natural and navy blue twine. I don;t usually have a lot of colored twine on hand but I tossed it in while warping the board for this one. In the end I ran out of the navy which is why the top is thinner but I liked the randomness of it. The last one I sold like this was a favorite so I think this one should be as well. It has some of my favorite scrap fabrics mixed in and the photos definitely do not do it justice. I will try to get better photos tomorrow but you can find the listing in the shop, I have named it the Indie Tara Woven Rug. 


Measurements: width 26" (66.04 cm), length of the woven part of the rug has a length of 41" (104.14 cm) and a gusset/ depth of 9" (22.86 cm).

and then one more in similar size and style ->


Well, that’s about it for now. I have one more woven rug to add tomorrow to the shop that is going to be about the same as the last one shown here. For design you have a blend of miss matched fabrics and a natural and navy blue striped twine running lengthwise for the warp. I left the knotted strands on the end longer but you can trim them if desired. This is machine washable but do wash it on a gentle wash and line dried. It is stronger than you would think but never the less it is handmade and I have found they hold up for a long time if you take just a little extra care when laundering them. I hate to lecture but if you knew how much I liked these rugs you would wonder why I sell any of them at all (ponders this…)


Have a great night and we will chat again tomorrow. Hope your day is sunny! 

Lindsay ;)

Wednesday, July 10, 2013

Making a Modern Day Corset: Part I


Hi everyone! I hope you are all enjoying the summer. I have been in the craft room for days but I have returned with a new blog post. And maybe it's just too hot being surrounded by all this fabric but I just might be crazy because I can’t seem to work on a project without taking on a few more at the same time...

In this case however the corset project has been a long one in coming. It all started when my sister sent me some corset images and said she wanted one in a Star Wars print. Well, I do like that idea and wow, she really is my sister all right. She might have had to wait a year while I worked my way through the craft mania but I finally made my way there. At the same time I managed to injure myself and in trying to straighten out and keep my body aligned as I healed I thought about the corset idea a bit more and realized it wasn’t such a bad idea, not entirely.

Now, before you make a judgment and send me pictures of crazy corset wearing women from the Victorian era I will say a few things on corsets. They are not supposed to be painful, and I do not want any of you wearing them so tight as to injure yourself-and yes I also mean by way of mushing your internal organs too much. I want you to take care of yourselves, nothing too tight ladies! But I will say a few things about the non-painful and organ jeopardizing issues that come with the idea of a corset starting with the concept that they are for the most part simply a different type of undergarment. 


Despite the obvious uses such as how they work with certain outfits better than other undergarments, corsets also keep your posture straighter, they remind you to hold your stomach in and I will say in its most basic form, the idea of an undergarment that reminds you of your waistline is not a bad idea. In truth I see it as more of a ‘mind hack’ in a sense where even when it is not worn you remember to hold yourself in a straighter manner. So do take care when wearing these but I think that our purpose for these today is a little different than that of the past. 

So I started the project by looking at corset images online to get a decent idea of the various styles and I pulled these images ->

I selected the above links so you have a chance to see the silver grommets in back, the different lacing options, etc. Based on those images you pretty much have these various styles ->

 Corset Styles:
1)     Classic Corset: Peaked at the top bodice and goes to a V at the lower waist. (This style would mostly be chosen to go underneath a gown where the top bodice is cut in a similar manner and the waistline comes to a V as well).
2)     Sweetheart Corset: Rounded at the top bodice and forms either a soft V at the lower waist or goes straight across (I would say this is probably one of the more common styles for corsets)
3)     Modern Corset: Straight across both the top bodice and the waist (slightly shorter in the waist than the 2 styles above). Any other modern changes that you will find useful.
4)     Cup Corset: This features a laced corset style however the difference is in that the cup for the bodice are set in and rounded. (This is another fairly popular style and as comfortable as the Sweetheart style above)
5)     Undercup-Opened Cup Corset/ Corset Vest: This is an opened bodice piece in the Cup Corset style, featuring the same cut for the waistline minus the cups. The Vest version of this style is an image such as this one where you have a corset vest with the cup area opened. Here is a link to give you an idea: http://goo.gl/dsXL6
6)     Half Waisted Corset: Straight across the top, straight or soft fan cut for the lower hem, shorter cut across the waist (lacing in back is standard, lacing both in back and front is optional)

The styles highlighted above are the four corsets I plan on making in my part I-IV blog posts on modern corset making. I am now going to cover a few of the details I experienced while making this first corset. It’s not perfect mind you but if you are setting out to make your own you might find some of the details below helpful.

This is the pattern I used -> 


Simplicity 5006

This first corset is what I have been calling the Classic Corset Style and it was made was with a white silk, pressed satin white trim, a simple white lining, boning, and silver eyelets. The idea with this first one was I wanted to check the cut, the boning, the comfort level. I wanted stability but you never know it’s going to go with a test so before you purchase even more materials, check out what you have so far and see. I personally like this pattern and the finished first item. I have boning running up all seams but the very back. I just didn’t want the poking in the back. It holds, it’s pretty comfy and well, it works! I pinched the top a little bit. I made it a size too big but that was because I thought the pattern might run small and this first one was a test after all. The lower half is a bit big as well so the rule from now on is just going to be to go with your size because this is a good pattern but most certainly runs true to size. I used the amount if boning called for in the pattern as well, it was accurate.

Picking the perfect materials:
I made this first corset with a white silk because I wanted to see how the silk breathes in the warmer weather and it’s an easy one for wearing under lighter colored shirts. I found that I do need a fabric steamer as folds in the fabric are showing up horizontally across the bust (puts fabric steamer on the shopping list) but more in different styles and prints are on the way. It will be more fun that way ;)

I say if you’re going to wear one make it something you like 
(It’s just you and yours that are going to see you in it anyway so it’s not a big deal).


For boning materials I go with boning already in the casing. It’s what my mom always uses and well, I just do. If you don’t use that type of boning then you will have to make your own casing. This is probably pretty easy but I admit I have not done this before so I recommend an online search if interested in doing that. I went with white silk, white pressed satin trim, and I went with silver grommets in back and hand dyed blue satin ribbon for lacing. The ribbon was about 1” wide so I took silver thread and bound the ends about ½” in so it would be easier to thread. The silver also looked pretty good for detail. For the lining I recommend a natural or breathable fabric.


Making the corset: Cutting the pieces and following the instructions for this particular pattern were quite easy. The pattern is true to size so just go with your correct size and you should find it fits well. Definitely go with grommets, it’s worth the splurge for the grommet pliers and grommets. I ran a test and laced up the back with button holes on one and did not like it. It was a test but I just went right back to the craft shop and picked up the grommet materials. I made the front, sewing each piece as instructed. Next I clipped the inside vertical seams and flatten it out.  I then add the boning. If you have boning already in the casing you will find you can (carefully + slowly) sew the right and left sides of the casing to the inside of the inside seams of the corset. Then add the lining. Then you are going to sew down the top and bottom hem and for this step I found the best way to get the perfect flat fit around the top and bottom was to trim and then sort of roll the hem down while stitching on a wide zig zag.

Once you have gotten this far you are going to want to go back over those seams in most cases with a trim and you can add this with a straight stitch. Just make sure that when you are sewing the hem down and under for both the top and bottom of the corset that you avoid sewing the boning itself as you go across. I also recommend not cutting the boning pieces out until the top has been sewn. Then take the boning and lay it out over the front seams and cut once you have matched the pieces up. This pattern called for boning up the middle center and I did this with this first one but I am thinking I will skip it next time, it’s not entirely necessary as the sides provide enough structure. We’ll find out soon when I run my next text. 


Now that the corset is almost finished, you really just need to finish up the back seams and this is a fun part. Mark out on your fabric where you are going to want your grommets, assuming 7-9 holes on each side and don’t forget to line up your back right and left side and making the hole marks together so they are perfectly aligned. A ruler or measuring tape will help you with this part. Next, if you have not used a grommet/ punch before try a few times on scrap fabric for a test so you do a decent job your first time on your pretty little corset. For the grommets and the grommet punch simply follow the instructions on the back of the package, essentially just punching the mark in the hole and them doing it again with the grommet set in and then punched in the fabric once more. Lace that baby up and you should be all set!


Final Project Notes: After having made a few of these as tests and working with the pattern I have to say I have learned a great deal about the corset in general, the comfort level and how and when they are most useful. I found they were rather comfortable, much more than I originally expected, and if I did not have a current day bra at my disposal or if I needed to wear a dress that required a strapless undergarment this is not so bad at all. I would say however that the best way to find one you like is to read through the details I have above so you can select a custom corset that will work really well for you. Your choice of cotton cording for lacing or silk or satin ribbons depends on what you are pairing it with. If this is a top meant to be shown as a top with a skirt then it makes sense. I am also really looking forward to incorporating the corset style into my dress making in the future. I think that will be a lot of fun for future projects and having a decent handle on the corset top construction certainly won't hurt!


If you are hoping to use this for the everyday or for a tighter fit then you are going to want to go with a cotton cording most likely. *I would probably steer away from black satin cording as I imagine it would be too slippery to hold a proper lace but we shall see soon, I have some in stock and a black corset coming up soon as a test so I will update as I test this. You can easily switch out the lacing at your digression as well. Some of you would also prefer to have the opportunity to lace yourself as opposed to needing a hand with it so if this is the case you are going to want to go with lacing in front so you can dress yourself and you will find those options below when you determine the lacing options you would like. I would like to just say one more thing if you do decide to go about sewing yourself a corset and that is to not let yourself be intimidated by it, just take your time and you really will do a  fantastic job. In the end you will be surprised by how easy it really was to construct.


Eyelet Lacing Options: These are the metal grommets added to the areas you plan to lace up. Here is a link of the tool you will find most helpful -> http://www.joann.com/dritz-eyelet-plier-/prd11082/

I found I had to pick up additional silver grommets to cover the 14 I used up the back as the pack only came with about 10 silver grommets. Don;t forget to read the instructions on the back of the pliers and practice with some of those extra grommets before adding them to your finished corset.

A)   Eyelet lacing in back (standard) (This usually requires help lacing up the back)
B)    Eyelet lacing in front and extends either half way or all the way down (This allows you to lace yourself more or less and is a bit practical for the everyday as it does not require help from someone else when lacing as you can have the back laced once and then tighten and lax the lacing in front for easier removal)
C)    Eyelet lacing on the lower sides (runs ¾ of the way up the sides-intended more for those with V peaked lower hem style)
D)   Hook Lacing or other-this is a different style than the eyelet grommet pieces I add for lacing purposes for my corsets however when the materials become available, I will allow this sewn in hook trim to be added in which case you can lace it with these pieces added vertically down both sides and lace up as desired. You may even want to add in a hidden side zipper or similar modern closure so you really make this item work for you.


When it comes to the style and design for these you can see how many options you have. I know you’ll do a fabulous job if you decide to make one for yourself. I have three more tests coming up soon so stop back in the next few weeks and I should have the rest up. Once I have finished all of these then I just might list a few custom orders for these in the Sophia shop, you never know ;)


Until next time, happy sewing...

Lindsay